In the final part, let’s look at how we can generate and use the AR depth maps through Unity’s AR Foundation. In the previous part, we tested the ready-made example. Now, it’s time to write code ourselves.
In this case, I’m using Unity 2021.1 (Alpha) together with AR Foundation 4.1.1 to make sure we have the latest AR support & features in our app. But as written in the previous article, Unity 2020.2 should be sufficient.
I’ve tested the example on Android (Google Pixel 4 with Android 11 & ARCore), but it should work fine also on iOS with ARKit.
You can download the full, final AR Foundation Depth Map sample from GitHub. I’ve released the project under MIT license.
Project Setup
First, configure the project for AR Foundation. I won’t go into too many details here, as the official documentation is quite good on that:
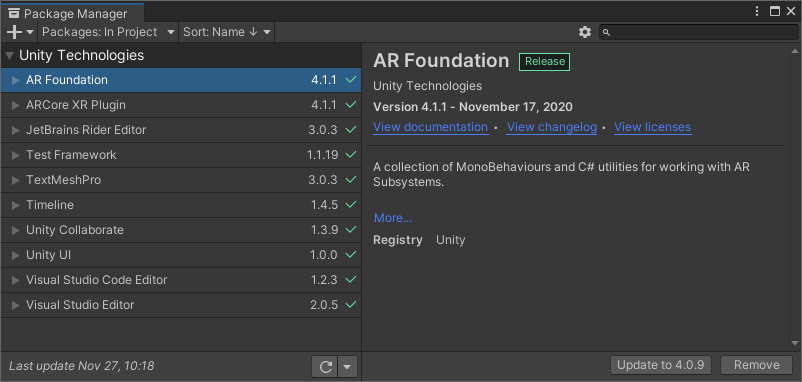
- XR Plug-in management: activate the management in the project settings. Additionally, enable the ARCore Plug-in provider. To check if everything was installed, open Window > Package Manager. You should see both AR Foundation as well as ARCore XR Plugin with at least version 4.1.1.
- Android player settings: switch to the Android build platform, uncheck multithreaded rendering, remove Vulkan from the rendering APIs, make sure the package name is personalized and finally set the minimum API level to at least 24 (Android 7.0).
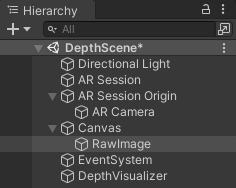
- Scene setup: add the required prefabs and GameObjects to your scene. Right-click in the hierarchy panel > XR >
XR Session. Also add theXR Session Origin.
By default, the AR depth map is always returned in Landscape Right orientation, no matter what screen orientation your app is currently in. While we could of course adapt the map to the current screen rotation, we want to keep this example focused on the depth map. Therefore, simply lock the screen orientation through Project Settings > Player > Resolution and Presentation > Orientation > Default Orientation: Landscape Right.
AR Occlusion Manager
After our basic AR Foundation scene is set up, let’s add the required code for visualizing the depth map in Augmented Reality.
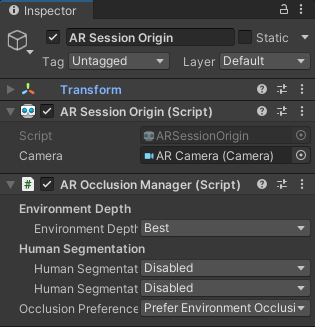
Add the ready-made AR Occlusion Manager script component to the AR Session Origin. You can also change the quality of the “Environmental Depth” to “Best” as this is the main target of our project. Unfortunately, “human segmentation” is not yet supported by ARCore.
Canvas and RawImage
To show the picture-in-picture depth map, add a Canvas to the scene. As a child, add the RawImage. We will update its size from code. Too keep things simple, let’s keep it centered on the screen.
AR Depth Maps Visualizer: Properties
Finally, create a new C# script called Depth Image Visualizer. In this, we will query the most recent depth map from AR Foundation and convert it for the RawImage in the canvas.
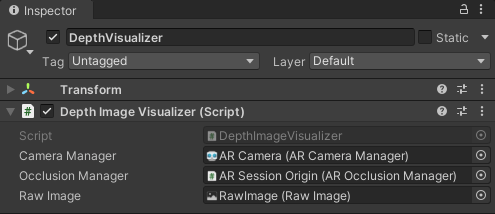
To achieve this, our script needs three public properties that we can connect within the Unity scene:
- AR Foundation’s ARCameraManager: this script was attached automatically to AR Session Origin > AR Camera in the hierarchy.
- AR Foundation’s AROcclusionManager: we added this script to the AR Session Origin.
- RawImage: we created this GameObject within the canvas. Here, we want to directly assign the
Texture2Dcontaining the depth map.
The corresponding code is standard C# – here written in a way that is easily accessible to the Unity Editor.
Accessing the AR Depth Maps in Unity with C#
The Google ARCore documentation has the starting code boilerplate for retrieving the depth map from the AROcclusionManager. Call the TryAcquireEnvironmentDepthCpuImage(out XRCpuImage) method. It returns whether it was possible to retrieve the depth map. In case it was, the variable provided through the parameter is updated with the depth map data.
The XRCpuImage is an AR Foundation specific class. It contains the raw image plane data, as well as some convenient methods to convert to different color and grayscale formats.
We’ll handle the depth map in a separate method. In Update, we simply acquire the depth map:
Converting the AR Depth Maps
The last step is converting the XRCpuImage to a Texture2D, which we can directly show on the RawImage GameObject. Luckily, the AR Foundation sample contains a snippet that is helpful – it’s contained in the CpuImageSample.cs file.
First, the code ensures that the Texture2D matches the required size and color format (which will be an RFloat). Then, it uses the pixel buffer as well as the conversion options to apply the new data to the Texture2D.
Adapting to the Depth Map’s Size
However, we still need to take care of resizing the RawImage GameObject in our scene’s canvas to the depth map we received. Note that the depth map size can change while your app is running, e.g., if it wasn’t possible to generate a depth map at all.
A good code snippet is included in the UpdateRawImage() function of the DisplayDepthImage.cs class of the AR Foundation sample. Their code is more generic and maps to different display orientations as well as aspect ratios. I’ve simplified the code to directly assume the landscape right orientation that we’ve locked our Unity project to earlier.
Add these few lines of code to the end of the function we just wrote. It will take care of resizing the RawImage to a suitable size (through sizeDelta), while keeping the aspect ratio of the depth map:
How does it look like in action? Again, testing the same scene, but now with our own short C# code. I’ve recorded a short video:
Please accept YouTube cookies to play this video. By accepting you will be accessing content from YouTube, a service provided by an external third party.
If you accept this notice, your choice will be saved and the page will refresh.
Note that we directly map the 32-bit floating-point values to the texture. As such, we did not do any scaling or color mapping. While the depth map would capture a wider depth range, we only see the close depth range colored in black / red.
Article Series
You just finished the final article of the series. If you’d like to go back and re-read another part, find all articles linked here: