Updated: January 18th, 2023 – changed info from Microsoft LUIS to Microsoft Azure Cognitive Services / Conversational Language Understanding.
In this last part, we bring the vital sign checklist to life. Artificial Intelligence interprets assessments spoken in natural language. It extracts the relevant information and manages an up-to-date, browser-based checklist. Real-time communication is handled through Web Sockets with Socket.IO.
The example scenario focuses on a vital signs checklist in a hospital. The same concept applies to countless other use cases.
In this article, we’ll query the Microsoft Azure Conversational Language Understanding Service from a Node.js backend. The results are communicated to the client through Socket.IO.
Connecting Language Understanding to Node.js
In the previous article, we verified that our language understanding service works fine. Now, it’s time to connect all components. The aim is to query our model endpoint from our Node.js backend.
You have multiple options for the service connection. Microsoft currently provides SDKs for Python and C#. However, we will use the REST APIs directly from our Node.js backend code.
Importing Modules and Setting Constants
Previously, we’ve already installed the “socket.io” and “node-fetch” Node modules. Let’s extend the first few lines of “index.js” from our current Node app. The new code loads and initializes everything, including Socket.IO and the “node-fetch” module. It’s based on the new ES modules syntax, which uses the “import” command instead of the “require” syntax.
import express from 'express';
import { createServer } from "http";
import { Server } from "socket.io";
import fetch from 'node-fetch';

// For creating the Node JS server in the ES modules syntax
// based on Express, see:
// https://socket.io/docs/v4/server-initialization/#with-express
const app = express();
const httpServer = createServer(app);
const io = new Server(httpServer);
Next, add the configuration for accessing your language understanding service directly below. The app key is a hexadecimal string, which we retrieved at the end of the previous tutorial part.
// TODO: configure these values according to your deployment!
const ENDPOINT_ID = "wete-language";
const PROJECT_NAME = "PatientCheck";
const APPKEY = "f1d19...";
const DEPLOYMENT_NAME = "vitalsigns-deployment";

// You do not need to change the following settings
const ENDPOINT = `https://${ENDPOINT_ID}.cognitiveservices.azure.com/language/:analyze-conversations?api-version=2022-10-01-preview`;
const PORT = process.env.PORT || 3000;
You can find the endpoint ID for example as the first part of the prediction URL from the “Deploy a model” section of the admin interface. In there, you can also find the deployment name. The project name you defined can also be retrieved from the project settings.
React to Incoming Socket.io Messages
Whenever a client sends an “assessment” message to our Node.js server, we forward the query to the Azure Conversational Language Understanding service.
Therefore, we create a connection that executes our handler method every time we receive a message with the name “assessment” (socket.on('assessment', ...)).
In the client-side JavaScript code, we sent the user-entered assessment text through the message parameter. The parameter is available through the function argument called “msg” in the code blow (async (msg) => {}).
Via socket.id, we get the unique ID of the client that sent the message. We’ll need this to later send the results back to that specific user. To keep the code clean, the actual message processing is placed in a new method we’ll create as the next step, called sendToCognitiveService(assessment, socketId) .
io.on('connection', async (socket) => {
    socket.on('assessment', async (msg) => {
        console.log("Got assessment: " + msg);
        await sendToCognitiveService(msg, socket.id);
    });
});
Creating the Query URL for Communicating with the Language Understanding Service
You should always check parameters for validity. I’m omitting this part in the article. For reference, check it out in the extended code on GitHub.
First, we’re building the POST request body that we will send to the service. This requires two components:
- Request headers, which include the app key / subscription key to authenticate.
- Request body, which includes the user-entered query text, along with parameters to specify the project and deployment name.
async function sendToCognitiveService(assessment, socketId) {
    let headers = {
        "Ocp-Apim-Subscription-Key": APPKEY,
        "Content-Type": "application/json"
    }

    let requestBody = {
        "kind": "Conversation",
        "analysisInput": {
            "conversationItem": {
                "id": "1",
                "participantId": "1",
                "text": assessment
            }
        },
        "parameters": {
            "projectName": PROJECT_NAME,
            "deploymentName": DEPLOYMENT_NAME,
            "stringIndexType": "TextElement_V8"
        }
    };
In the configuration code above, you see that two JSON-style objects are created. Three of our configuration constants are inserted. In addition, the “text” of the “analysisInput” is the “assessment” parameter, which is the string we got from the user.
Communicating with the Language Service over HTTPS
The natural language understanding service is of course available via an encrypted HTTPS REST API. Node.js contains a built-in module called HTTPS. It allows detailed control but is very low-level.
For our needs, it’s easier to use the well-known node-fetch module. It’s built on top of HTTPS and simplifies common usage scenarios. We’ve already installed it in our Node.js app. We also imported it to the variable “fetch”.
“fetch” requires two parameters: first, the endpoint URL. Second – as we are sending a POST request – the header and body information.
This data is sent not through individual method parameters, but as an object. This contains three parts: “method”, “headers” and “body”. The method is fixed to POST. In the previous step, we have already prepared the objects for the other two objects.
It then returns the response, which we can await. Querying the web service can take some time, so this is an asynchronous operation.
try {
    const response = await fetch(ENDPOINT, { "method": "POST", "headers": headers, "body": JSON.stringify(requestBody) });
    if (!response.ok) {
        io.to(socketId).emit('Error', 'Sorry, I had problems with the request. ' + response.statusText);
    }
    const data = await response.json();

    // Check if the relevant properties exist
    if (!data.result.prediction.topIntent ||
        !data.result.prediction.entities ||
        data.result.prediction.entities.length == 0 ||
        !data.result.prediction.entities[0].text) {
        io.to(socketId).emit('Error', 'Sorry, I could not understand that. [No intent or entity identified]');
        return;
    }

    const topIntent = data.result.prediction.topIntent;
    const topEntity = data.result.prediction.entities[0].text;

    io.to(socketId).emit(topIntent, topEntity);
} catch (error) {
    io.to(socketId).emit('Error', 'Error understanding your assessment: ' + error);
}
If there is a general exception with the request, the function directly returns an error message to the client: io.to(socketId).emit('Error', ...)
Otherwise, the function parses the response body and checks if the JSON contains the data we need.
If everything we expect is present in the response, the function emits a message with the intent name to the client (in our app: “Temperature”, “PupillaryResponse” or “Age”).
The language understanding service would further parse the entity contents for us, which results in a specific format depending on what we’re listening to (temperature, age, custom list). In our case, we simply want to get the relevant text of the entity instance. There is a bit of JSON parsing going on to extract that. Simply copy the code and it should work.
As all three intents we’re using only have a single entity each, we don’t need to consider any potential additional entities.
In case you also wish to formulate utterances where the users can include two bits of info into a sentence (e.g., “Your temperature is 37 degrees celsius and your pupillary response is sluggish”), you’d need to extend the code to extract multiple entities and forward all of these to the client.
This example shows how simple communication with the Azure service is. Of course, you should add a bit more error handling. The example source code on GitHub includes some console outputs. This makes it easier to see what’s happening while running the app – especially to find issues in case for example the entity isn’t found.
Finalizing the new index.js: Starting the Server
There’s one more change we need in the “index.js” file: a slight change of the “listen” statement, compared to the original Hello World code. Change app.listen to httpServer.listen – this ensures that socket.io is looped into the web server’s communication.
httpServer.listen(PORT, () => console.log(`Vital Signs Checklist server listening on port ${PORT}!`));
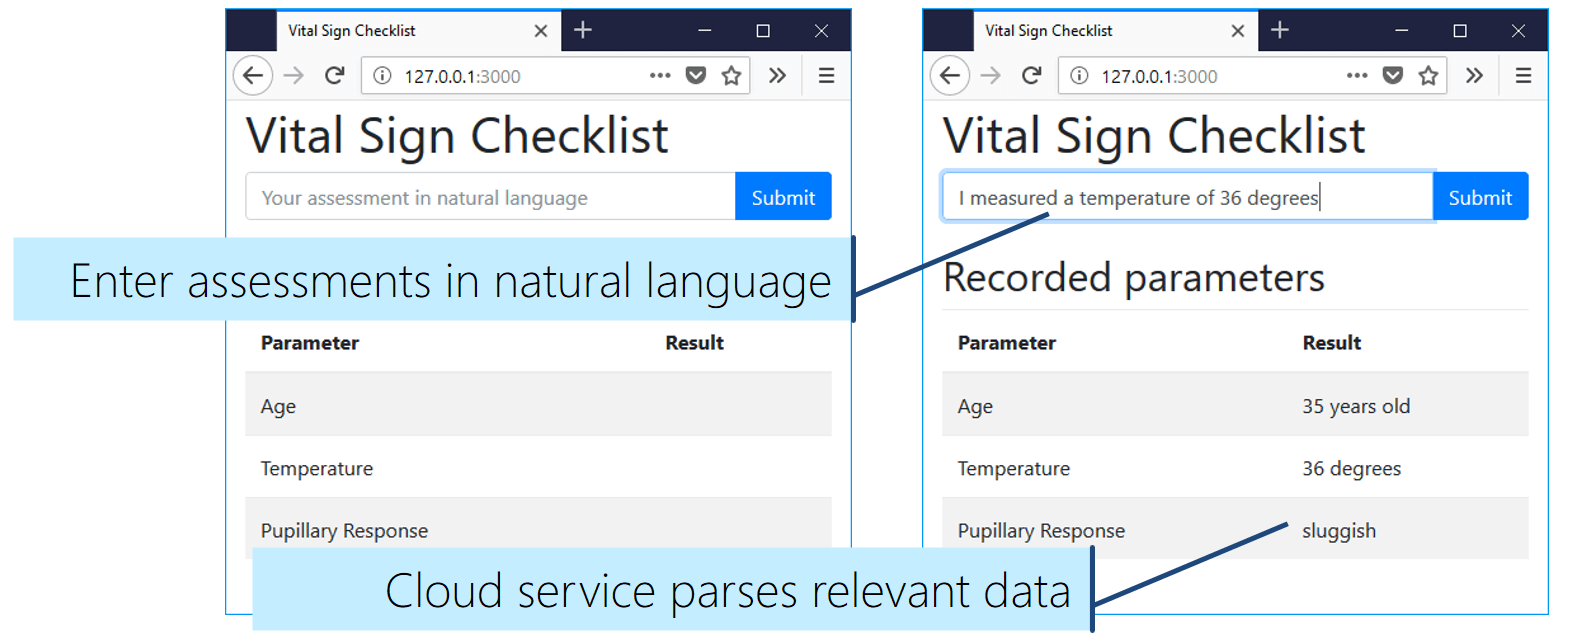
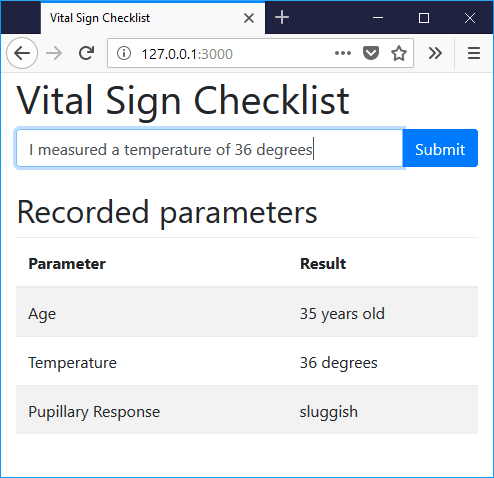
Testing the Vital Signs Checklist with Natural Language Understanding
Now we have all the components in place to test the overall service. Restart the Node.js server from the console (node index.js) and open the client-side website in your browser (http://127.0.0.1:3000/).
Next, enter an assessment in natural language into the text box at the top. After a moment, you’ll see the result in the client UI. Otherwise, a yellow error note appears right below the text box.
Download & Next Steps
You can download a slightly extended version of the source code explained in this article from GitHub.
There are many interesting extension areas to make the app even more versatile, for example:
- Adding speech input for recording verbal assessments
- Extending the number of recognized scenarios
- Storing the values in a database and tagging them with patients and timestamps
- Enabling recognizing multiple entities in a single intent
All these steps would be required to create a fully usable project. However, you can see how easy it is to get started. Within a short time, we implemented a minimum viable prototype. It already supports an amazing core functionality: extracting relevant vital sign data from natural language assessments. And there are countless more scenarios where the conversational language understanding service helps getting things done quicker!
In addition, our app is ready to be published to Azure App Service. Simply install the extension into Visual Studio Code and you can deploy to a live Node.js server running in the cloud with a few clicks.