Updated: December 12th, 2022 – changed info from Microsoft LUIS to Microsoft Azure Cognitive Services / Conversational Language Understanding.
The vision: automatic checklists, filled out by simply listening to users explaining what they observe. The architecture of the sample app is based on a lightweight architecture: HTML5, Node.js & the Microsoft Conversational Language Understanding Cognitive service in the cloud.
Such an app would be incredibly useful in a hospital, where nurses need to perform and log countless vital sign checks with patients every day.
In part 1 of the article, I’ve explained the overall architecture of the service. In this part, we get hands-on and start implementing the Node.js-based backend. It will ultimately handle all the central messaging. It communicates both with the client user interface running in a browser, as well as the Microsoft LUIS language understanding service in the Azure Cloud.
Creating the Node Backend
Node.js is a great fit for such a service. It’s easy to setup and uses JavaScript for development. Also, the code runs locally for development, allowing rapid testing. But it’s easy to deploy it to a dedicated server or the cloud later.
I’m using the latest version of Node.js LTS (currently version 18) and the free Visual Studio Code IDE for editing the script files.
Create a folder on your PC (e.g., “vitalsigns-checklist”) and open a PowerShell window. The easiest way is to right-click on the folder name in Windows Explorer while holding the “shift” key on your keyboard. From the popup-window, choose “Open PowerShell window here”.
To initialize the Node.js environment, type:
npm init
Enter all the info as you see fit. This sets the app name and other details like the version, license, or your name. You can stick with the defaults for everything if you like.
Next, open the folder with Visual Studio Code. Right now, the repository only contains a few files, most importantly the “package.json” that was generated by “npm init”.
Node.js as a Webserver
We’re going to run the service on a web server through Node.js. “Express” is one of the most popular modules that makes it easier to serve web sites from a Node.js environment. Add “Express” to your project from PowerShell through:
npm install express
Now, it’s time to create the backend code of our vital signs checklist app. Go to File > New File. Save it under the name you have given the main file when you executed “npm init”. By default, it’s “index.js”. This is the entry JavaScript file that will be executed on the server. It’ll contain most of the logic of our app.
But before we code the cloud-specific code, create a simple test server to see if your installation works:
import express from 'express';
const app = express();
const PORT = process.env.PORT || 3000;

app.get('/', (req, res) => res.send('Hello World!'));

app.listen(PORT, () => console.log(`Example app listening on port ${PORT}!`));
As you can see in the first line, we’re using the newer ES Module syntax to load the Express module. One of the modules we’ll require later only supports the new syntax and no longer the old way using “require”. To enable the new module syntax, also add the following line to the definition of your package.json:
"type": "module",
Next, start your server from PowerShell:
node index.js
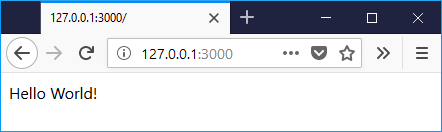
Finally, run the website from your favorite browser using the following URL:
http://127.0.0.1:3000/
Additional Modules
For the client-server communication, we will use the “Socket.IO” module, as it’s more versatile than traditional AJAX.
And finally, the node-fetch module simplifies the https request to the language understanding service.
Add both modules to our Node.js app using:
npm install socket.io
npm install node-fetch
Enabling Routing of Files for the User Interface
For the client-side UI, your server will need to provide HTML files, along with images and stylesheets. The best way to do this is to create a folder within your app. Call it “public”.
Next, reconfigure your “index.js” file to serve all the contents of the “public” directory. Instead of the app.get() line, enter the following:
app.use(express.static('public'));
In the newly created “public” folder, create two files: “index.html” and “language.js”. This will be what your users will see when they request the main page from your server. These files will be rendered in the browser of the client.
User Interface: Code and Frameworks
Bootstrap provides great UI templates that make the app look nicer. Essentially, I’ve included it mainly for the pre-built CSS, so that I don’t have to style the app. Additionally, Bootstrap depends on JQuery, which is also helpful for updating the UI with results received from the server.
I decided against using a bigger JavaScript framework (like Angular or React) to minimize the number of new concepts for people not yet too familiar with web development.
The code for “index.html” is directly based on the Bootstrap starter template.
HTML for the UI
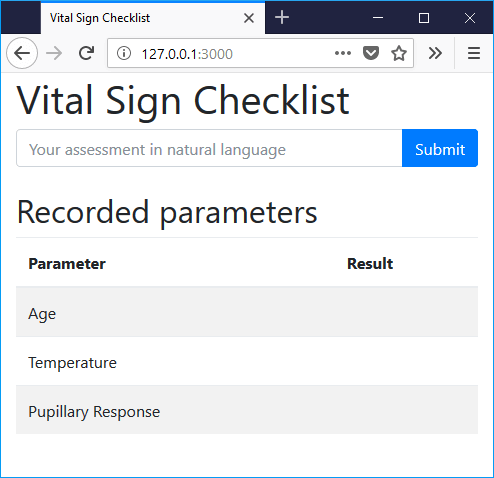
This is the complete code you need for “index.html”:
<!doctype html>
<html lang="en">

<head>
    <title>Vital Sign Checklist</title>
    <!-- Required meta tags -->
    <meta charset="utf-8">
    <meta name="viewport" content="width=device-width, initial-scale=1, shrink-to-fit=no">

    <!-- Bootstrap CSS -->
    <link rel="stylesheet" href="https://cdn.jsdelivr.net/npm/[email protected]/dist/css/bootstrap.min.css"
        integrity="sha384-rbsA2VBKQhggwzxH7pPCaAqO46MgnOM80zW1RWuH61DGLwZJEdK2Kadq2F9CUG65" crossorigin="anonymous">

    <!-- jQuery first, then Bootstrap JS (includes popper) -->
    <script src="https://code.jquery.com/jquery-3.6.2.min.js"></script>
    <script src="https://cdn.jsdelivr.net/npm/[email protected]/dist/js/bootstrap.min.js"
        integrity="sha384-cuYeSxntonz0PPNlHhBs68uyIAVpIIOZZ5JqeqvYYIcEL727kskC66kF92t6Xl2V"
        crossorigin="anonymous"></script>

    <!-- Socket.io client code. The file is served by our Node.js server because we installed the module.
    See: https://socket.io/docs/v4/client-installation/#standalone-build -->
    <script src="/socket.io/socket.io.js"></script>

    <!-- Our own logic -->
    <script src="language.js"></script>
</head>

<body>
    <div class="container">
        <div class="row">
            <div class="col">
                <h1>Vital Sign Checklist</h1>
                <form id="assessment_form">
                    <div class="input-group">
                        <input type="text" class="form-control" id="assessment_text"
                            placeholder="Your assessment in natural language">
                        <span class="input-group-btn">
                            <button class="btn btn-primary" type="submit">Submit</button>
                        </span>
                    </div>
                </form>
                <div class="errormsg alert alert-warning hide" role="alert"></div>
            </div>
        </div>

        <div class="row mt-4">
            <div class="col">
                <h2>Recorded parameters</h2>
                <table class="table table-striped">
                    <thead>
                        <tr>
                            <th scope="col">Parameter</th>
                            <th scope="col">Result</th>
                        </tr>
                    </thead>
                    <tbody>
                        <tr>
                            <td>Age</td>
                            <td><span class="result_age"></span></td>
                        </tr>
                        <tr>
                            <td>Temperature</td>
                            <td><span class="result_temperature"></span></td>
                        </tr>
                        <tr>
                            <td>Pupillary Response</td>
                            <td><span class="result_pupillaryresponse"></span></td>
                        </tr>
                    </tbody>
                </table>
            </div>
        </div>
    </div>
</body>

</html>
The head is similar to the bootstrap template. I only added a reference to the “socket.io” library and our own JavaScript file called “language.js”.
The body is a simple responsive UI, containing two Bootstrap-rows. Each has a single column (-> full width):
- The first row contains the form, consisting of:
- Text input field with the id “assessment_text”
- Submit button
- Optional error message
div(class “errormsg”) below
- The second row is a table with the three lines. These will be filled by our backend through the language understanding service: the age, temperature, and pupillary response.
As placeholders for the values that will be inserted, each table line has aspanthat will be filled with text from our JavaScript code.
JavaScript: Sending Assessments & Showing the Analysis
The JavaScript code of “language.js” is split up into three parts:
- Initialization
- Sending a textual assessment received from the client to the server
- Showing the server’s response in the UI
1. Initialization and Socket.Io Connection
The initialization is short: after the document is loaded, we first make sure the error message is not visible. Then, we initialize a web socket to the server. This will be used for the communication via socket.io.
$(document).ready(function () {
    console.log("Document ready");
    $('.errormsg').hide();
    const socket = io();

    // Place the remaining code of this article here...
});
2. Form Submission to the Backend Server
Next, we need to handle the form submission. The most important line of the following code: calling socket.emit(). This sends the user-entered text to the server, using the message ID “assessment”. The ID is defined by us, and if the server expects a message with the same ID, the communication works.
The rest of the code makes sure the UI is all right:
- First, we hide a potentially still visible error message from a previous, failed submission attempt.
- Then, we also clear the entered text from the input field “#assessment_text”. This allows the user to immediately start typing the next assessment.
- Finally, we use
preventDefault()to make sure the browser doesn’t reload the whole page when the form is submitted. That would be the standard behavior. However, we will dynamically update the page on-the-fly, without ever reloading the whole HTML content.
$("#assessment_form").submit(function(e){
    // Hide previous error message in case it's still visible
    $('.errormsg').hide();

    // Retrieve text entered into text box
    let enteredText = $("#assessment_text").val();
    console.log("Form submitted - entered text: " + enteredText);

    // Send the message to the server via socket.io
    socket.emit('assessment', enteredText);

    // Clear the entered text from the text box
    $('#assessment_text').val('');

    // Do not reload page
    e.preventDefault();
});
3. Handling the Server Response
Finally, we need to handle the response from the server. The JavaScript from our Node.js backend will handle the interaction with the language understanding service. Our front-end JavaScript code only receives and shows pre-processed messages containing the results / or a potential error message.
As we don’t use a JavaScript framework that supports bindings, we directly write the measurement result to the corresponding span elements in the HTML table.
Only the error message is slightly different – we also ensure the line is visible to the user by calling show() on the div.
socket.on('Temperature', function(msg){
    $('.result_temperature').html(msg);
});
socket.on('PupillaryResponse', function(msg){
    $('.result_pupillaryresponse').html(msg);
});
socket.on('Age', function(msg){
    $('.result_age').html(msg);
});
socket.on('Error', function(msg){
    $('.errormsg').html(msg);
    $('.errormsg').show();
});
The User Interface
That completes the UI. It allows for full user interaction and real-time communication with the backend hosted on a Node.js server. Also, it shows the extracted checklist items from the entered assessment in the appropriate places of the UI.
Up Next…
In the next part of the article, we’ll set up the Conversational Language Understanding service from Microsoft Azure.