Learn how to let individual parts of your AR / VR app communicate with each other. This part of the tutorial lets the user trigger actions within your scene. For example: the host starts explaining an object when you tap on it. Internally, the connection is established via messages. It’s a vital concept to understand on your journey to real-life AR apps with Amazon Sumerian.
The guide builds upon the project created in the previous parts of the article: 1 – general setup, 2 – speech & gestures, 3 – 3D Models & AR Anchors.
App Scenario: “Digital Healthcare Explained”
After the basic components of the scene are in place, it’s time to wire everything together. We want to achieve two things:
- Chain sequences together to make one thing happen after another
- Let the user interact with entities in the scene
Our demo app informs the user about different healthcare topics. The following chart summarizes its flow:
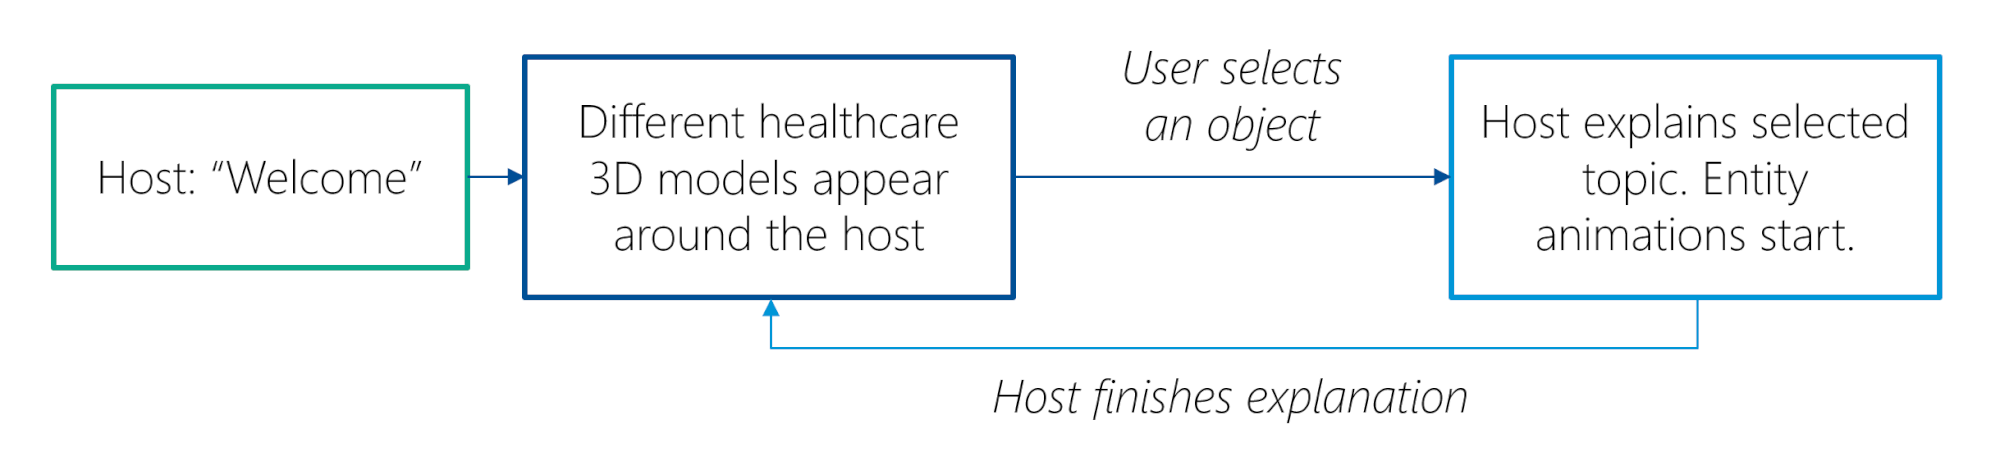
At first, the host greets the user. Then, several 3D models representing different healthcare topics appear around the host. The user selects one of these topics by tapping the respective entity. As we’re creating an Augmented Reality app, the user can walk around in the room to discover different topics.
Once the user tapped on one of these topics, the host starts explaining. Specific animations for the selected object start, which help understanding the topic.
After the host finished the explanation, the user can select the next topic.
Messages: Communication within the Scene
Events are broadcasted through messages. These are simply user-defined strings. In Sumerian, they’re often referred to as “channels”.
For our scenario, we want the 3D model to appear after the host finished welcoming the user. The initial state of the host has an event called “On Speech End”. We need to connect to that.
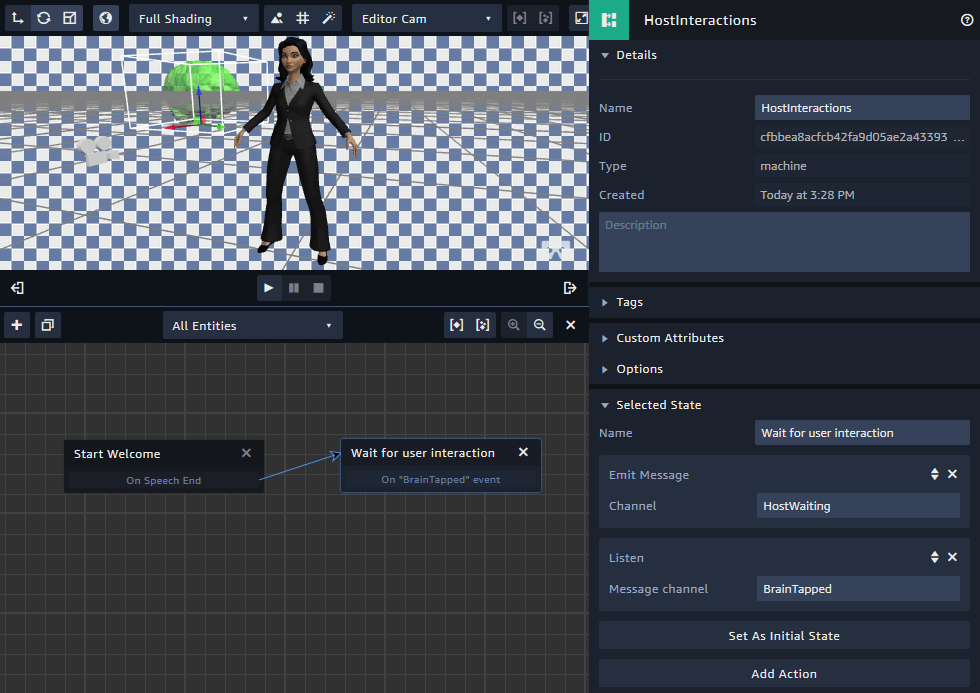
Open the “HostInteractions” state machine editor. Create a second state through the “+ Add State” button and call it “Wait for user interaction”.
Actions for the “Wait for user interaction” state:
- Emit Message: Channel = “HostWaiting”. This message is sent out by the host so that the 3D models can make themselves visible. This is the more powerful approach – of course, you could change the visibility of other entities directly from this state. However, that wouldn’t scale well once your scene grows bigger. Also, from a logical perspective, the host should only know what’s relevant to it. In this case, that is: “I just finished talking”. How the rest of the scene reacts to that event, should be up to the other entities in the scene, not the host itself.
- Listen: Message channel = “BrainTapped”. This message will be sent out by the 3D model entity as soon as the user taps on it. We will continue working on the following states later. Ultimately, the host should then start explaining the tapped entity.
Animated Entity Behavior (Brain)
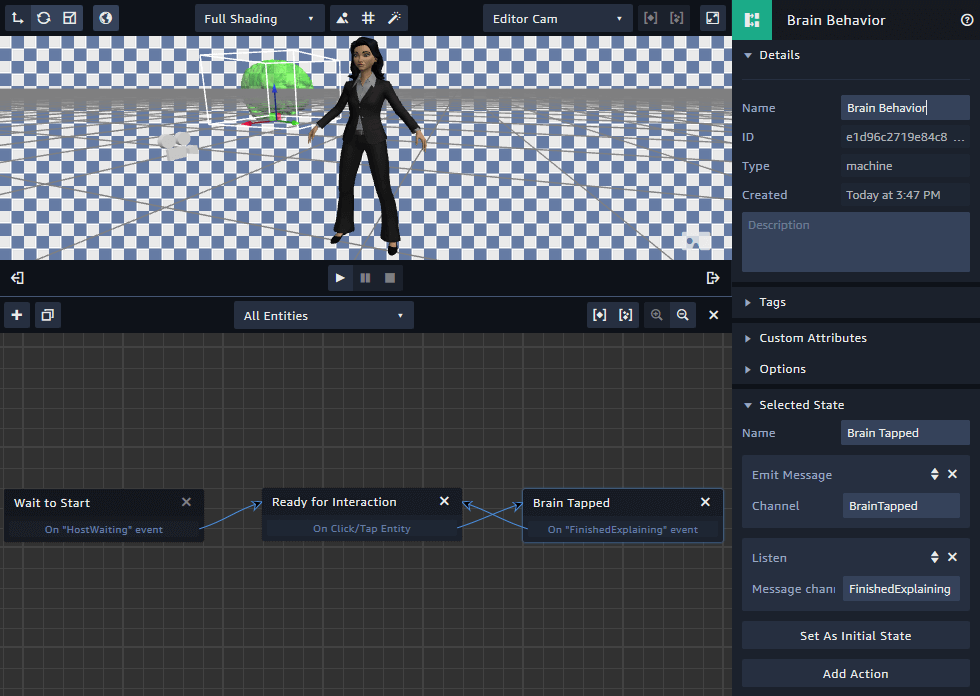
Next, go to the imported 3D model entity and add a state machine component. Call it “Brain Behavior”. Rename the initial state to “Wait to Start”.
Actions of the 1st “Wait to Start” state:
- Hide: makes sure that the 3D model is initially invisible. You could also hide it in the entities panel of the Sumerian editor; but this dynamic approach makes it easier for you to find and configure the element in the Sumerian browser editor.
- Listen: Event channel = “HostWaiting”. Make sure the spelling is exactly the same as the event emitted by the host.
As soon as the host finished welcoming the user, it emits its “HostWaiting” message. We use this to trigger a transition to the next state within the “Brain Behavior”. Add a new state and call it “Ready for Interaction”.
Actions of the 2nd “Ready for Interaction” state:
- Show: reveals the entity to the user after the host finished speaking its welcome message.
- Click/Tap on entity: whenever the user taps the 3D model, we trigger another state transition.
The brain behavior needs a third state. It might appear a lot now, but it’s super easy to work with states, so don’t worry. Create a third state.
Actions for the 3rd “Brain Tapped” state:
- Emit Message: Channel = “BrainTapped”. Informs the host to start explaining the healthcare aspects of the brain topic. Once we add additional topics to explain, each gets its own channel name.
- Listen: Message channel = “FinishedExplaining”. When the host finished explaining, this gives the entity the chance to transition back to the “Ready for Interaction” state. After all, the user might want to hear the explanation again. Alternatively, you could transition to a 4th state and hide the brain model after the user heard its story.
Now that you have created all the actions, simply drag and drop from the relevant actions to the new states. This creates the transition connections. Check this screenshot for reference:
If you try your app right now, it already works. The host speaks its text and then the brain entity appears. However, we have not yet wired up the speech for the host to explain this topic.
Note: of course, we could make the behavior more generic, instead of using an extra channel for each topic. But the aim of this tutorial is to get things done fast in AR / VR, without having to spend too much time on coding or optimization. A good example of more advanced custom events is the “Deep Dive into Real World Applications” YouTube video from Amazon by Jake Smeester and David Chiapperino. They use custom speech marks to trigger other actions in the scene while the host speaks. This shows how flexible messages can be emitted and used in a scene.
Explaining Entities
We’ve already created a speech file for the welcome text in part 2. Use the same approach to create another text that explains the brain topic.
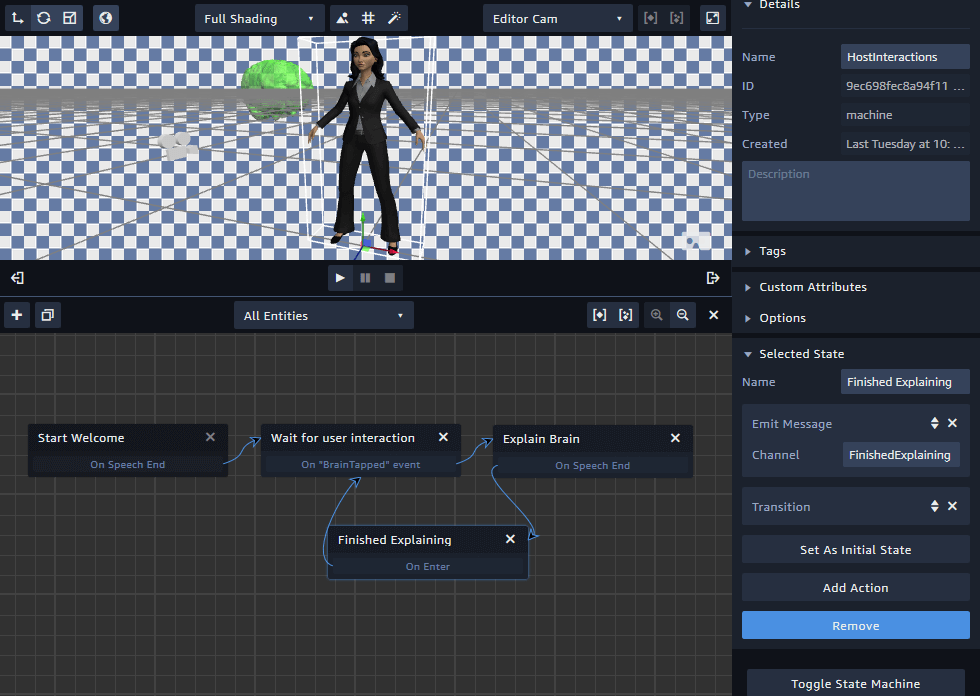
After you finished creating the text and adding it to the speech component of the host, go back to the state machine. We need to extend it with two more states (3+4).
Action for the 3rd “Explain Brain” state:
- Start Speech: assign the new speech file you just created.
Actions for the 4th “Finished Explaining” state:
- Emit Message: Channel = “FinishedExplaining”. Informs the brain entity (and all the other interested entities) to go back to its/their waiting state.
- Transition: as the “emit message” action doesn’t have something to connect a state transition to, use the generic “Transition” action to trigger another transition back to the host’s waiting state. After all, the host should now be ready to explain another topic to the user.
The final state machine of the host looks like the following:
Now, the basic app is essentially finished! With the same approach, you can add multiple 3D models and wire them up the same way. That way, you can easily expand your app with insights and knowledge for the user to explore. Different messages ensure that all components in your app react accordingly to the overall state of the app.
Up Next: Animations
Of course, one of the next steps is to add animations. We’ll take a closer look at this in the next part. Also, we need to explore sharing and re-using content in the upcoming steps. This will make it easier to work in teams.
Amazon Sumerian article series:
- Amazon Sumerian & Augmented Reality (Part 1)
- Speech & Gestures with Amazon Sumerian (Part 2)
- Custom 3D Models & AR Anchors in Amazon Sumerian (Part 3)
- User Interaction & Messages in Amazon Sumerian (Part 4)
- Animation & Timeline for AR with Amazon Sumerian (Part 5)
- Download, Export or Backup Amazon Sumerian Scenes (Part 6)