So far, we have set up a fully functional scene for our ambitious Augmented Reality project. The overall idea: a host avatar explains different 3D objects, which are placed in the user’s surroundings. Only one piece is missing – an animation.
In this part of the article series, we’ll look at three possible ways to animate objects in Amazon Sumerian: timelines, “classic” continuous animations and tween actions as part of state machines in behaviors. All three have different advantages and use cases. Thus, it’s important that you can decide which approach is best for each situation.
This is a capture of the current prototype and what it’ll look like, captured from a phone in Augmented Reality.
Animation Actions
Let’s get started with the tween actions. In the previous parts, we’ve already integrated several state machines and actions into our scene. This approach ties in perfectly well into the same approach.
Sumerian includes a wide variety of different actions for animations. The most important are:
- Move, Rotate and Scale: the “classic” animations, which directly affect the position of the object in the world. The important distinctions are:
- Update the object by specifying absolute world coordinates? Or rather use relative values, based on the entity’s current transform?
- Perform the transform once (instantly!) – or every frame? You can for example achieve a continuous rotation, where the object just turns around its own center.
- Tween: smoothly animate the translation. You specify the final position, how long the object should take to reach it, and the “smoothness” of the motion.
In addition, you can of course also animate other properties. For example where the object looks at or its material.
Continuous Rotation
A common scenario is that an entity continually rotates around a fixed point. The most obvious example is a planet that rotates. But it’s also useful in many other scenarios.
In our scenario, this would be a simple animation to indicate that the user successfully selected an entity. While the host explains the story behind the object, it slowly rotates so that the user remembers what the host is referring to.
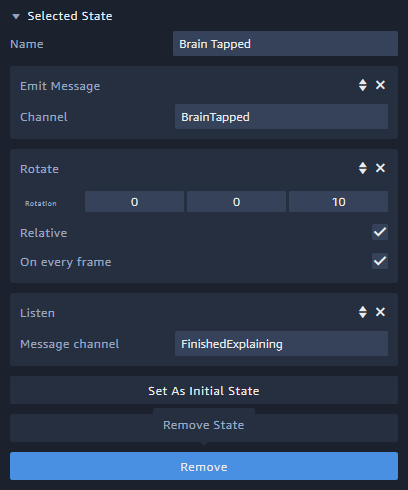
In the state machine of the selected object from the previous part of the tutorial, go to the “Brain Tapped” state. Once the brain was tapped, we now want to add the effect of a continuous rotation.
To do that, add the “Rotate” action to the state. Depending on the object orientation and rotation direction you want to achieve, enter a value like 10 to one of the axes. The bigger the value, the faster the object rotates.
For a continuous rotation, you need to activate both available options:
- Relative: ensures that the rotation values you specify are continually added to the current object rotation. Otherwise, you’d specify the same absolute rotation of the object over and over again. The entity doesn’t rotate along the axis where you specify “0”. In the screenshot above, this would apply to the X and Y axes.
- On every frame: ensures that the object continually rotates if the entity is in this state. As soon as you transition away from the state, it will stop. In this scenario, this will happen once the “FinishedExplaining” message is received.
Tween Action: Smooth Movements
In most situations, it looks better if a property of an entity changes smoothly – instead of the object jumping to a new position. The most straight-forward option to achieve this is to use tween actions.
Let’s continue with our example. The entity now continually rotates while the host explains it. However, once the host finishes with the explanation, it shouldn’t just freeze in its current rotation. Instead, it’s better if the object tweens back to its original rotation. Otherwise, it could happen that the object faces with its back to the user, which wouldn’t look too great.
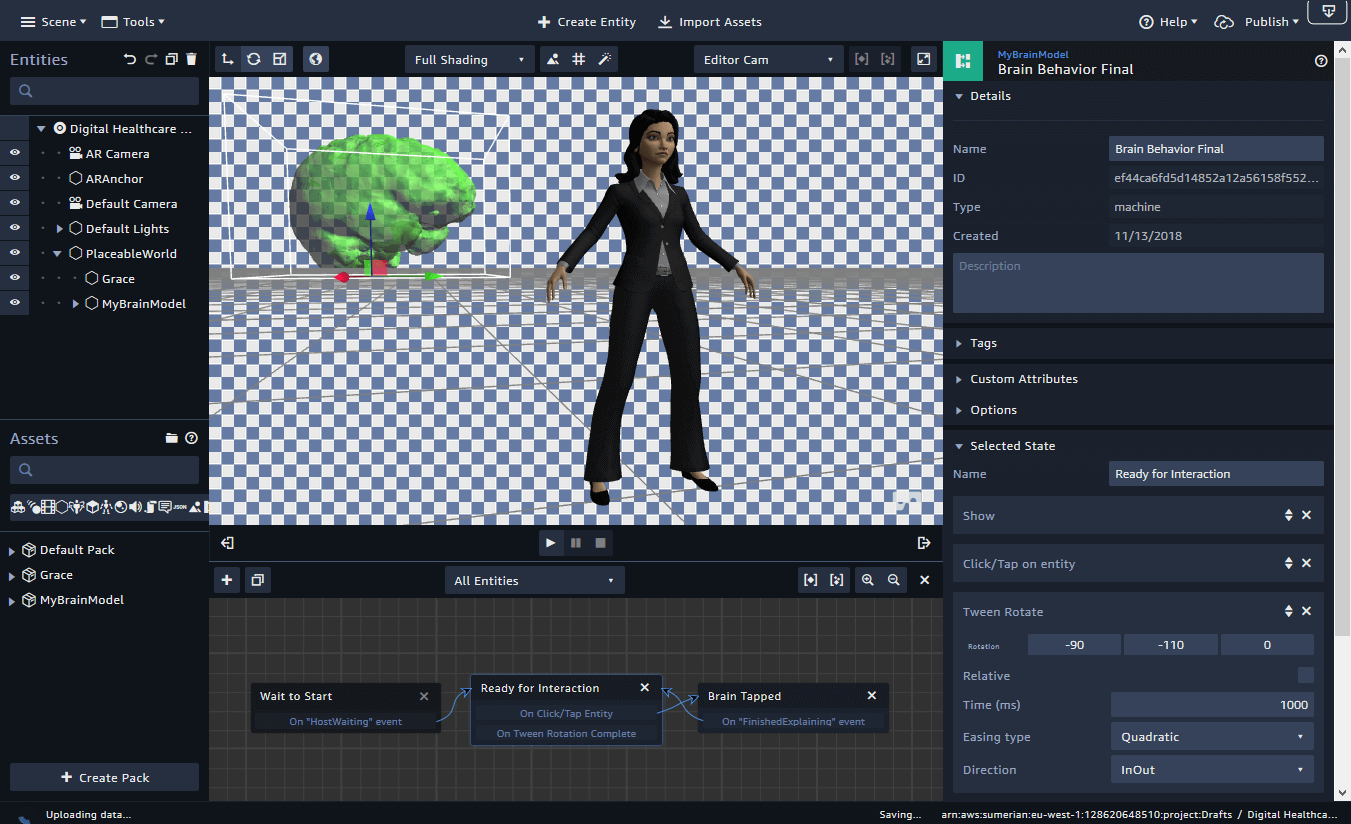
To prevent that, we add a “Tween Rotate” action to the “Ready for Interaction” state of the 3D model entity. This ensures that the object has the correct rotation every time it enters this state. As a quick reminder: we created this state in the previous step. This is what the looks like with the tween rotation action added:
Setting up the Tween Rotate Animation
You can see the “Tween Rotate” properties in the lower right corner. The rotation values supplied for the X, Y and Z coordinates is just what’s right for this model, so that it’s slightly turned towards the user.
In this case, do not activate the “Relative” flag. The specified values represent the absolute transformation; the values shouldn’t be added to whatever was currently the case before the entity transitioned back to this state.
What’s “Time (ms)”, “Easing type” and “Direction”? These settings influence the duration and smoothness of the movement. With a time of 1000, it’ll take exactly 1s for the entity to reach its final rotation.
The “Easing Type” describes if the transition from the previous rotation to the new rotation should be linear or follow a different path. With the settings “Quadratic” and “InOut”, it’ll start slow, then rotate faster and then get slower again close to reaching the final position. This way, the animation looks smoother, as it doesn’t have abrupt changes in speed from turning to suddenly stopping.
Unfortunately, Amazon Sumerian doesn’t show a preview here – it does so when adding animations to a timeline, as you will see in the next section.
Timeline
Another option to modify the scene contents is to use timeline components. They contain a continuous time stream that corresponds to the real elapsed time of your running app.
At certain key frames, you specify the position, rotation and size of different entities. Then, the timeline takes care of animating the transitions in-between those key frames.
Bouncing Arrow
Let’s start with an example. In our Digital Healthcare Explained scenario, we’d like to have an arrow pointing to the specific region of the brain that is explained by the host. To make it more visible to the user, the arrow should bounce a little.
In Sumerian, add a new “Cone” entity. Make it a child of the “MyBrainModel” and rename it to “Arrow”. Then, move and rotate it so that it’s pointing to the right place. Of course, it looks nicer if you also change the default gray material to for example a red surface color.
Timeline Entity
Now that we have added the object, we need a timeline to animate it. There are multiple options, and I wasn’t too sure about the best approach either.
As a general tip: a great resource to learn more and to ask questions directly to the AWS engineers is the Sumerian Slack channel. Thanks to Cameron Luck and Jake Smeester for helping me out on this and even providing a short example. The following is based on what they suggested.
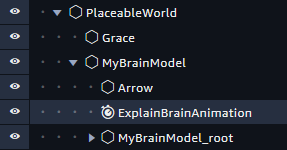
To be most flexible, create a “Timeline Entity” in your scene. This is essentially just an “Empty Entity” with an attached “Timeline” component.
Then, it’s time to make sure the scene stays organized. First, rename it to “ExplainBrainAnimation”. Then, make the new entity a child of the Brain Model through drag & drop. It’s always a good idea to keep your scene organized so that elements that belong together are in the same hierarchy level.
Timeline Creation
A timeline can animate multiple entities. This is very useful, as you can tell a whole story with a single timeline. To view and edit the timeline, click on the “Toggle Timeline” button in the entity’s component.
Right now, the timeline is empty. It only has one line: “Event channels”. This allows you to emit events while the timeline is running. With this, you can easily synchronize other parts of the scene to your animation.
In the top left corner, you can find the instructions “Drop Entity Here To Animate It”. Go ahead and drag & drop the “Arrow” entity from the “Entities” panel into the timeline.
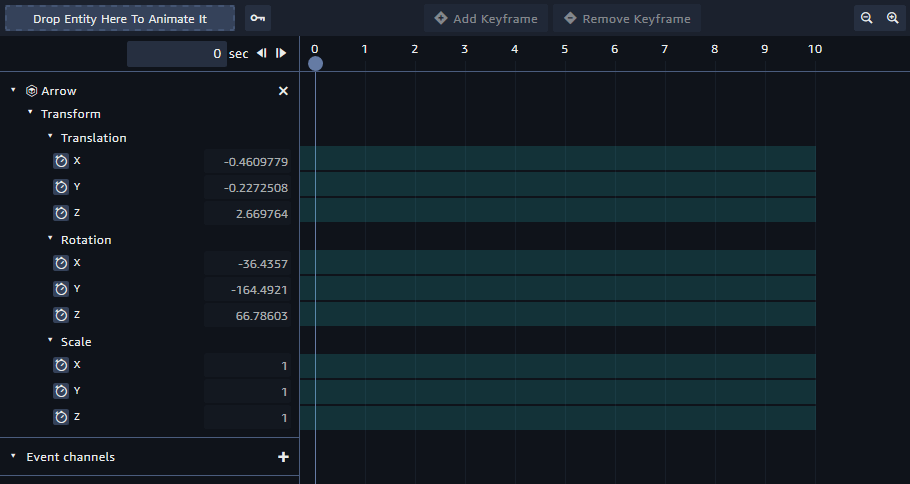
Now, you can see the entity within the animation. Its transform is already part of the timeline, split up into translation, rotation and scale. All these values are set to the current values of the element. Don’t worry if they are different for you.
Right now, the timeline has a duration of 10 seconds. You can change that in the properties of the timeline entity in the inspector on the right side. Let’s make the bouncing animation a bit shorter and change it to only 5 seconds. Also, configure it so that “Loop” is enabled.
However, disable “Auto Start”. We want to have control over the timeline and manually start / stop it when required.
Animating the Entity’s Transform
Even though you could animate all different transform properties of the element, you should only activate the timeline for the values you are interested in. For example, if you want to animate the translation, there is no need to touch the object’s scale.
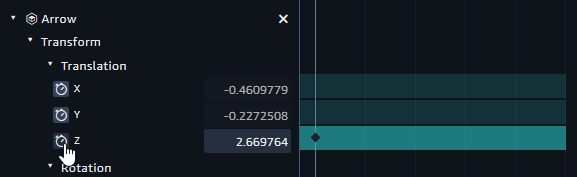
To explicitly tell Sumerian which properties to animate, you first need to activate them by clicking on the small stop watch symbol next to the relevant line. In our case, we only need to animate the Z axis to bounce the arrow up and down. Once the channel is activated, the bar on the right turns brighter.
Animation Keyframes
Timelines work based on keyframes. At specific points in the timeline, you explicitly state the current value of the channel. Amazon Sumerian then takes care of animating the property change from the previous to the new value between the keyframes.
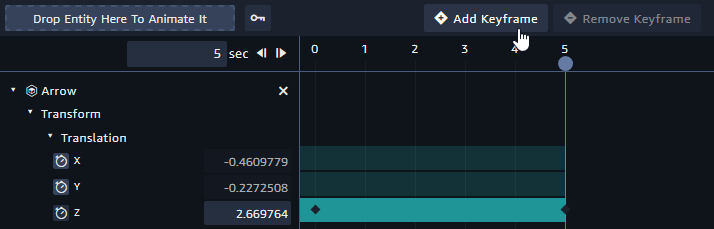
The first keyframe has already been automatically created at second 0. It’s indicated by the little diamond symbol ◆. You can easily create and remove keyframes by moving the timeline head to the position and then clicking the buttons in the top bar of the timeline view.
For a looping animation, the transform at the end should be the same as at the start. To achieve this, it’s a good idea to create a second keyframe at the end of the animation right now. Thus, move the play head to the end of the timeline and click the “+ Add Keyframe” button.
Bouncing Animation
Now, we’re ready to create the actual bouncing animation for our entity.
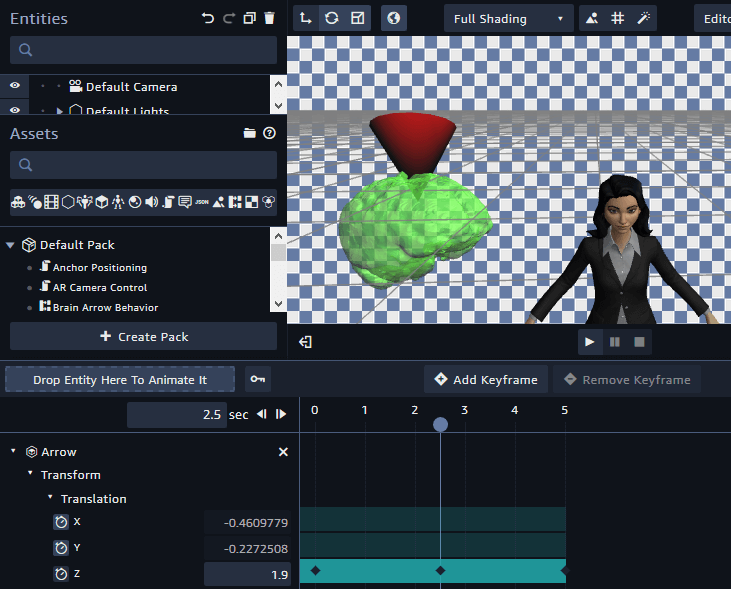
Move the timeline to the middle of the animation (2.5 seconds). Then, click the “Add Keyframe” button again. We now have three keyframes in the timeline of the Z axis translation of the “Arrow” entity.
Using the text field on the left of the timeline bar, modify the value to what you’d like it to be at this time. You can easily do that with the mouse – click into the text field and move the mouse while holding down the mouse button. You instantly see a preview of how the entity moves in the scene. Move the object a little to set the ‘other’ position of the bouncing animation.
Easing: Smooth Animations
You can preview the animation by manually dragging the playhead along the timeline. You’ll see that the arrow entity moves in a completely linear way up and down. That doesn’t look very smooth.
To improve this, add an easing function to the transitions between keyframes.
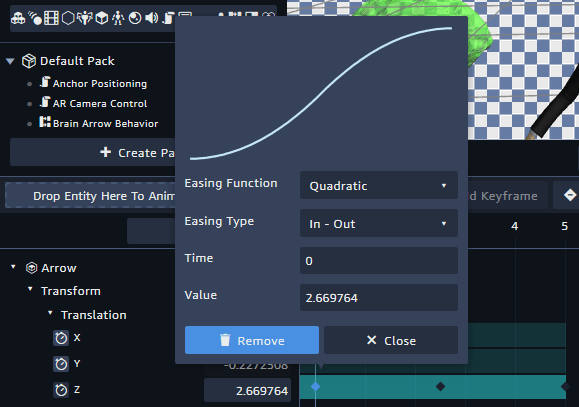
Right-click a keyframe. This opens a small pop-up menu. Here, you can select the easing function and the easing type. In contrast to the easing in the tween actions explained before, this window gives you a nice preview of how the animation looks like with the easing applied.
A good choice for smooth movements is a quadratic easing. Also activate the “In – Out” type. This results in a motion that is slower at the start & end, and faster in the middle. Also apply the same easing curve to the middle keyframe. This is what the configuration looks like:
Triggering the Timeline
Now, we still need a trigger to start and stop the timeline. Fortunately, we already set up our scene in a very flexible way in the previous part. The brain 3D model emits a message when it is tapped. This should start the animation. On the other side, the host emits a message when it finished explaining.
These messages are global. Every component can listen to these messages and react accordingly. To do so for the timeline, add a “State Machine” component to the “ExplainBrainAnimation” entity. Call the behavior “Brain Arrow Behavior”.
The behavior only needs two states, representing if the animation is currently running or not. Therefore, create two states: “Wait” and “Bounce”.
Each of these states starts/stops the timeline, respectively. Additionally, each state needs to wait for the event to transition away from this state. See this screenshot for reference of the finished setup:
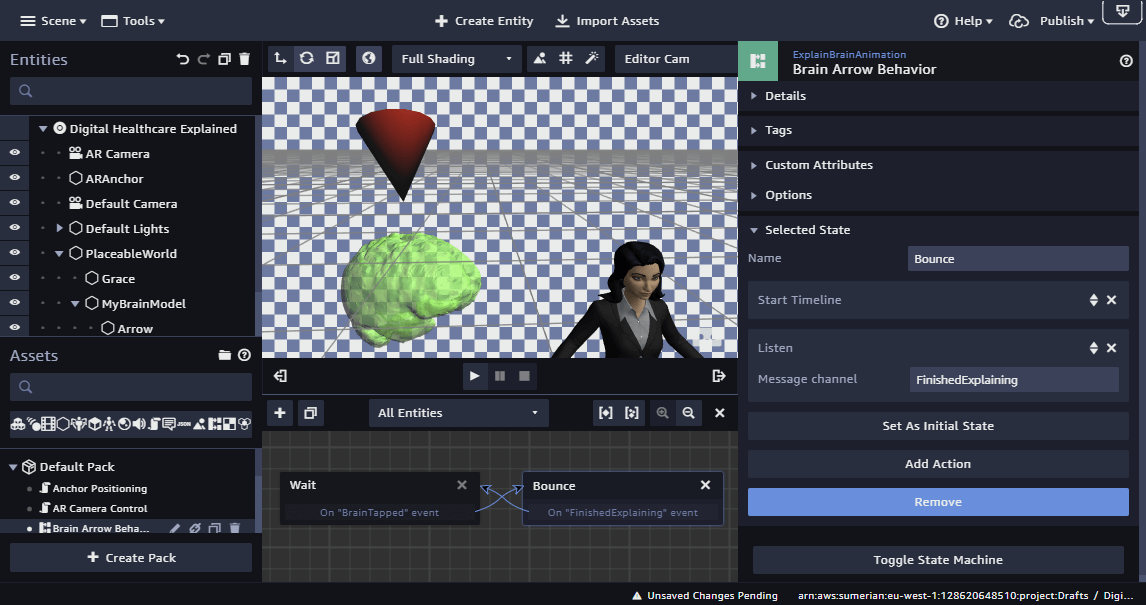
State Configuration
Actions for the “Wait” state:
- Stop Timeline: stops the timeline of the current entity if it’s currently running. Note that both the timeline as well as the state machine are attached to the same “ExplainBrainAnimation” entity. Unfortunately, it doesn’t (yet?) work to start/stop the timeline of a remote entity. That’s why we created the new “Timeline” entity: to combine everything into one entity.
- Listen: Message Channel = “BrainTapped”. That’s the message emitted by the brain entity when the user tapped it. For this timeline, it serves as trigger to transition to the animated state.
Actions for the “Bounce” state:
- Start Timeline: starts the looping timeline of the bounce animation we created for the arrow entity.
- Listen: Message channel = “FinishedExplaining”. Emitted by the host when it finished its speech. If the bounce animation was active at this time, this behavior transitions back to the “Wait” state.
After both states are defined, the only thing left to do is creating a cross-transition between both states. This enables the behavior to switch between both states, triggered by the received messages.
Testing Animations
After these steps, the animations already work fine! We’ve integrated three different kinds of animations into our project:
- Continuous animation: for an entity that always rotates around its axis
- Tween rotation: for a smooth rotation back to the initial transform of the entity
- Timelines: for a more complex bouncing animation, with easing for smooth movements
With this knowledge, you can go ahead and create more complex animations and timelines that animate multiple objects at once. Try creating your own animations that work alongside the host’s explanation!
Next Steps
In the next part of the series, we’ll take a closer look at sharing your assets, working in a team and ultimately how to finalize the app to submit it to an app store.
Amazon Sumerian article series:
- Amazon Sumerian & Augmented Reality (Part 1)
- Speech & Gestures with Amazon Sumerian (Part 2)
- Custom 3D Models & AR Anchors in Amazon Sumerian (Part 3)
- User Interaction & Messages in Amazon Sumerian (Part 4)
- Animation & Timeline for AR with Amazon Sumerian (Part 5)
- Download, Export or Backup Amazon Sumerian Scenes (Part 6)