In the previous blog posts, we’ve used a simple grayscale threshold to define the model surface for visualizing an MRI / CT / Ultrasound in 3D. In many cases, you need to have more control over the 3D model generation, e.g., to only visualize the brain, a tumor, or a specific part of the scan.
In this blog post, I’ll demonstrate how to segment the brain of an MRT image; but the same method can be used for any segmentation. For example, you can also build a model of the skull based on a CT by following the steps below.
First, make sure you’ve loaded a sample data set in 3D Slicer, or that you have imported your own DICOM data as described in part 1. Also apply “Auto W/L” in the Volumes module to get a good representation of the grayscale values. This is important, as we need a good contrast in the image to segment regions out of the image data.
Segmentation Setup
I’m using the latest nightly build of the upcoming Slicer 4.7 release. It features a new and more advanced Segment Editor compared to the currently stable 4.6 version (where the module is only called “Editor”). The new Segment Editor is a powerful toolkit containing various methods to segment parts of the scans to further analyze these or to ultimately create 3D models.
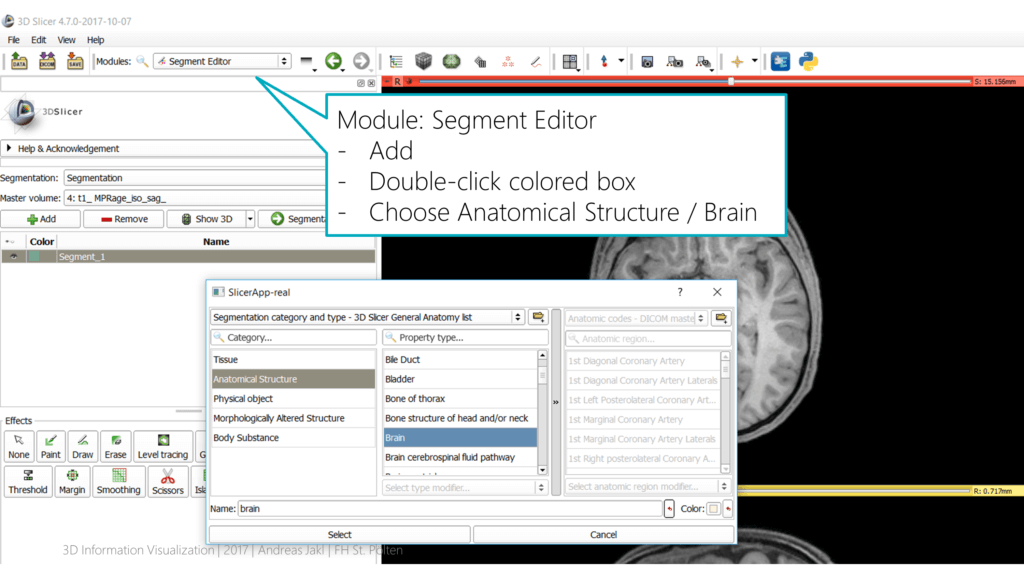
In the toolbar, select the “Segment Editor” module. Make sure that the “Master volume” is set to the data set you’re currently editing. Click on the “Add” button.
Slicer comes with a pre-defined color scheme for various segmentation categories. Double-click the small turquoise box to open the category editor. Choose “Anatomical Structure” > “Brain”. This assigns the commonly used color for the brain segmentation.
Aligning Views for Segmentation
Slicer offers more specialized modules for segmenting the brain, or even for categorizing various brain regions. In this tutorial, I’ll use the generic “Level tracing” effect, as it also works well for brain segmentation. Plus, you can easily use the same method for many other segmentation tasks as well.
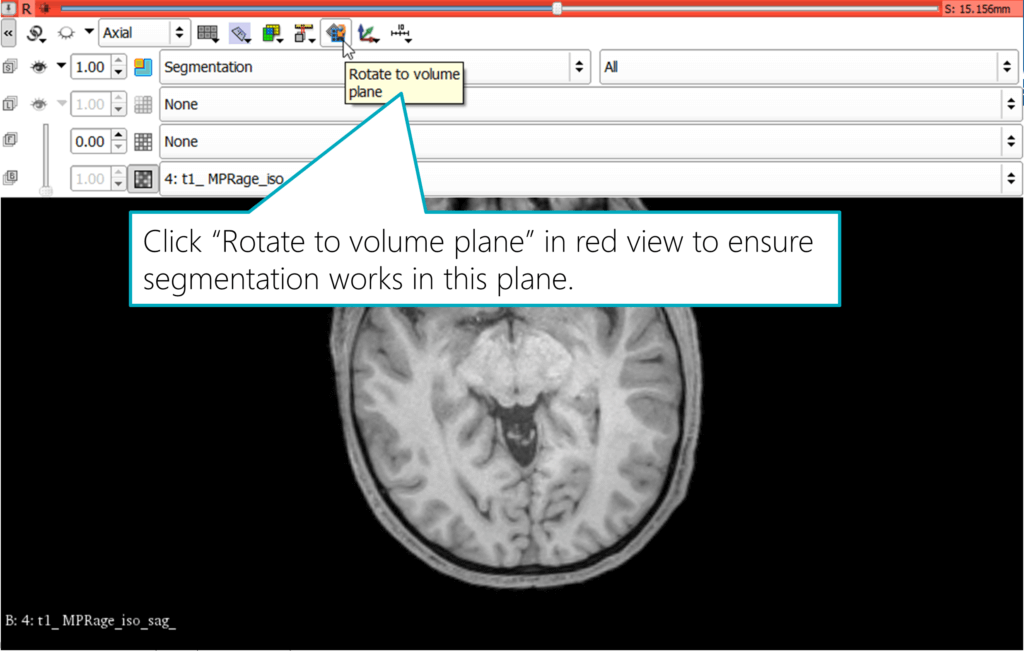
Warning: the following is tricky to find out: to use all three views for segmentation, you need to ensure the view is rotated to the volume plane. Otherwise, Slicer can’t use the tools for segmenting in that view. The resulting segmented area wouldn’t be what you expect and see in the view, but Slicer would instead use a different 3D plane to segment a connected region.
To apply this change, hover the mouse over the small pin icon in the top left of a view, and then expand the toolbar by clicking on the “«” double arrow symbol on the left. The interface will reveal additional controls, including the “Rotate to volume plane” button. Activate this. The image in the view will slightly rotate, ensuring that it’s aligned with the plane you’re seeing in this view.
Level Tracing: Segment the Brain from the MRI image
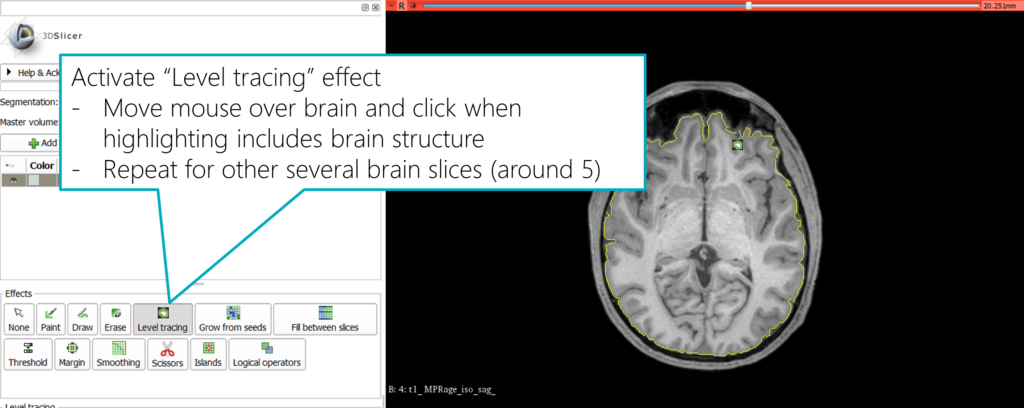
Back in the segmentation module, activate the “Level tracing” effect. Now, hover your mouse over a structure and you will immediately see a preview of the segmentation: a yellow outline combines the structure that has the same background color as the outer border. Therefore, it’s a good and straightforward way to segment a structure that has a clear border compared to the surroundings.
When you’re happy, click the mouse button to apply this segment. You can also combine multiple mouse clicks to extend the segment to make sure it covers all relevant areas.
Next, move to a different slice of the data set (using the mouse wheel or the slider at the top of the view) and repeat the process. You can also segment in other views, e.g., the coronal (green) view. Make sure you also align the rotation of the view to the volume plane as described before; in case the level tracer doesn’t draw the highlight line around the structure as you expect.
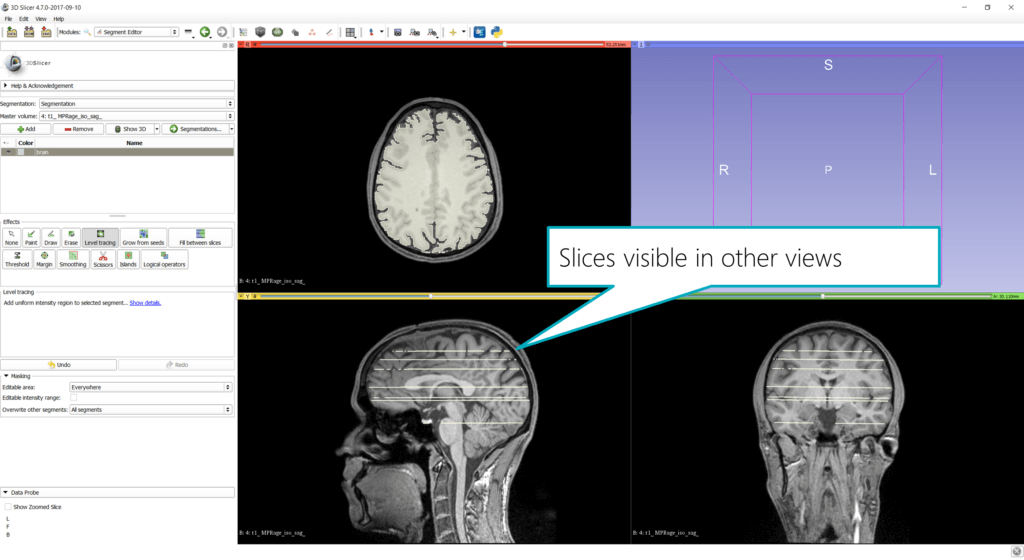
The resulting slices are also visible in other views as well:
Exporting Segmentation to a Label Map
With hundreds of individual slices that make up your dataset, we need a little help from Slicer to expand the segmentation for the whole 3D volume, based on the segmentations we’ve already created.
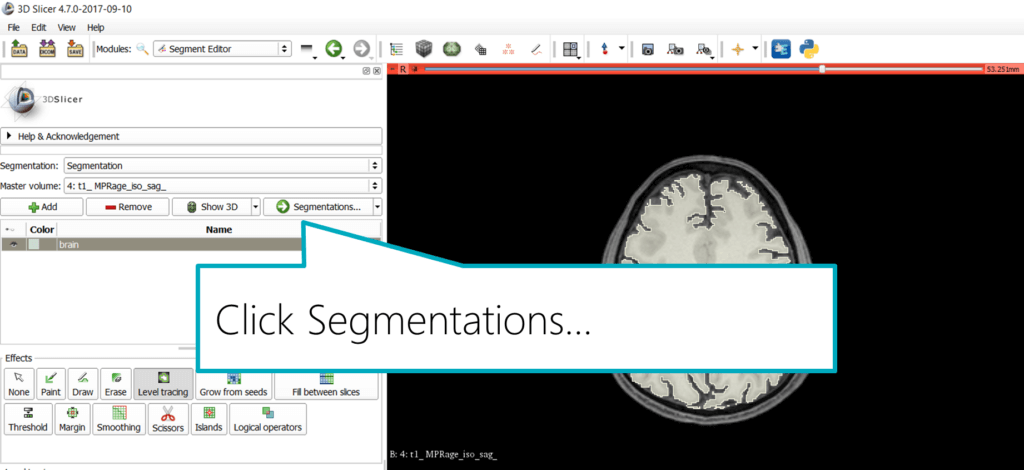
First, save the segmentation. In the module panel, click “Segmentations…” to get to the next step of the module UI in the panel.
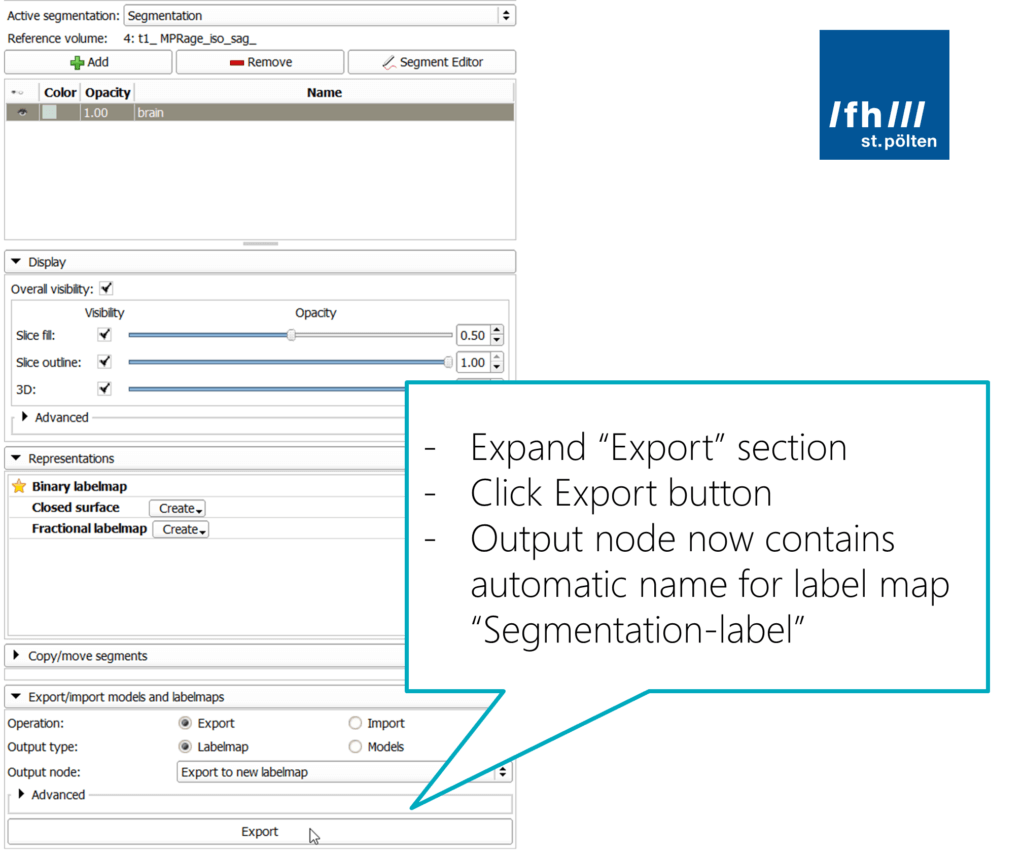
At the bottom, expand the “Export/import models and labelmaps” section to reveal its parameters. Make sure you keep the “Export” operation selected, and that you create a “Labelmap”. The output should go into a new labelmap. The name of that is generated automatically, by default it will be “Segmentation-label”.
Creating a Model from the Label Map
Right now, we have several 2D label maps that segment the brain in various slices of the dataset. For 3D visualization, we need to expand this, to ultimately create a 3D surface that we can export to a 3D modeling app.
One of the best approaches for our scenario is available in the module menu through Segmentation > Specialized > Robust Statistics Segmenter. It’s a general purpose segmenter that is initialized by a label map (which we have just generated). The segmenter module evolves the contour model to extract the boundary of the 3D object.
In the module settings, you need to adapt the parameters a bit to get a good outcome, which we can directly use for 3D printing as well as for AR / VR scenarios.
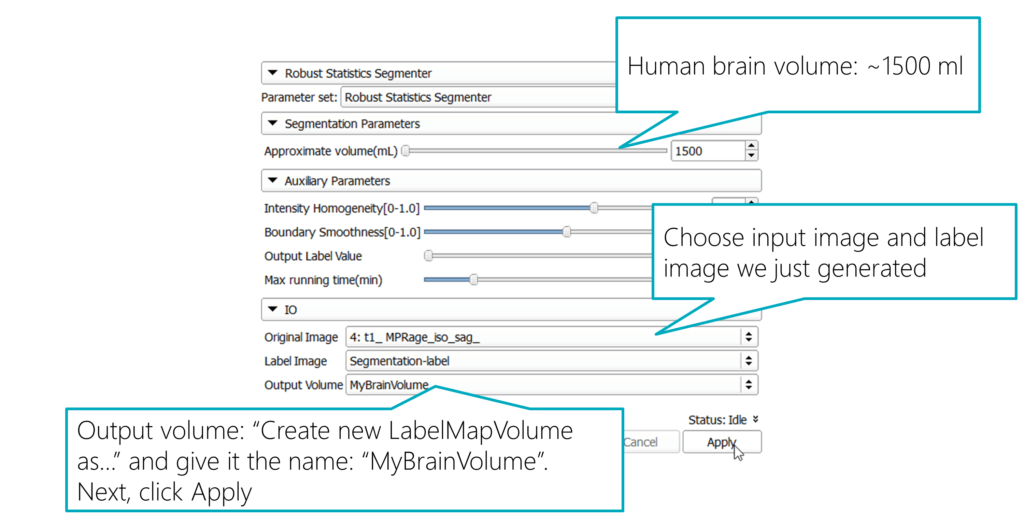
In the “Segmentation Parameters”, set the “Approximate volume (mL)” to 1500 ml. That’s around the maximum brain size of average humans. Specifying it helps the segmenter to create a volume that corresponds to what we are looking for.
For the “Original Image”, choose the input image from the dataset that we’ve also used for the segmentation. The “Label Image” is the auto-generated labelmap name from the previous step: “Segmentation-label”. For the “Output Volume” select “Create new LabelMapVolume as…” and give it the name “MyBrainVolume”.
Now, you’re all set. Click Apply and wait a few minutes until the tool has performed its magic and created a 3D label map based on our sample segmentations.
3D Volume Rendering of Segmented Brain
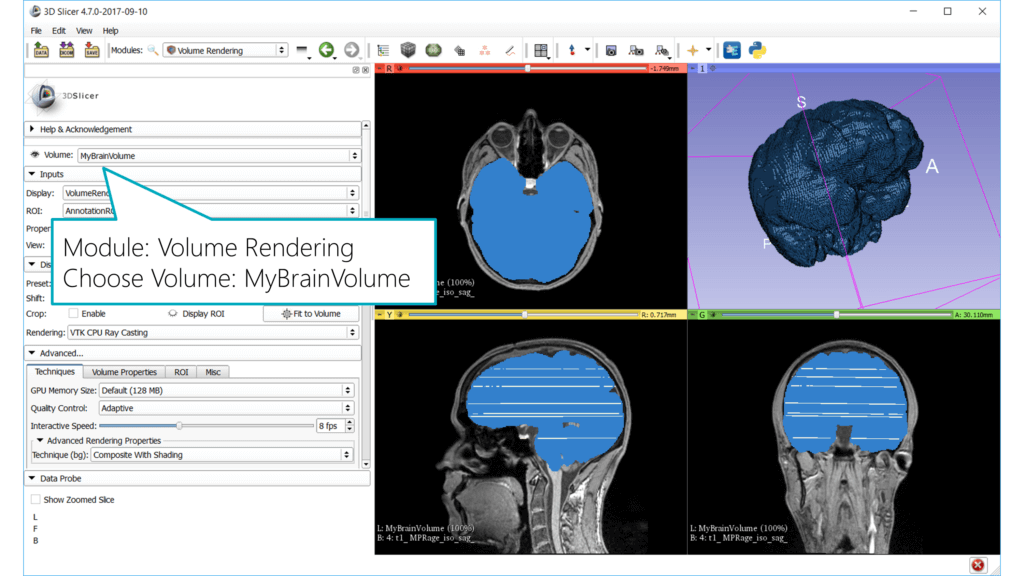
After the segmenter is finished, you will see a blue volume in all three views that corresponds to the complete brain – amazing!
Let’s visualize that in 3D. Go to the Volume Rendering module and choose the “MyBrainVolume” volume. The object will now show up in the 3D view.
3D Model for Export
In the previous part of the blog post series, we’ve used the simple Grayscale Model Maker. It used a threshold brightness value to define the surface of the generated 3D model.
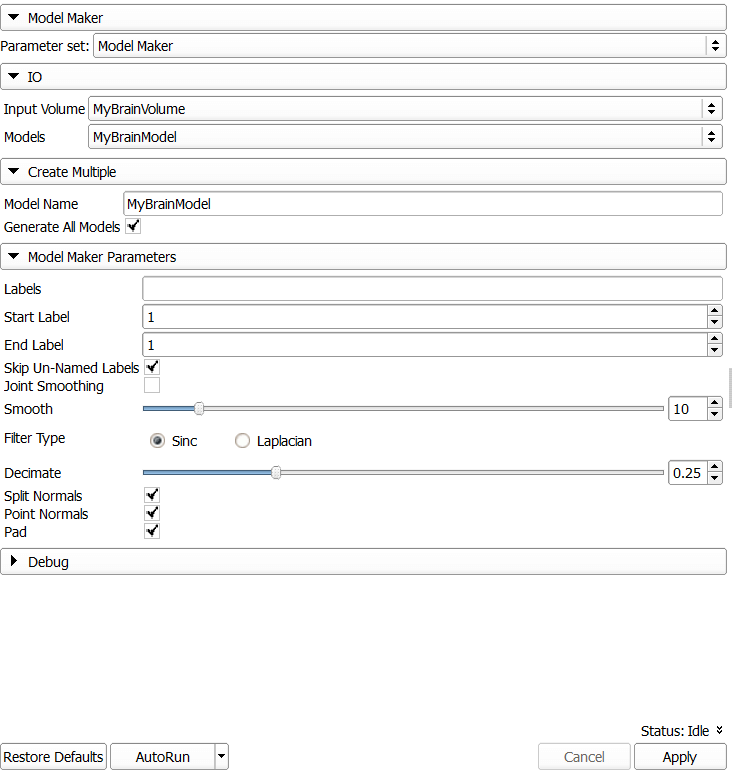
Through the segmentation described in this blog post, we’ve now created a 3D label map, which we can directly convert into a 3D model using the Model Maker module.
In the settings of the Model Maker, make sure you select the correct input data: “Input Volume” = “MyBrainVolume”. For the generated model, choose “Create new ModelHierarchy as…” and type “MyBrainModel”. Also type this name into the “Model Name” below.
If needed (e.g., if you have performed multiple segmentations), limit the labels to include in the model. Hover the mouse over a view and observe the status output in the “Data probe” window in the lower left corner. In line “L” it will for example state “MyBrainVolume jake (1)”, which tells you that this region is included in the label map with ID 1.
Once you’re finished, click Apply. You can also increase smoothing and decimating to reduce the details of the model.
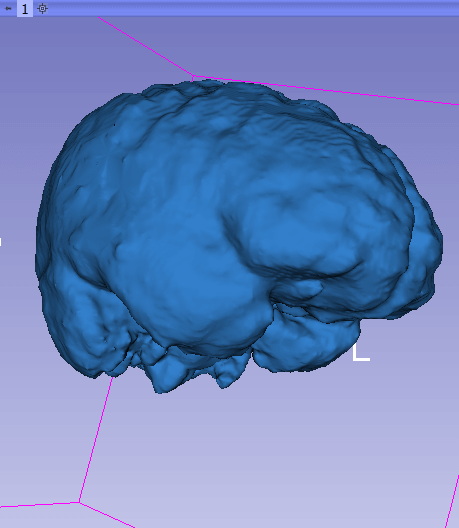
This is what the generated 3D model looks like when rendered using Slicer:
Export the 3D Model
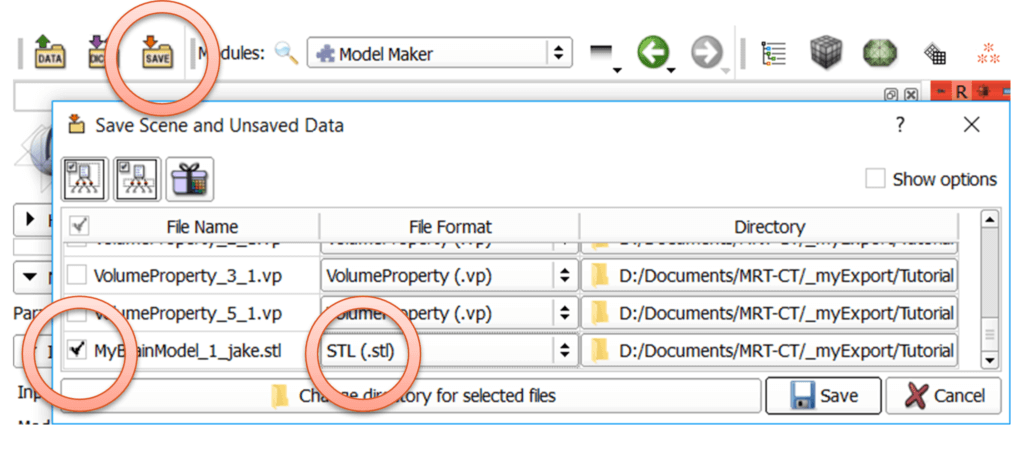
As described in the previous blog post where we exported the model of the whole head, we need to save the model as .stl file:
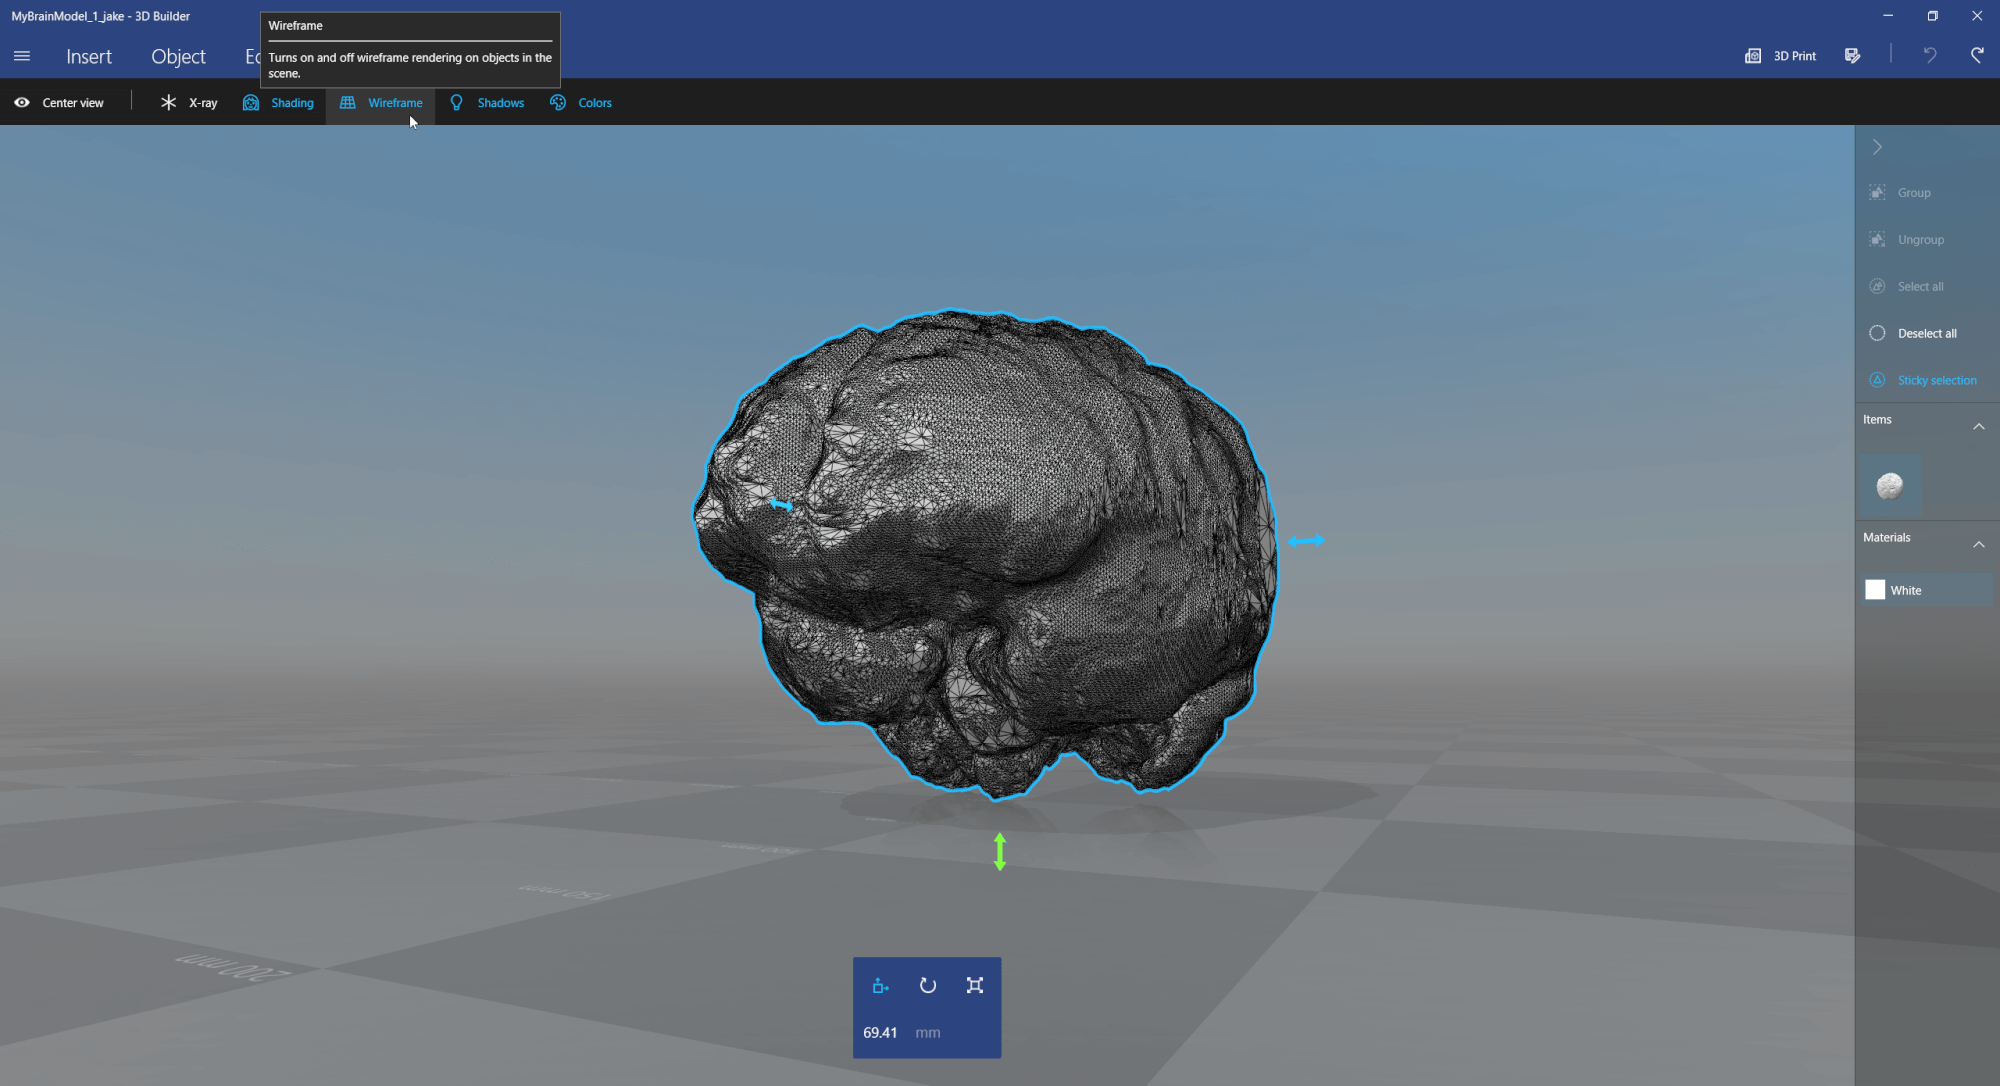
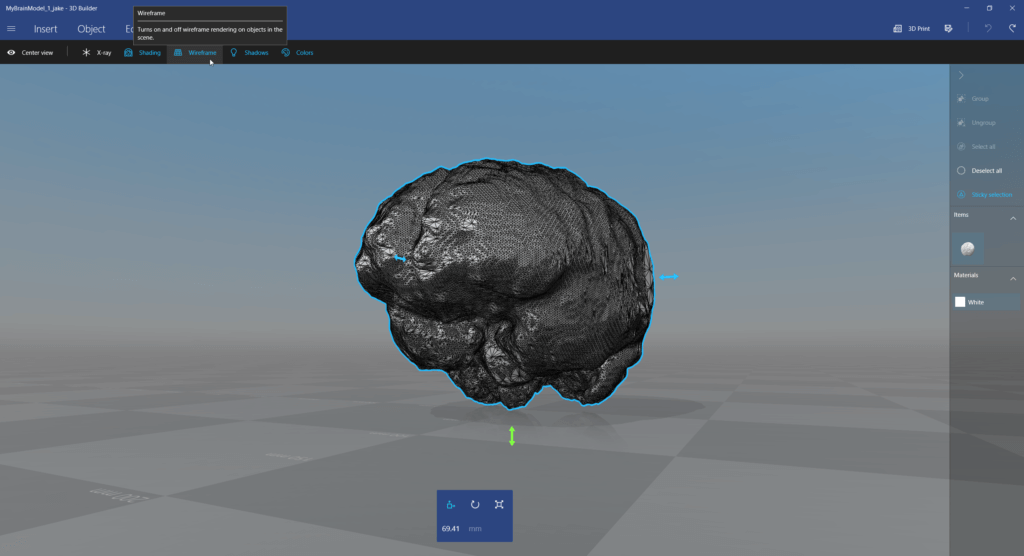
Next, view and simplify the 3D model, e.g., using the free 3D Builder app from Windows 10:
Now, you can use the same method as in the previous example to visualize the segmented brain from the MRI / MRT image as a hologram in Microsoft HoloLens.
The same generic segmentation method presented in this blog post should also work fine for many other segmentation scenarios – no matter if you have MRI, CT, or Ultrasound data!
Update: You can download my 3D model as .obj file of the final segmented brain from Poly by Google, as well as from Remix3D by Microsoft.
