Currently, Facebook’s Spark AR Studio is restrictive with supported audio formats. Unfortunately, only M4A with specific settings is allowed. This short tutorial is a guidance on how to convert artificially generated neural voices (in this case coming from an mp3 file as produced by Amazon Polly) to the m4a format accepted by Spark AR. I’m using the free Audiacity tool, which integrates the open-source FFmpeg plug-in.
Spark AR has the following requirements on audio files:
- M4A format
- Mono
- 44.1 kHz sample rate
- 16-bit depth
Generating Audio using Text-to-Speech (mp3 / PCM)
Neither Amazon Polly nor the Microsoft Azure Text-to-Speech cognitive service can directly produce an m4a audio file. In its additional settings, Polly offers MP3, OGG, PCM and Speech Marks. MP3 goes up to a sample rate of 24000 Hz, PCM is limited to 16000 Hz.
Choose either PCM for uncompressed sound or go with MP3. It doesn’t make much difference if you don’t plan many intermediary processing steps, as the final file size should anyway be extremely low to bring your finished project to Facebook or Instagram.
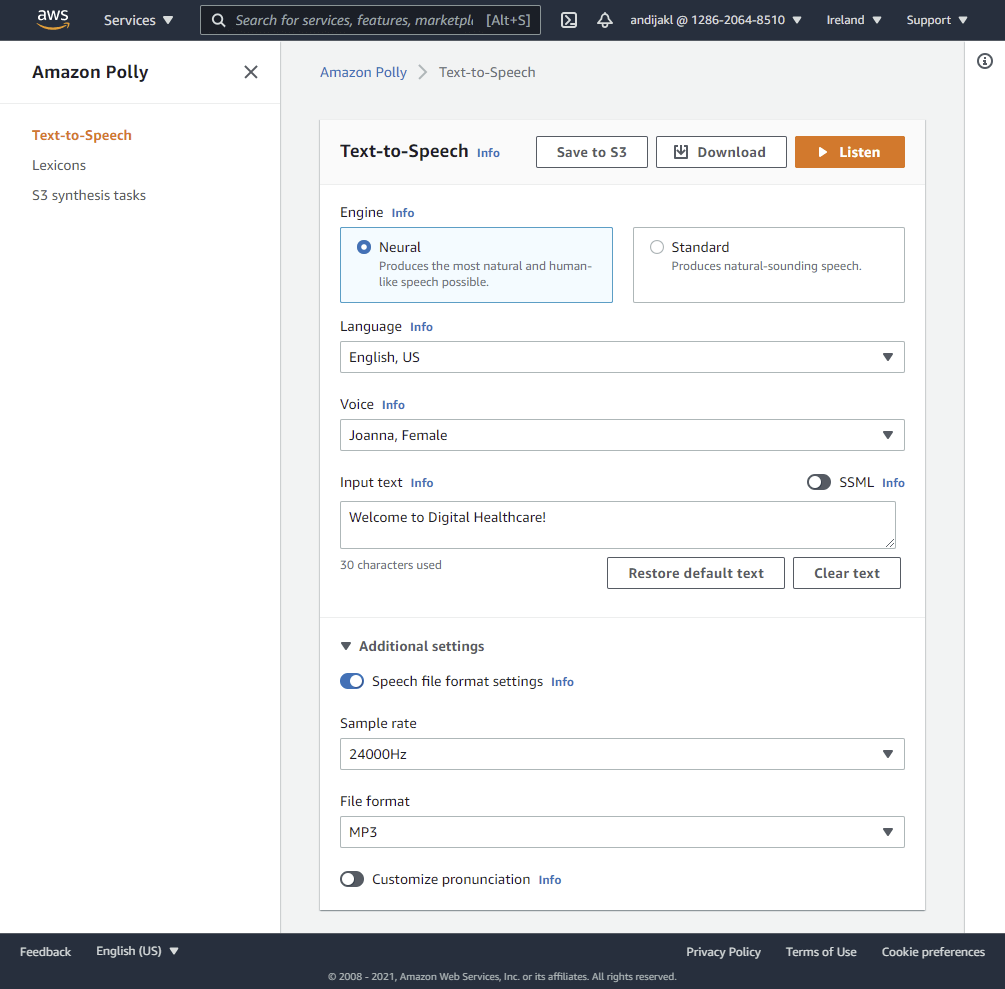
Next, choose the language, the voice to use and enter the text to speak. Most languages already support neural voices, which I’d recommend, as they sound more natural. They are not yet available in all AWS regions and not for all languages. Plus, neural engines are more expensive; however, for a few static short text blocks that you generate, the cost savings of the standard voice are not worth the huge quality boost you gain by selecting neural voices.
You can always click on “Listen” to hear a preview. Once you’re happy with the spoken text, click on “Download” to get the mp3 file. To quickly test, you can also download my generated sound file.
Converting Audio for Spark AR M4A with Audacity
First, download and install the open-source Audacity tool. Make sure you get it from the official Audacity website.
FFmpeg for Windows and Linux
While Audacity itself is immensely powerful, it doesn’t offer m4a / mp4 support out of the box on Windows and Linux, due to legal reasons (patent concerns). However, there is a great open-source library called FFmpeg. The framework provides only the source files, which you’d have to compile yourself. As this would require setting up quite some technical infrastructure, you can simply go with pre-compiled libraries provided by the community.
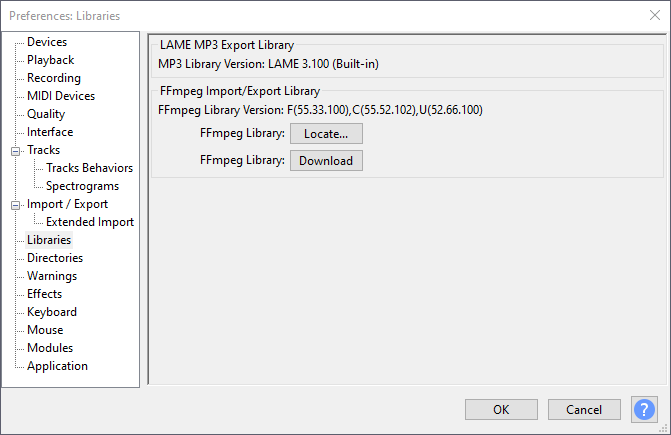
Directly in the Audacity menu Edit > Preferences > Libraries, you will find a button that takes you to the FFmpeg download page. Make sure you close Audacity while you install FFmpeg. If you stay with the default location and settings during installation, Audacity will automatically find and start using the library. You can always verify the FFmpeg location and version in the Audacity settings, or manually locate the install path if auto-detection didn’t work.
Adapting the Sample Rate to 44.100 Hz
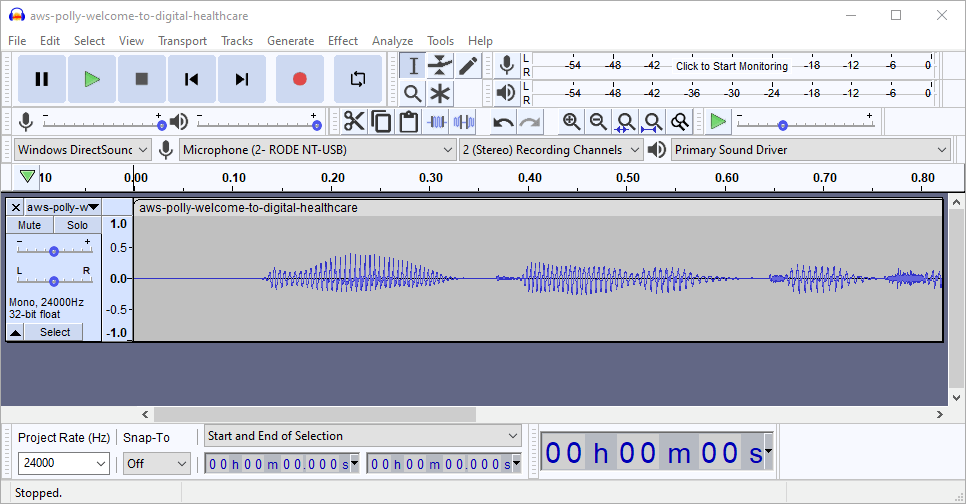
Open the created mp3 file with Audacity. While the sound file is already mono, it’s in a wrong format: 32-bit float with 24000 Hz sample rate.
In the lower left corner of the main Audacity window, change the “Project Rate (Hz)” to 44100. This step is easy to miss; you would get an export error if you don’t perform this!

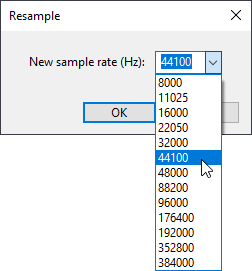
Next, let’s change the track sample rate. You need to be careful here – simply switching the rate would speed up the sound file, making the voice sound like Mikey Mouse. The correct tool to use is: Tracks > Resample…
Select 44100 as the “New sample rate (Hz)”.
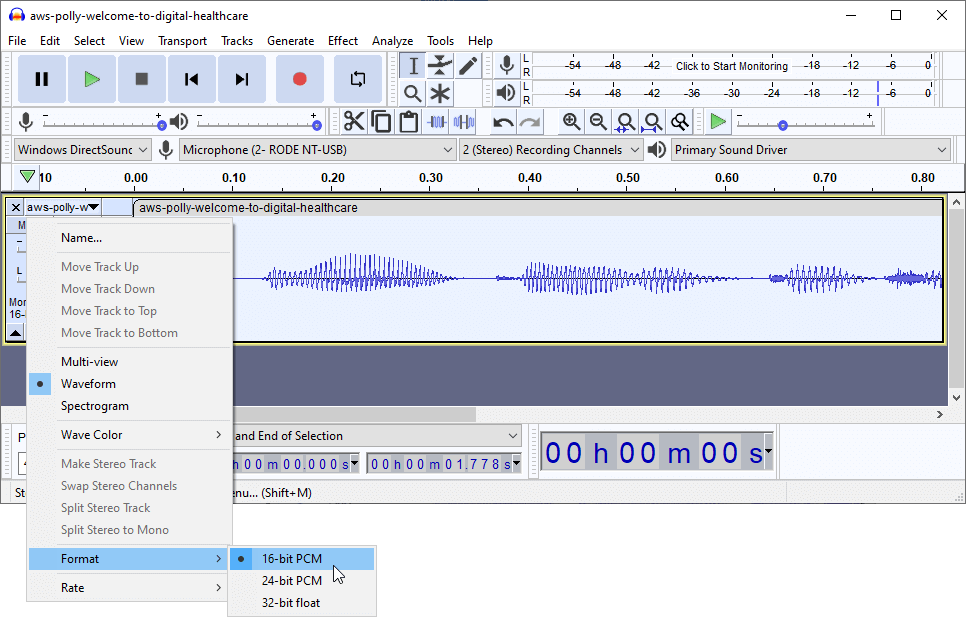
Change the Format to 16-bit PCM
Another requirement of Spark AR is the 16-bit PCM format. The generated mp3 file had a 32-bit float format. The easiest way to perform the conversion is by clicking the little down-arrow at the top of the track menu. Next, select Format > 16-bit PCM.
Export the Speech File as m4a
All conversions are done, now we only need to save the file in the format required by Spark AR.
Go to File > Export > Export Audio… If you are on a mac or have installed FFmpeg correctly, you will see the option of using M4A. For Spark AR, try to balance the quality with the file size; don’t go to the highest quality setting by default, as this could prevent you from distributing your finished project to Facebook or Instagram for larger projects.
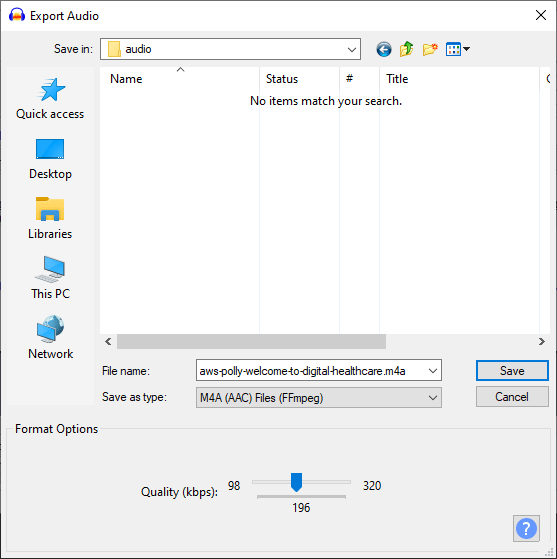
In the following dialog, you can keep the defaults. To save every bit of storage (Spark AR effects have extremely strict size limitations), you can delete the tag about the software. Check the exported m4a file if it still sounds correct. As additional check, you can download my generated and converted sound file and compare it with your results.
Possible Errors
I struggled for some time with the following error message “FFmpeg Error – Can’t open audio codec “aac” (0x11a)”:
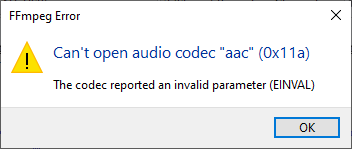
In this case – given that FFmpeg is correctly installed – you didn’t change the project sample rate to 44100 Hz in the lower left corner of Audacity. Make sure that both the project sample rate as well as the track sample rate are 44100 Hz.
Playing the M4A Sound File in Spark AR Studio
Now, create a Sharing Experience project in Spark AR. In the Assets panel in the bottom left corner, import the exported m4a file from your computer.
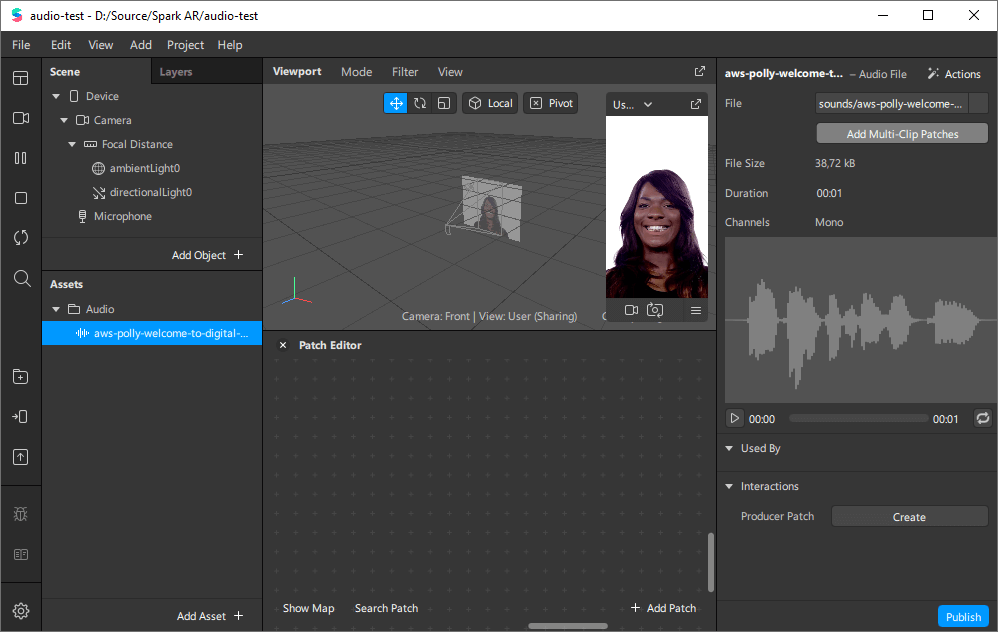
When selected, you see the audio file’s property in the properties panel on the right.
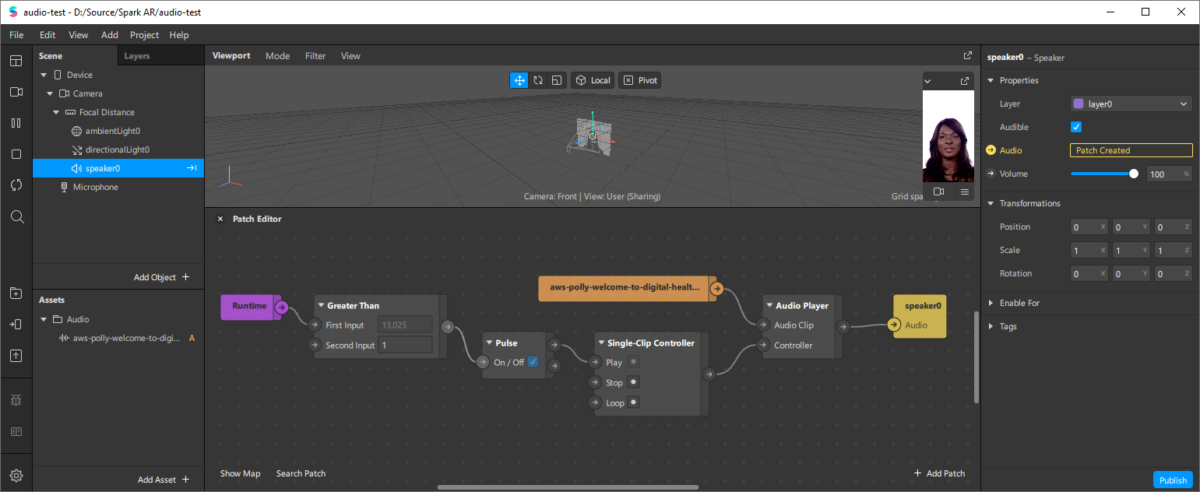
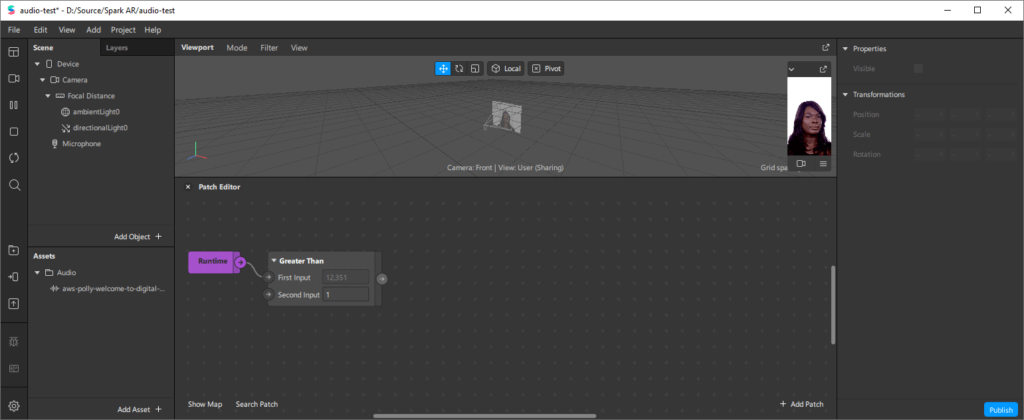
Let’s configure the project so that it plays the audio file shortly after the project starts. Activate the Patch Editor (e.g., through the Workspace > Show/Hide Patch Editor in the upper left corner).
Next, add the Runtime patch (purple) to the canvas. This patch outputs the time in seconds since the project started. Connect a Greater Than patch to its First Input. In the Second Input, enter “1” so that we start the audio after 1 second.
Adding the Sound File, Player, Controller and Speaker
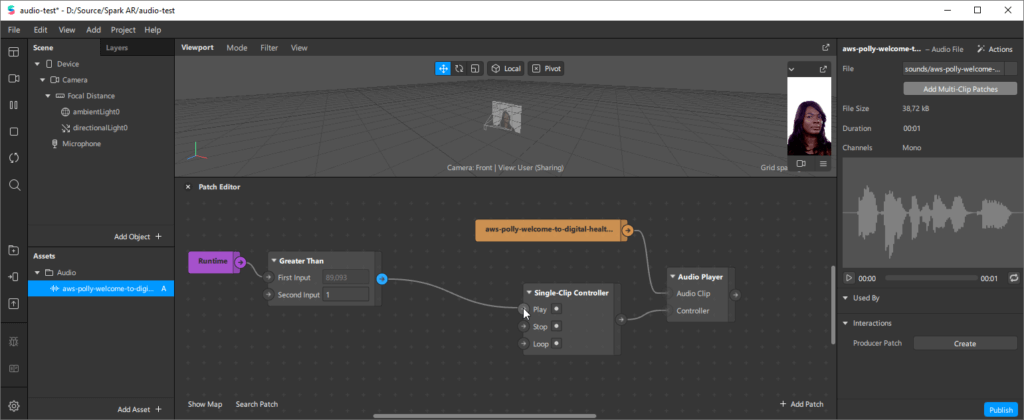
Next, drag the sound file from the Assets into your patch editor. It will get an orange highlight and has a single output. Connect that to an Audio Player patch; this in turn has a second input; choose the Single-Clip Controller. This patch can start playing the sound file when a specific event occurs.
Now, we simply need to connect the output of the Greater Than patch to the Play input of the Single-Clip Controller patch. This doesn’t work directly. However, if you just drag the line between the patches, Spark AR automatically inserts the required Pulse patch in the middle.
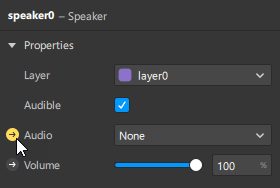
However, we still won’t hear anything. We still need to connect the patches to a speaker. In the Scene panel, under Camera, right click to Add Objects > Speaker. This adds a speaker0 object.
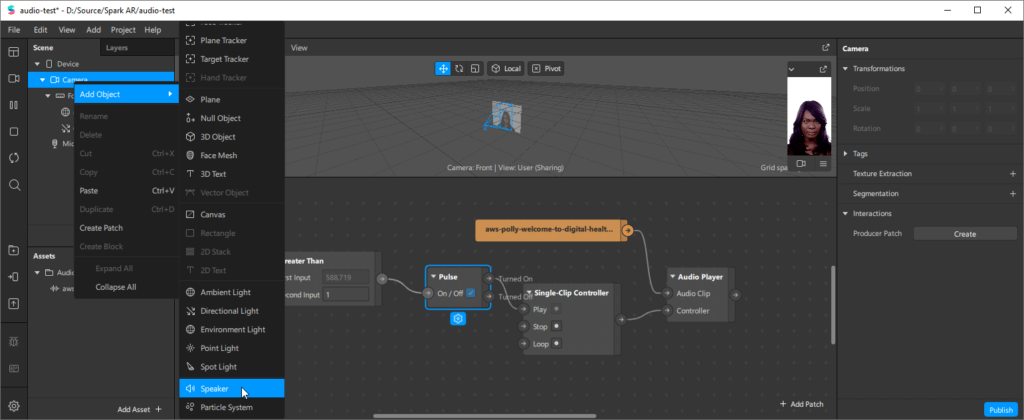
Make sure the speaker is selected in the scene. In the properties panel on the right, click the right-arrow next to Audio. This will insert an input patch into the Patch Editor.
The final step is to connect the Audio Player to the yellow speaker0 patch. To test, restart the scene from the icons on the left side. After one second, the neural speech file will start playing!

You must be logged in to post a comment.