With 2D image tracking, you can create real-life anchors. You need pre-defined markers; Google calls the system Augmented Images. Just point your phone at the image, and your app lets the 3D model immediately appear on top of it.
In the previous part of the tutorial, we wrote Unity scripts so that the user could place 3D models in the Augmented Reality world. A raycast from the smartphone’s screen hit a trackable in the real world, where we then anchored the object. However, this approach requires user interaction and a good user experience to guide users, especially if they’re new to AR.
Please accept YouTube cookies to play this video. By accepting you will be accessing content from YouTube, a service provided by an external third party.
If you accept this notice, your choice will be saved and the page will refresh.
Using 2D Image Tracking
You need to provide reference images, which your app’s users will then encounter in the real world. AR Foundation distinguishes these images and tracks their physical location.
Some usage scenarios where 2D image tracking is helpful:
- Recognition of real-world objects
- Automatically place information on top of objects
- Create an indoor info or navigation system
- Often quicker & easier than plan detection
There are some terms used in AR Foundation that you should know:
- Reference image: the 2D image (e.g., JPEG) to be found in the real world.
- Reference image library: a set of reference images.
- Provider: the image database implementation differs per provider (e.g., ARCore or ARKit)
Limitations of ARCore Augmented Images
As the actual implementation of the 2D image tracking is provided by the AR subsystem, different limitations apply depending on the platform you’re targeting. For Google’s ARCore, the most important properties are (read the full specs in the official documentation):
- Static, flat images
- At least 15cm x 15cm physical size
- Provide the width (in meters) for quicker pose & size estimates
- ARCore still updates its size estimation at run-time
- Occupy at least 25% of the camera frame at run-time to be detected
What kind of data source is supported?
- Max. of 1,000 reference images in an on-device database
- Multiple databases are supported, but only one can be active at the same time
- 20 of these reference images can be tracked simultaneously
- Support for adding images at run-time
- Only stores meta-information about images (~ 6 kB / image)
Providing Reference Images for 2D Image Tracking
For the smartphone to find an optical structure in the live camera view, it needs to be well visible and distinguishable. Try to achieve the following:
- Reference image resolution: 300 x 300px or more
- High contrast in the image
- Note: colors are irrelevant: images are automatically converted to grayscale
- Includes enough features (see a previous article about unique features and keypoints in AR scenarios)
- No repetitive features
ARCore itself contains an image quality tool in the Kotlin / Java / native C++ SDK, called arcoreimg. It’s not included in the Unity editor if you use AR Foundation. However, you can easily download the ARCore SDK for Android to use the command-line tool. It gives you an image quality estimate score with a max of 100 points. You should try to stay above 75 to get reliable tracking results. Some examples:
Score: 100 
Score: 0 
Failed to get enough keypoints
Scene Setup for 2D Image Tracking
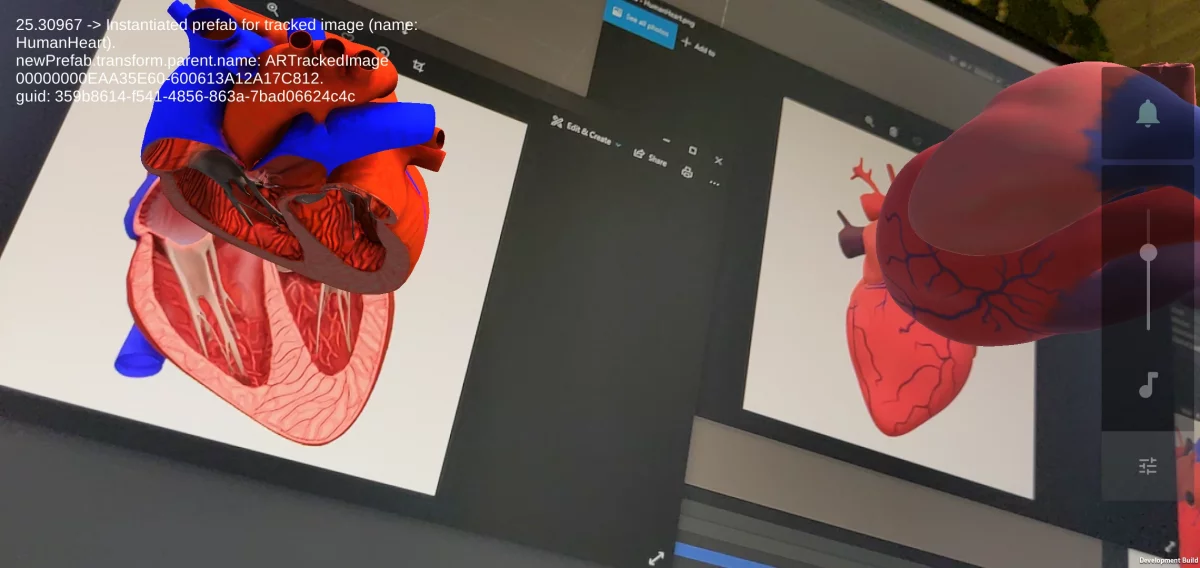
We want to track two images simultaneously. When our sample app detects a reference image in the real world, it places an (animated) 3D model on top of the marker.

Continue with the project from the previous part of the tutorial. You can of course always download the complete final project from GitHub.
As usual, also this feature needs a manager in AR Foundation. To get started, add the AR Tracked Image Manager to your AR Session Origin.
Reference Image Library
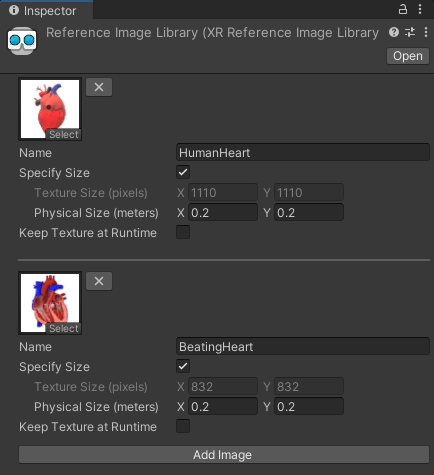
To provide all the reference images to Unity, select Assets > Create > XR > Reference Image Library. Place the library in an “images” folder to keep your project organized. Then, add the images you want to use as references in the same folder.
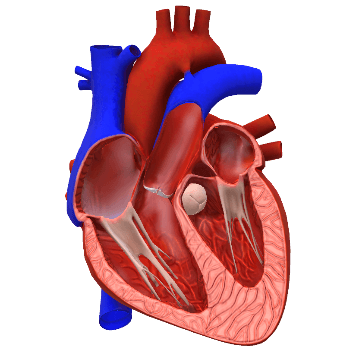
If you’d like to use the reference images and 3D models used in this tutorial, you can download them here. Microsoft originally released the models on the (now shut down) Remix3D platform under Creative Commons CC-BY-SA license. I’ve slightly modified the models (moved the pivot point) to make positioning in a 3D world easier and packaged them in a UnityPackage for direct import as prefabs.
Now, add both reference images to the reference image library through the “Add Image” button in the inspector. Next, you can set the following properties:
- Name: this is available at runtime to identify the reference image. It is not used by the subsystem though. The default name corresponds to the image name. Do not change it, our code expects the reference image name to correspond to the prefab name it’ll instantiate.
- Specify Size: the physical size of the image in the real world, in meters. This is optional for ARCore, but helps tracking.
- Keep Texture at Runtime: keeps a reference to the source texture. Only needed if you want to use the reference image as texture in your scene, not required for tracking. You can leave it unchecked.
Internals of the Reference Image Library
AR Foundation uses two different types of libraries: the editor creates an XRReferenceImageLibrary, which is not modifiable at runtime. This is automatically converted to the runtime version: RuntimeReferenceImageLibrary.
The actual image library data processing is provider specific. So, behind the scenes, Unity calls tools from the target platform SDK.
Warning: for Windows, do not use space characters in your Unity project directory name – otherwise, Unity will fail calling the tool to convert the image library using the command-line arcoreimg tool (tested with Unity 2021.1).
Note: starting with AR Foundation 4.2+, image libraries can be added via asset bundles.
3D Models for Tracked Images
Next, import the UnityPackage from the sample files of this tutorial. This will place the 3D models in a “Prefabs” folder in your Unity project. Alternatively, just use your own 3D models.
Tracked Images –> 3D Models
Add a new script ARPlaceTrackedImages.cs as component to the AR Session Origin. It will handle 2D image tracking.
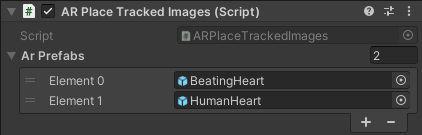
In contrast to the Unity AR Foundation sample, I’ve implemented a 1:1 mapping between markers and 3D models. This means that you assign a different 3D model to each marker. Matching is done via the reference image name and the prefab name.
To enable this behavior, simply start by creating a public array of prefabs:
public GameObject[] ArPrefabs;
Next, assign the prefabs you imported before through the Unity editor.
Additionally, our script should store a reference to the instantiated prefab for each marker. The string key of the dictionary will be the name of the reference image, which must correspond to the prefab name.
private readonly Dictionary<string, GameObject> _instantiatedPrefabs = new Dictionary<string, GameObject>();
React to Changes of Tracked Images
The AR Tracked Images Manager provides an event for changes to tracked markers. Get the component in Awake() from the AR Session Origin (both the AR Foundation manager and our new script are attached to it). Subscribe to changes in OnEnable() and remove the subscription in OnDisable().
// Cache AR tracked images manager from ARCoreSession private ARTrackedImageManager _trackedImagesManager;

void Awake() {
    _trackedImagesManager = GetComponent<ARTrackedImageManager>();
}

void OnEnable() {
    _trackedImagesManager.trackedImagesChanged += OnTrackedImagesChanged;
}

void OnDisable() {
    _trackedImagesManager.trackedImagesChanged -= OnTrackedImagesChanged;
}
The changes you get can have 3 possibilities, informing your script what changed since the last event was sent:
- Added: only called once when a new tracked image was found.
- Updated: check for the tracking state and hide your 3D model when needed. If the status is limited, this means that you’d have poor tracking or are not tracking at all if the reference image is not seen on the screen.
- Removed: hide or delete your 3D model.
Handle new Tracked Images: Instantiate Prefab
The following listing contains the first part of our event handler method. Whenever our app discovers a new tracked image, our logic instantiates the prefab (if we do not already have an instance in our scene):
First, we go through the list of all added tracked images. Then, we get the name of the reference image (that was set in the AR Reference Image Library; it automatically corresponds to the file name if you didn’t change it).
Next, we go through the array of prefabs our handler script can instantiate. It compares the name of the prefab to the name of the reference image. If we have not instantiated this prefab so far and found a prefab with the same name as the reference image, our script continues with instantiating the 3D model.
The AR Tracked Images Manager creates a GameObject with the ARTrackedImage script attached for each new marker it is tracking (see the AR Foundation documentation for details). This is what we get through the trackedImage variable we retrieve from eventArgs.added.
As the first parameter for the Instantiate() method, we provide the matched prefab (variable name: curPrefab). The second parameter is the trackedImage.transform. This automatically makes the auto generated ARTrackedImage the parent of our instantiated GameObject. Going forward, the translation and rotation of our instance will automatically be applied in accordance with its parent, which is glued to the 2D image tracked in the real world. This corresponds to the recommended method from the docs.
With this method, we do not need to manually update the position of our instance each frame. You can also do this manually, as seen in the AR Foundation Demo on GitHub.
Updated & Removed Images
Next, let’s handle updated and removed tracked images. Add these two foreach-loops to our OnTrackedImagesChanged() method:
In case AR Foundation updates the tracking state, this usually means that the reference image is no longer visible in the live camera stream, or it got visible again. If the item is not in TrackignState.Tracking, we set our 3D model GameObject to inactive, so that it’s no longer visible and doesn’t waste resources.
As for removed images: this is a bit unclear. At least with ARCore it seems that the subsystem doesn’t remove tracked images at all; they will just stay in the TrackingState.Limited. If the subsystem does want to completely abandon the tracked image, it would remove the ARTrackedImage it instantiated (and which it manages automatically). As our GameObject is a child of that, it’d get deleted automatically.
Therefore, we only need to set our prefab to “not active” in case the tracked image is removed. The GameObject should get deleted automatically by AR Foundation. However, this would still occupy the place in our _instantiatedPrefabs dictionary, preventing a new instance to appear in the scene. Therefore, we can still remove “our side” of the instance: the instantiated GameObject from the scene as well as the entry in the C# dictionary. We do not delete the ARTrackedImage, as this was created and is managed by AR Foundation.
Conclusion & Next Steps
In our tutorial, we’ve gone from creating a project to a powerful AR application. It lets users place objects on tracked structures in the Augmented Reality environment. Additionally, the demo project automatically instantiates 3D models according to tracked 2D images based on reference images seen in the user’s environment.
Of course, there are a lot more AR features to explore. You can add environmental HDR lighting support to your scene. And of course, use many additional AR features to make your app stand out even more.
Most important is however to achieve great usability. The AR Foundation Demos example by Unity contains nice-looking UI assets that guide the users through the process of the phone orienting itself after starting the app.
AR Foundation Article Series
A hands-on tutorial which guides you through your first AR Foundation app. Start with a new Unity 3D project. Understand its architecture with trackables and managers. Use Plane and Point Cloud detection. Perform raycasts and create anchors in the real world or on planes. Plus: place 3D models on printed 2D images that your app tracks in the real world.