Learn how to access a cloud-based NoSQL database from Node.js. The Azure Cosmos DB stores documents (e.g., JSON) and allows scaling for improved performance plus geo-redundancy with one click. The access interface also allows well-known SQL queries.
This guide uses the latest Azure Cosmos DB JavaScript module (released as final version just 17 days ago). Additionally, this article is based on the ES 2017 standard. The async / await syntax makes the code short and readable. In contrast to many other tutorials, this article focuses on the minimum code required to understand the concepts.
The complete source code of this article is available on GitHub.
Cloud-Based NoSQL Database?
Databases are a tricky part of servers: it’s easy to get started with a traditional MySQL database hosted locally on your web server.
But, once your app grows bigger, the database server quickly reaches enormous resource requirements. Scaling is difficult and changing the database structure of a production system is risky.
Especially for innovative products that quickly evolve based on user centered design, it can be difficult to continually adapt a traditional relational database. If new versions of your app need new columns in a table, you need to upgrade the schema – potentially causing problems for older versions of your app.
NoSQL databases that store data as JSON are typically easier to adapt to new requirements. Also, scaling the server resources to match growing demand is done through a single click with cloud-based databases.
The Azure Cosmos DB is a flexible backend, as it supports multiple protocols. It doesn’t lock you in to a specific API – you can choose whichever best matches your demands. Simple operations are directly handled by JavaScript methods through ready-made APIs. In addition, you can use queries based on SQL, MongoDB, Apache Cassandra and more.
Start: Node.js Server with Express
In this article, we’ll create an Azure Cosmos DB server and a simple Node.js app that interacts with the cloud database.
First, create a new Node.js project using npm init. Choose the name “db-client” and accept the defaults for the other questions. Next, add the express module to simplify handling HTTP requests.
npm install express
Finally, use Visual Studio Code to open the directory and create an index.js file. Copy and paste the following boilerplate code:
Save the file. Then, start the server using “node index.js” and open “http://127.0.0.1:3000/” in your browser. It should display the “Hello DB!” message.
Azure Cosmos DB
Now that the basics are in place, we can set up the Cosmos DB database. First, let’s look at the basic database structure:
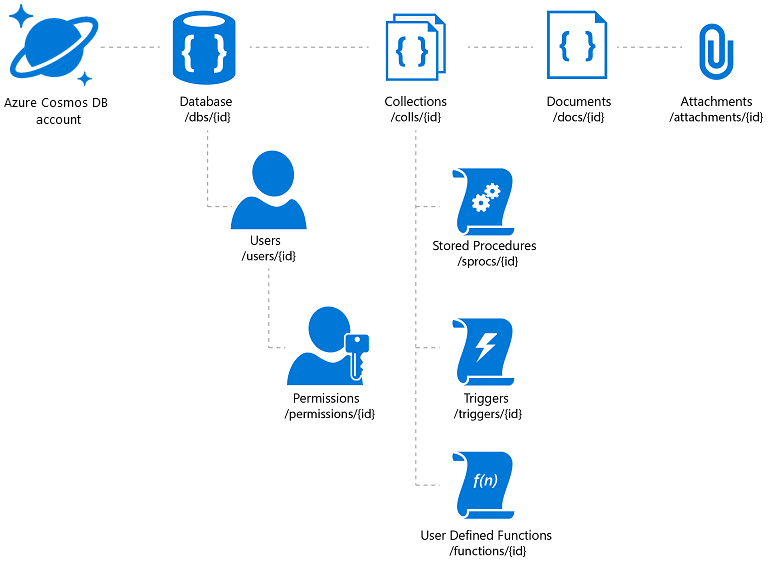
- A Cosmos DB account can have multiple databases, with their respective users and access permissions.
- Each database is then organized into collections, which are containers for the actual documents you store. The collection can also contain logic or automated triggers for the entries.
- The actual documents are usually JSON files. Optionally, you could also add attachments; we don’t need these in our example.
Create a Cosmos DB
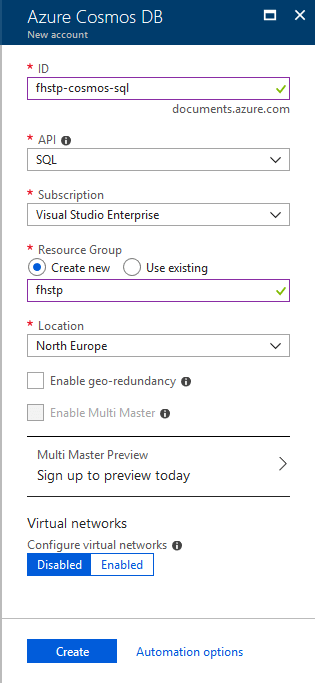
Sign into your Azure account and create a new “Azure Cosmos DB” resource. Set the following properties:
- ID: up to you. It’s the access URL your app will use to load the data, so think wisely.
- API: SQL
- Subscription: if you don’t already have an Azure account, you can try Cosmos DB for free without the need for a credit card.
- Resource group: generate a new resource group and give it a name. You should group related services together.
- Location: closest to where the main counterpart (server) of your database is located. Right now, we’ll access the database from our own computers, so choose a region close to you.
It’ll take a few minutes until your Cosmos DB is up and running.
Cosmos DB Configuration
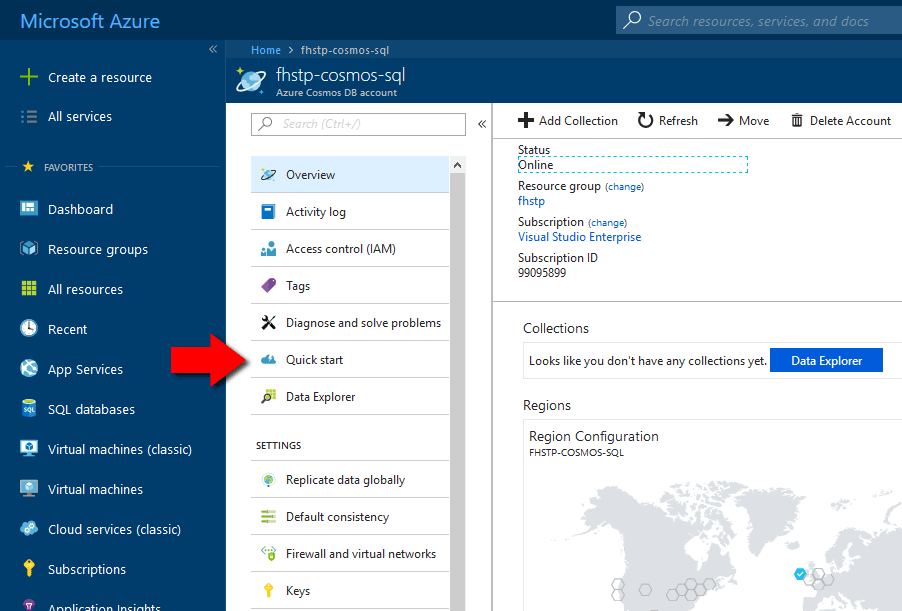
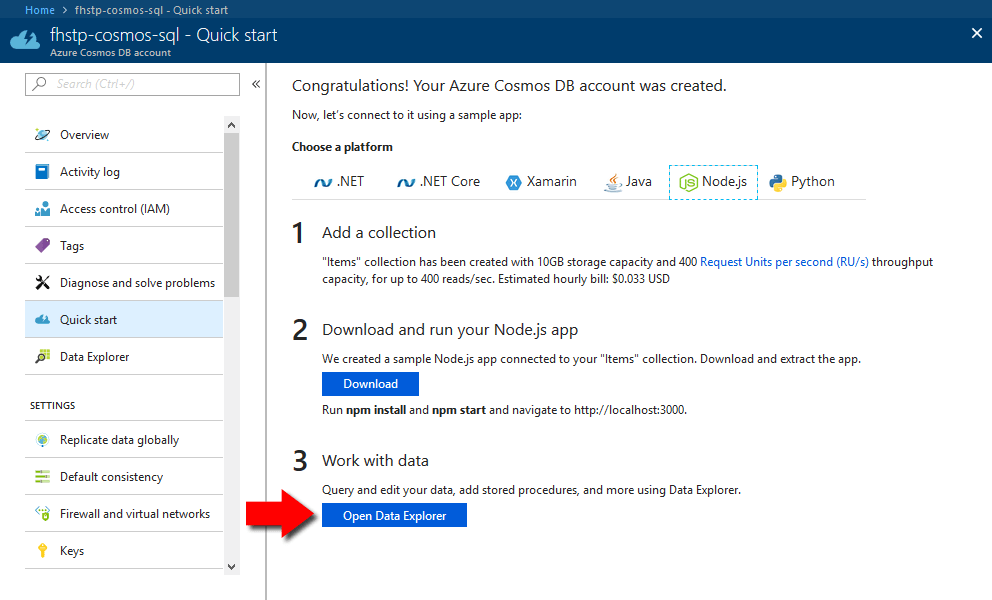
Now, it’s time to set up your database. The easiest way to generate a default structure is launching the “Quick start”.
In the wizard, select “Node.js” as the platform and click on “Create ‘Items’ collection”. This generates a sample structure.
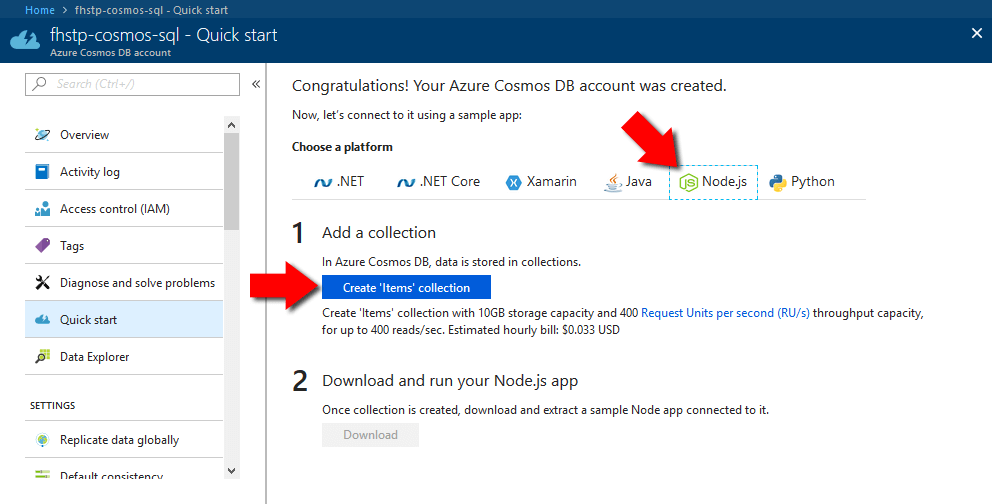
We don’t need the sample Node app. Instead, we will write the code ourselves – using the latest Cosmos DB SDK and with ES 2017 features. Therefore, skip Step 2 and go right to “3) Work with data” > “Open Data Explorer”.
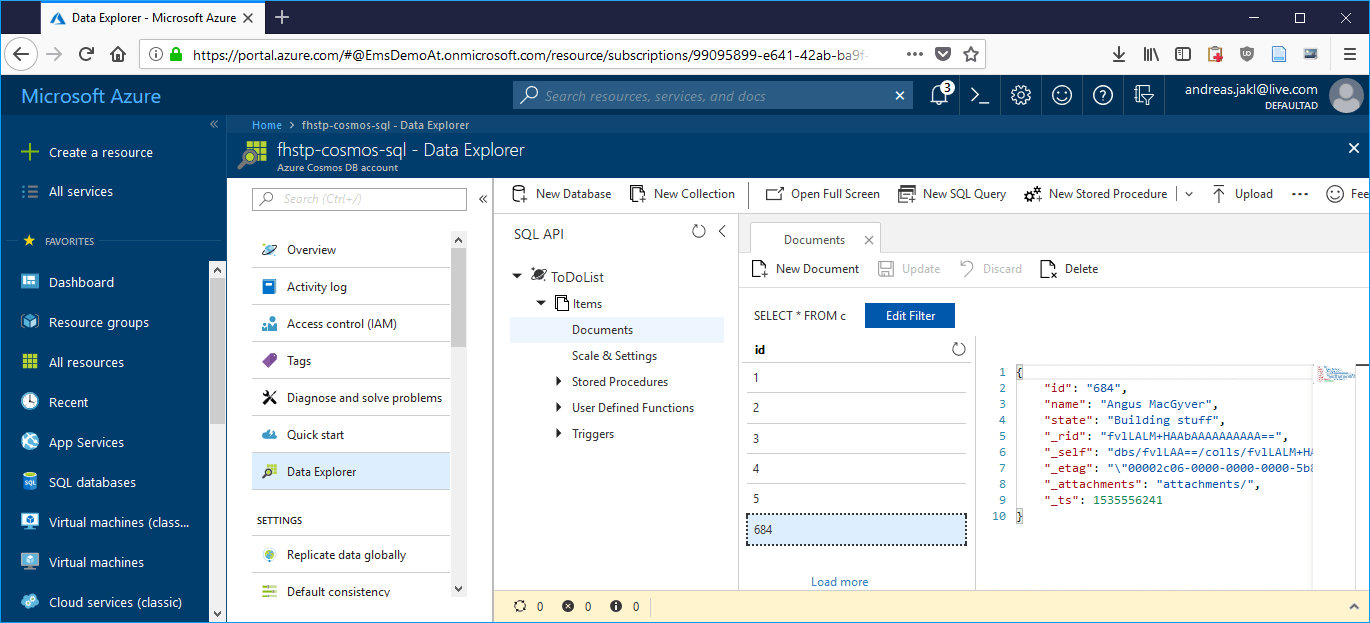
Once you’re in the Data Explorer, go to “Documents” (1), click on “New Document” (2), copy and paste some JSON documents (3) and then click on “Save” (4). For our example, use numeric IDs and add some other properties, like a name and a state (e.g., a number or what that person is doing right now – “building stuff”, “coding”, …).
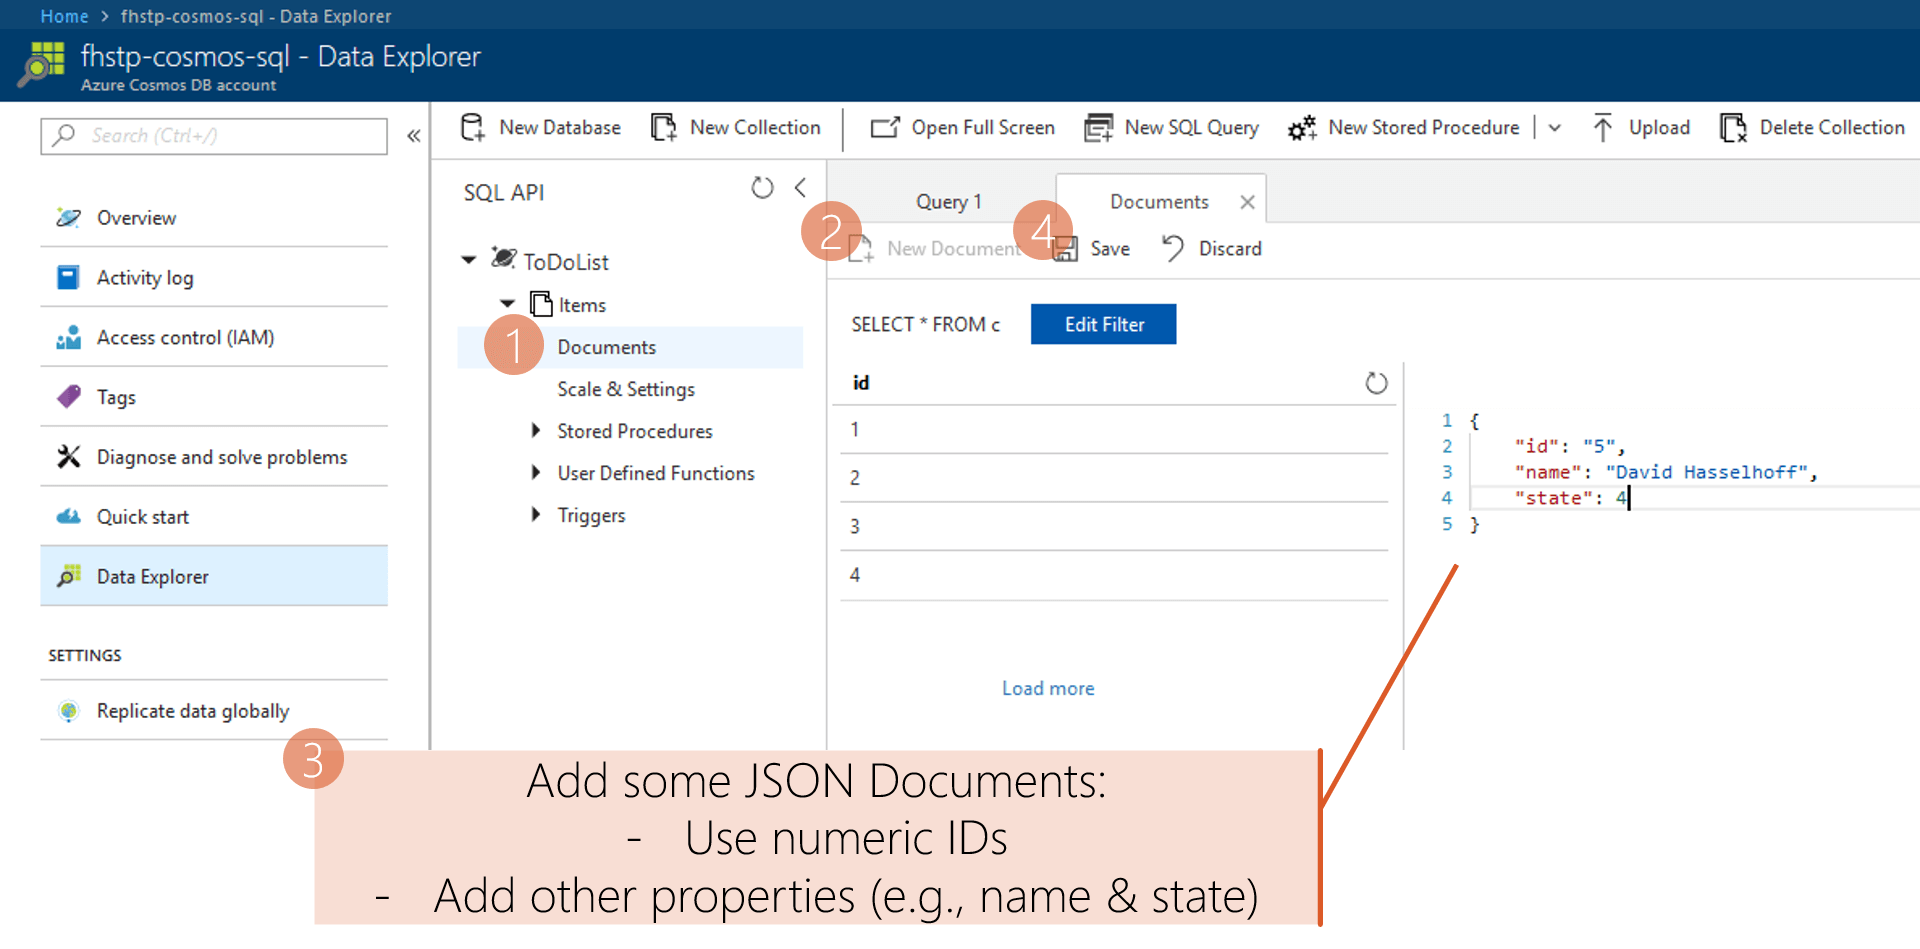
Try to add at least 3-4 different entities, so that queries make sense.
Cosmos DB will automatically add some additional properties to the JSON documents (“_rid”, “_self”, “_etag”, “_attachments”, “_ts”). As you can see, they all start with an underscore. Most of these are generally not relevant to you. The internal timestamp is stored in “_ts” with Unix Timestamps.
SQL Database Queries from NoSQL
Before we get to accessing the database from Node.js, you can play around with SQL queries directly in the Azure interface. Click on “New SQL Query” (5), enter a query text and click on “Execute Query” (6). You could try the following queries:
SELECT * FROM c
SELECT * FROM c WHERE c.state=2
SELECT * FROM c WHERE STARTSWITH(c.name,"A")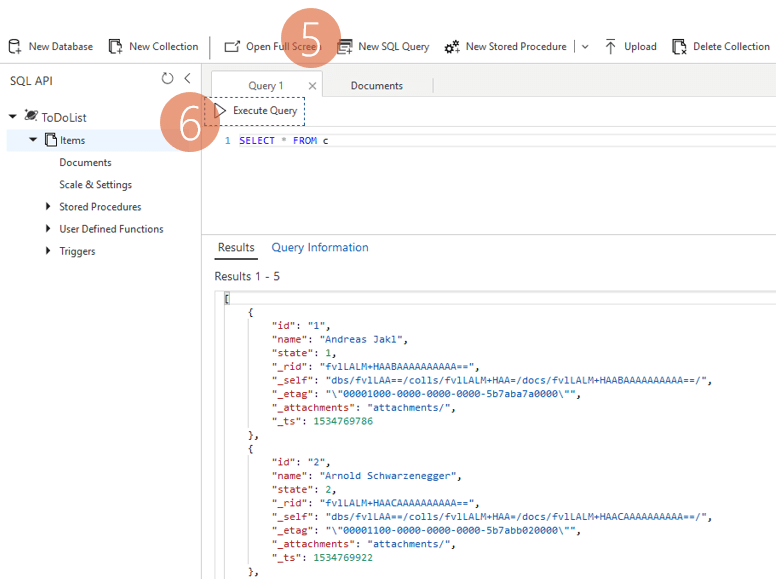
Cosmos DB Access with Node.js
In this part, we’ll use some JavaScript functionality like async / await that’s new in JavaScript ES 2017 / Node.js 7.6+. If you have not used this syntax before, read the refresher article.
First, add the node module for the database client. If you’re interested, its source code is available on GitHub.
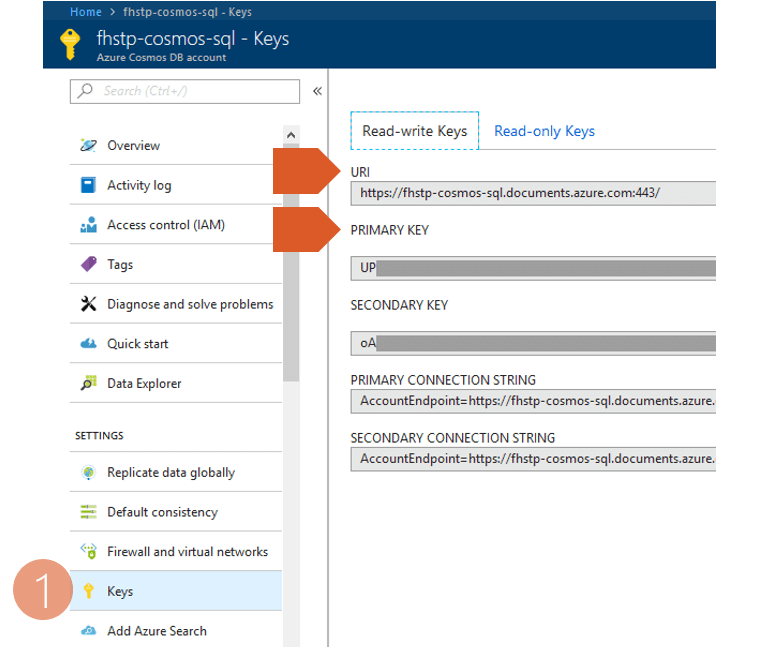
npm install @azure/cosmosNext, make sure you get your keys and the URI to access the database. These can be found in the “Keys” section of the Cosmos DB in Azure (1). Copy the “URI” and the “Primary Key”.
Initialize the Cosmos DB
Go back to Visual Studio Code. We’ve already added a route for the root path (‘/’). Note that the handler Arrow Function is marked with the async keyword. This is necessary, as database operations are asynchronous and we will use await to keep the code clear and easy.
But before we get to interacting with the cloud database, we need to configure everything. Adapt the existing route to look like the following:
First, the code imports the CosmosClient module. You can also place this require statement at the beginning of the JavaScript file.
As we used the quick start to generate a database and a container for us, the default names are “ToDoList” and “Items” respectively.
The next few lines simply configure everything we need to access the data. Make sure you replace the endpoint URI and the authkey with the values you copied before.
The final part instantiates the Cosmos DB client based on the connection configuration defined before.
Connect to the Cosmos DB
Any interaction with the Cosmos DB can cause an exception. The internet connection might be down, your access credentials could be wrong.
Therefore, we surround the database interaction code with try / catch. In the catch-block, we log the error to the console. Additionally, we send the “Internal Server Error” (500) code to the user’s browser, together with the main text of the error message.
But let’s stop talking about errors, let’s get to the code that could potentially cause them! Line 3 is a risky one: we try to open a reference to the database by specifying its ID. In case the database doesn’t exist yet, we automatically create it.
In many real-life scenarios, you’d probably want to report an error in case the database isn’t here. That would be a serious issue for your app. As we’re just exploring the Cosmos DB, it makes sense that our client creates the database in case anything else went wrong during the previous steps.
Retrieve Cosmos DB Container
Corresponding to the Cosmos DB architecture overview, after retrieving the database, we need to get the container. The container then contains the documents (JSON items).
const { container } = await database.containers.createIfNotExists({id: containerId});The assignment of the results to the container variable is a recent feature introduced in ES2015: object destructuring. It directly binds variables to properties of an object. You could also write it as follows – same results, but more code:
const coResponse = await ...
const container = coResponse.container;
Add JSON Documents to Cosmos DB
After connecting everything, this is the first exciting part: adding an item to the database from code!
First, the code creates a random item ID. Next, the variable documentDefinition collects all items that should be part of the JSON document.
For storing the item to the database, we use an API function of the JavaScript API. This allows directly using a JavaScript object as parameter. You don’t need to worry about building the SQL query or any security issues related to those.
Also, the item creation is asynchronous. Thus, we use the await keyword again to ensure that our code only continues execution once the results of the operations are in.
If everything worked fine, you can immediately go to the Azure Data Explorer to see your new item. That’s helpful to check the results immediately!
Retrieve JSON Documents
Of course, now that we created the item, we also want to see how we can retrieve it again from code. This time, we’ll use an SQL query. They work the same way as in our previous tests through the web portal.
This is the straight-forward way to retrieve the item based on its ID, which was the random number we generated when creating the item:
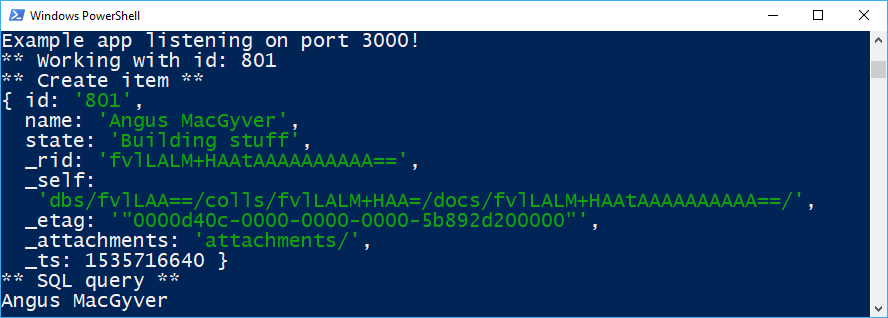
The API function to execute any SQL statement is just called “query”. To print the returned items, you can simply convert the returned data to an array and then print the name of the result. Your console output should look like the following so far:
Recap: HTML GET Parameters
The code to retrieve the item works. However, it’s not the safest variant and you shouldn’t do it that way. Why is that?
Somehow the new data needs to be transmitted from the user or a sensor to the Node.js server, which then interacts with the database. A usual way to do so for simple updates is the GET parameter.
Quick recap of GET requests: the parameters are sent as part of the URL. The first query is added to the URL with “?”. Multiple query strings are then separated with “&”. It’s typical to have a format of “field=value”. Special characters are encoded through URL encoding.
The route handler in Express provides easy access through the req parameter. An example for another route named ‘/db’:
app.get('/db', async (req, res) => {
  // Access query parameters from GET request
  // If not specified, the variable will be 'undefined’
  console.log("Sensor name: ", req.query.sensorname);
  console.log("Sensor value: ", req.query.sensorvalue);
The code works like this:

SQL Injection Attacks
So, there is an easy way to retrieve data to add to the database. But: can you trust what’s being sent to you? It’s often not too difficult for users to modify the query string to the following (with URL encoding):
http://127.0.0.1:3000/db?username=%27%20OR%20%271%27=%271The parameter looks strange due to its URL encoding. But simply replacing the % encoded characters with the normal characters, this reveals the following “username”:
' OR '1'='1Now, let’s combine that with our previous approach of retrieving an item from the database. In this case, we use the query parameter instead of the random number:
As you can see, the parameter is directly inserted into the SQL query. Which in turn then says: “get me all the items from the database where the name is empty or 1=1”.
Of course, “1=1” is always true, so the query will ultimately return all items from your database – even though you only intended to get one! If you directly show the results to your users, they’d see everything in your database.
Prevent SQL Injection, I: Escaping
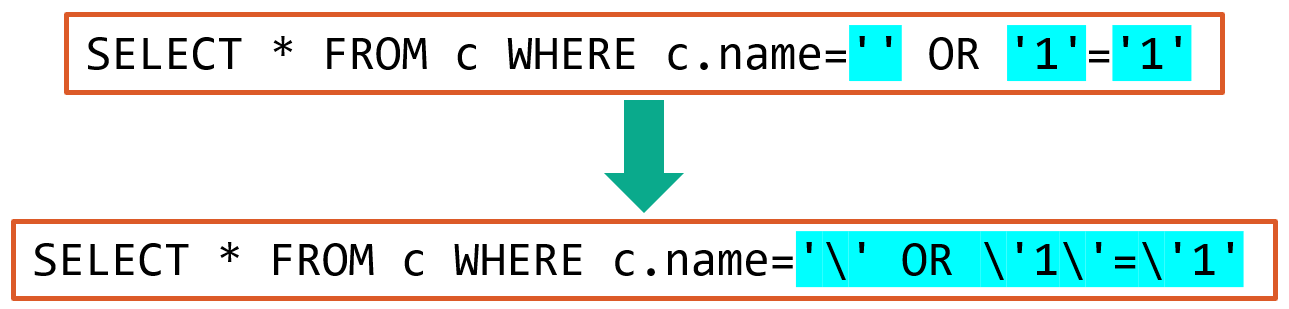
The most straight-forward way to prevent SQL injection attacks is to escape data strings before feeding them into the SQL queries. This turns characters with a special meaning into escaped variants.
Thus, the user would be unable to add new code to your SQL query – the parameter would always remain a simple string. A “ character is transformed to \”, or the ‘ char to \’.
How to use this in Node.js? The framework has a built-in module for working with query strings. You don’t need to install it, but you need to load it. Add the following at the beginning of your Node.js script:
const querystring = require('querystring');Then, to escape the parameter in your code, use:
const queryResponse = await container.items.query("SELECT * FROM c WHERE c.id='" + querystring.escape(newItemId) + "'").toArray();That sounds fine, and it is pretty safe. But, it’s easy to forget escaping parameters in code! Especially in more complex application where data gets sent between services, you often don’t know if the data has already been escaped or not and if you should do it now.
Prevent SQL Injection, II: Parameterizing
There is a better way: you parameterize the SQL query. Instead of directly constructing a string that contains the whole SQL query and sending that to the server, you use placeholders.
These placeholders are marked with the @ character in the SQL query. Then, you supply the parameter values through an extra array.
The API transmits those separately to the database server, which then knows that your username is only a single value and can’t magically contain additional SQL commands.
Your code would look like this. I highlighted the three major items in different background colors so that it’s easier to see where they’re used.

Do we need to use this method for our sample code? Sure, you can. As we generated the item ID ourselves in code and use that directly, there’s no way for the user to modify it, though. But it’s always good practice to at least escape the values. This prevents issues if the string should contain any special characters that you didn’t think about.
Delete Items & Read All Cosmos DB Documents
Now that we know how to work with SQL queries, let’s finish this example and add two operations:
- Delete the newly created item again
- Retrieve all items from the database to confirm that the item is gone
Of course, these operations would be possible via SQL queries as well. But, as these are directly supported by the Cosmos DB JavaScript API, it’s easier to use the dedicated functions:
The first part deletes the item by calling the delete() function on the item that is retrieved through its ID. To confirm, the API returns a response that contains the ID of the deleted item.
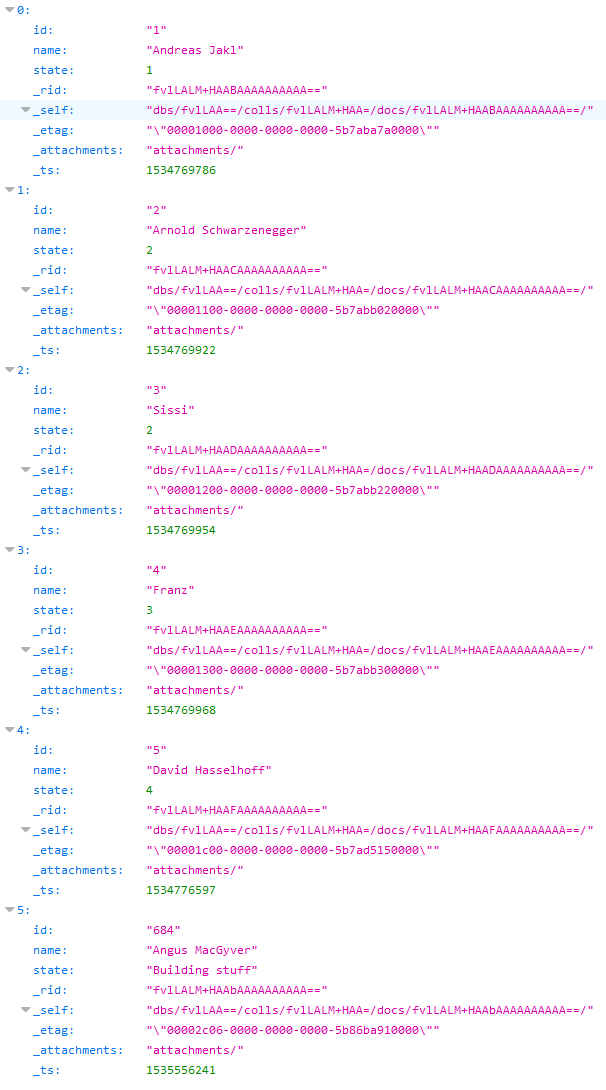
Next, through the readAll() function, we query all items from the container and send these as the response to the user’s web browser.
Conclusion
In this article, you learned the basics about:
- Setting up a web server with Node.js and Express
- Creating a cloud-based NoSQL database with Azure Cosmos DB
- Using the Azure web portal to work with JSON documents in the database collection
- Connecting to the Cosmos DB using the new JavaScript API
- Adding, querying, deleting and reading all JSON items from the database
- Working with database items using ES2017 features like async & await
- Preventing SQL injection attacks through parameterized SQL queries with Cosmos DB
That’s quite a lot! In case something didn’t work on your computer, check the finished code example on GitHub.
Next Steps
To further experiment, I suggest combining all the information from this article to create a solution for sensor data logging – e.g., for logging regular heart rate or machine data measurements.
Send the current sensor reading to the server through GET parameters. These are easiest to play with from the browser. Use multiple query parameters, e.g., sensorname and sensorvalue. The URL to add a measurement to the database with a new addmeasurement route in Express could look like this:
http://127.0.0.1:3000/addmeasurement?sensorname=heartrate&sensorvalue=95
Next, add a new JSON item to the database containing the data. Use the parametrized variant of the SQL query to prevent SQL injection attacks. Additionally, add a timestamp to the stored data (using the Node.js server’s time) when creating the item.
Once you have that running, you should have a good understanding of how to work with a cloud-based NoSQL database using traditional SQL-based queries!