In this article, you will learn how to add NFC tag reading to an Android app. It registers for auto-starting when the user taps a specific NDEF NFC tag with the phone. In addition, the app reads the NDEF records from the tag.
NFC & NDEF
Apple added support for reading NFC tags with iOS 11 in September 2017. All iPhones starting with the iPhone 7 offer an API to read NFC tags. While Android included NFC support for many years, this was the final missing piece to bring NFC tag scenarios to the masses.
A quick recap of NFC:
- Short-range wireless communication technology: NFC instantly transmits data over <1 cm (real-life). Thus, it’s easier to say “tap” something.
- Transmission speeds are slow: the maximum is 424 kbit / sec. Sending an image over NFC would take minutes. So, NFC is only used for short transactions (authentication, room access, payments), and as a trigger for other actions (open web sites, pair with Bluetooth or Wi-Fi).
NFC Operation Modes
Fully NFC capable phones support 3 modes of operation:
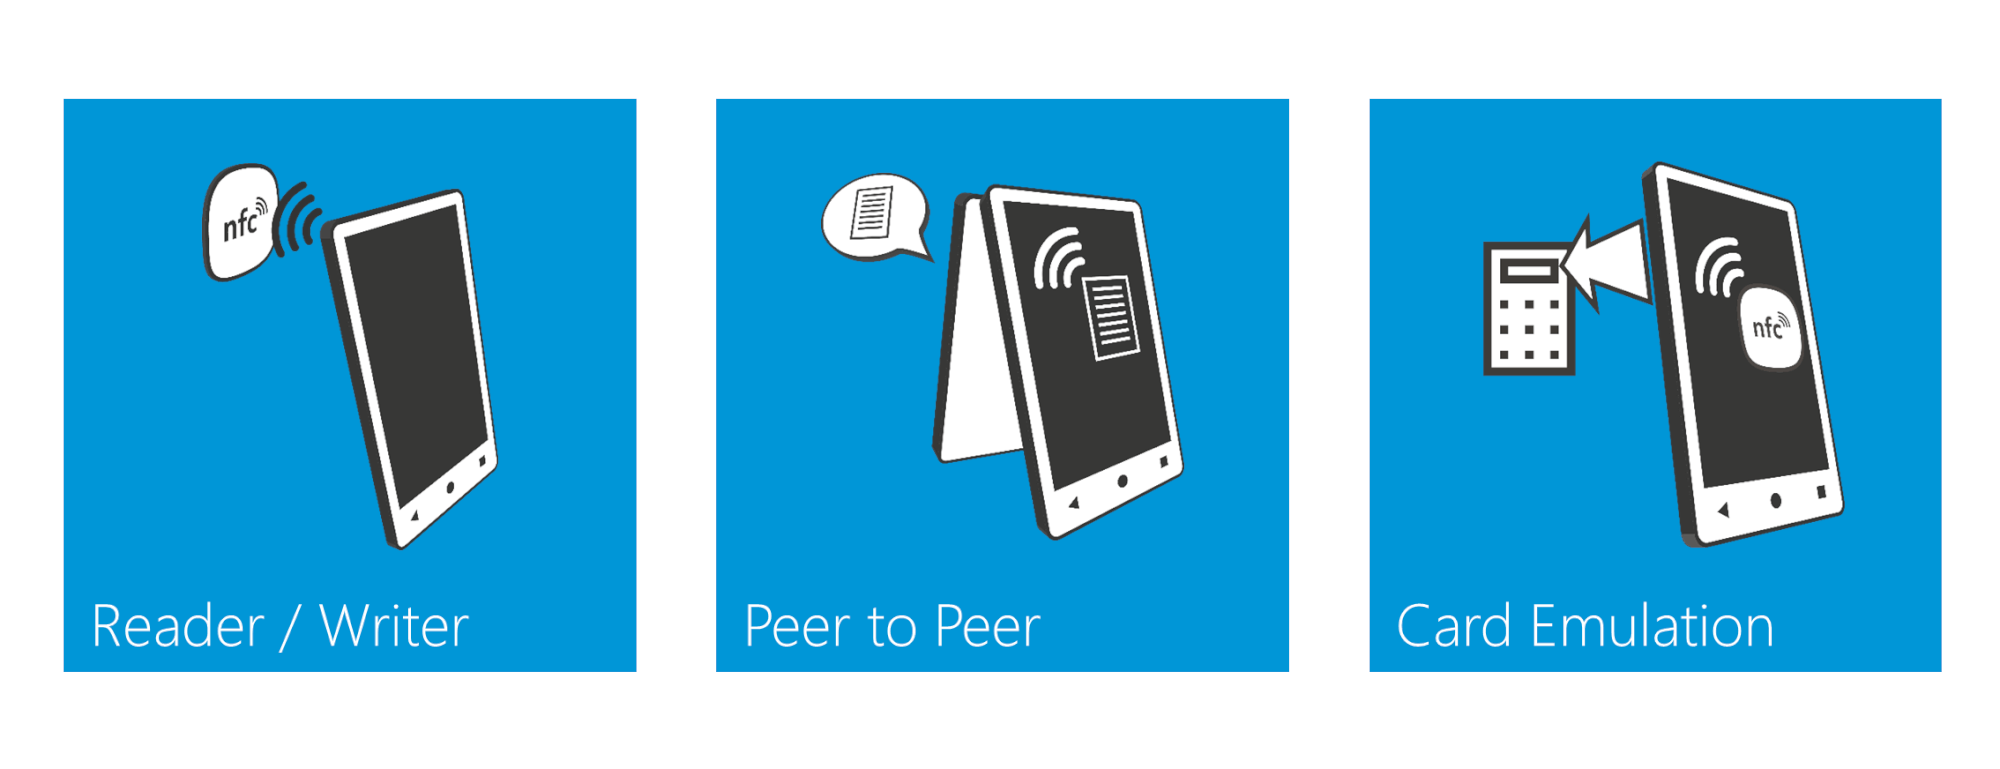
- Reader / Writer: the phone reads data from an NFC tag or writes data back to it. The Core NFC API of Apple only supports reading open NFC tags containing NDEF messages. Android phones usually allow reading and writing, giving full access to the tag.
- Peer to Peer: transmit data directly from one phone to another. Android uses the standardized SNEP protocol (Simple NDEF Exchange Protocol). Google created the branding “Android Beam” for this.
- Card Emulation: the phone simulates an NFC tag / a smart card. To an external reader device, it could appear like an NFC enabled credit card. This traditionally required dedicated hardware (a “Secure Element”). Now, it’s also possible to simulate the card from apps.
NFC Tags & NDEF
5 different NFC tag types have been standardized by the NFC Forum. Which one you need depends on various factors: features (encryption), memory size, speed and cost.
A common choice for standard use cases is the NXP NTAG, which is an NFC Form Type 2 tag. It’s available in configurations from 144 to 888 bytes user memory.

An NFC tag contains a small storage area for bytes. The NFC Forum standardized a content format called NDEF (“NFC Data Exchange Format”). iPhones only support NFC tags that contain NDEF messages. Android fully supports NDEF messages, but also gives you additional options (e.g., low-level tag access).
What’s inside NDEF? A tag can contain one or more NDEF messages. Given how small the storage area is, I’ve never seen more than one message on a tag in practice.
An NDEF message is composed of 1+ NDEF records. These contain the payload. Depending on the record type, it can be standardized content – like URLs, text, MIME types or handover information. Additionally, it’s possible to define custom content formats.
Create an NFC Tag
Buy some NFC tags to experiment with. Many specialized NFC stores (like GoToTags) offer starter kits. These contain a variety of tag types, in different physical forms.
To write to an NFC tag, you need an Android or Windows device. I recommend these apps:
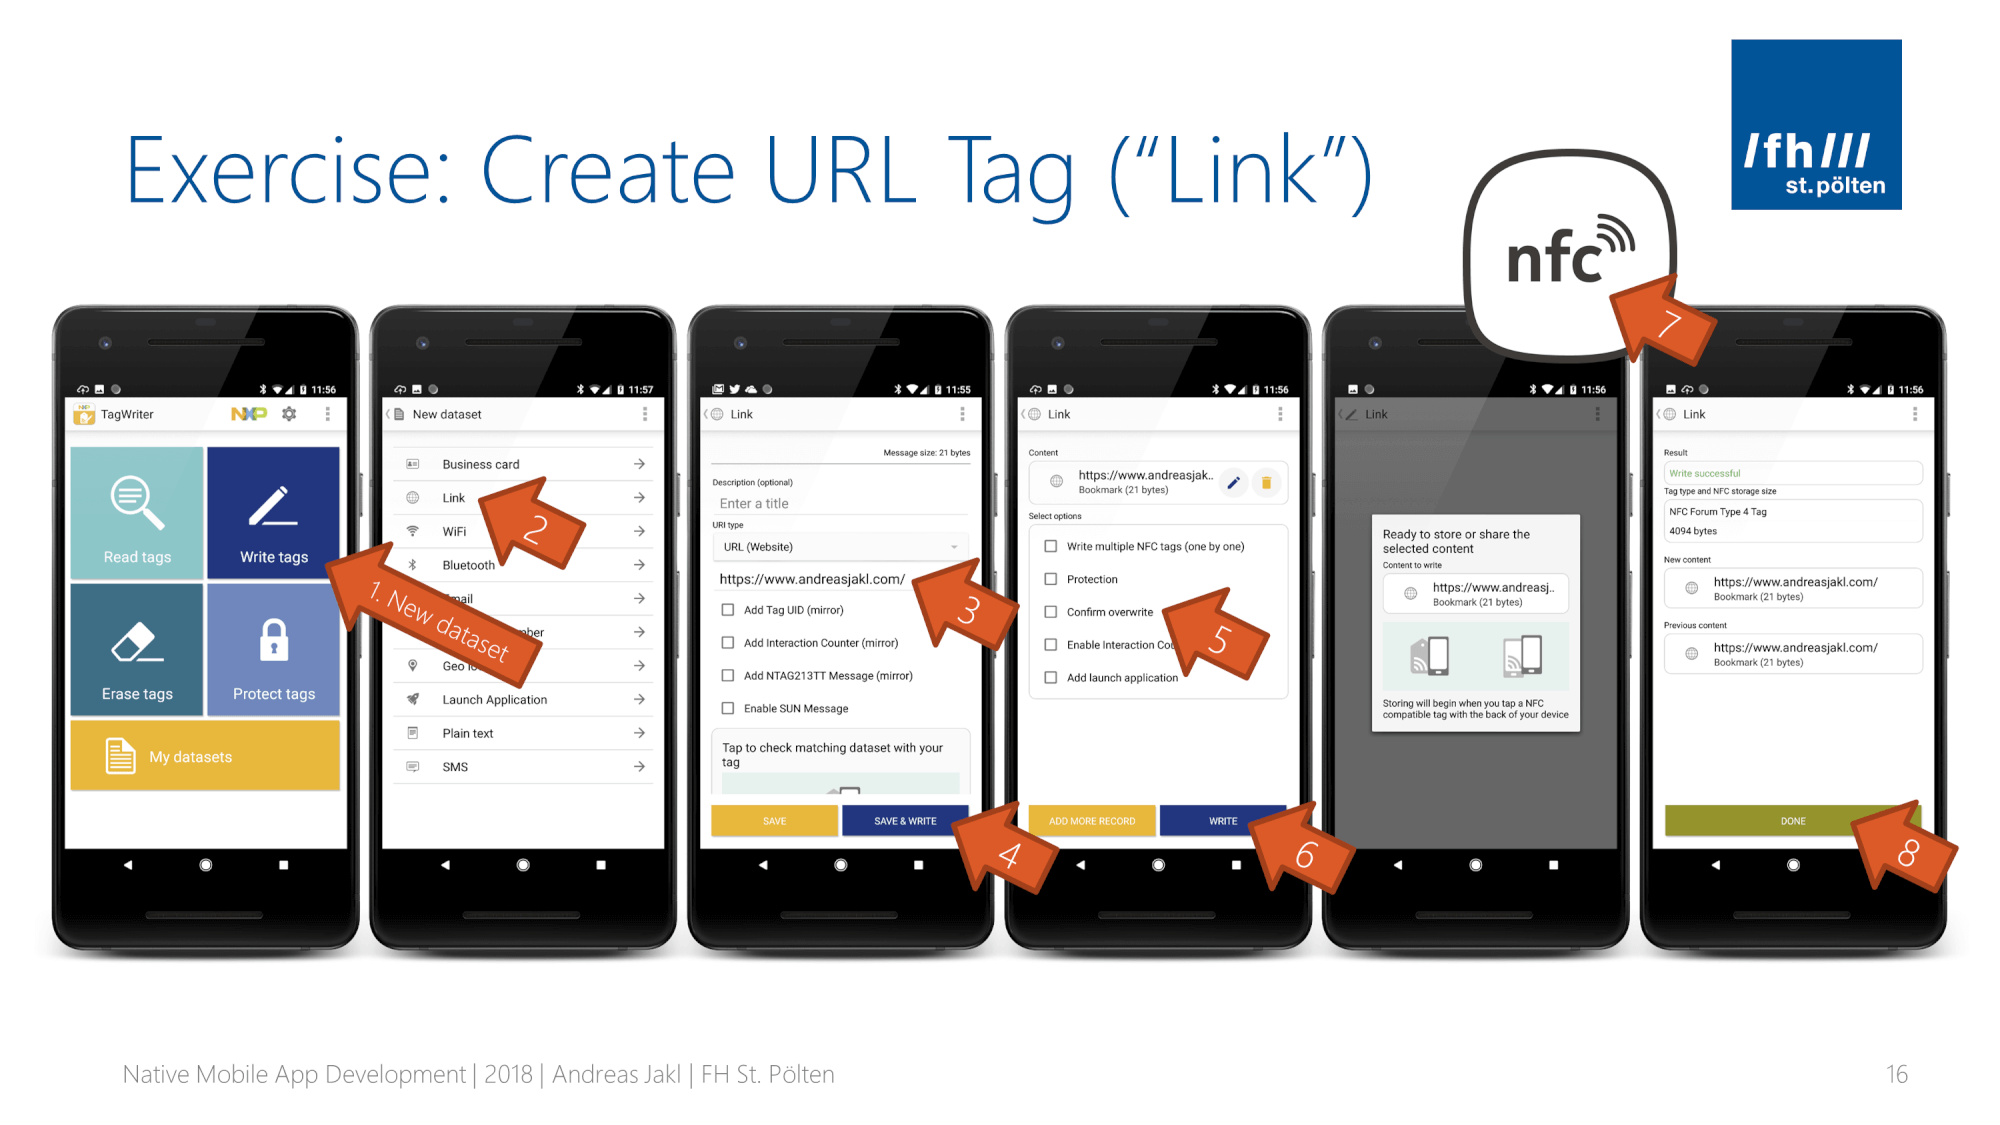
For our example app, create an URL tag. If you use NXP TagWriter, follow these instructions:
Android NFC Demo – Sample App
 Now that our tag is ready, it’s time to start with our NFC app. To make your life easier, I’ve created a start project for Android Studio. Download and import this app.
- Android NfcDemo Start (Updated January 7th, 2019)
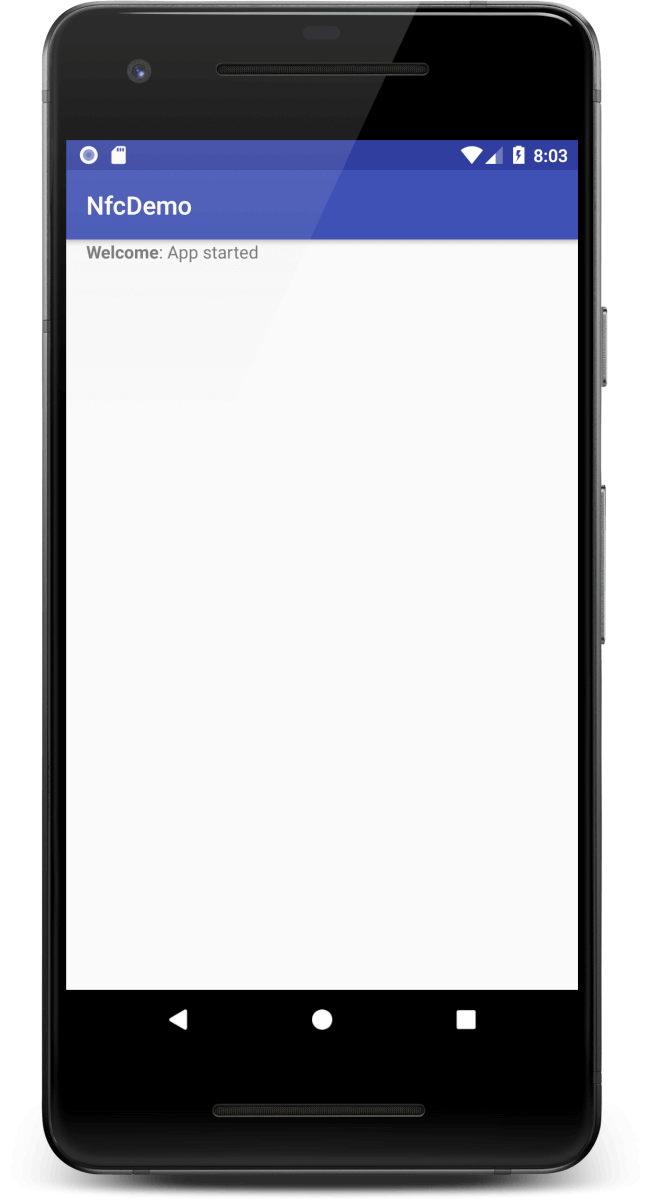
The sample contains a simple on-screen logger. You can add auto-formatted message to the log by providing header and text, e.g.:
logMessage("Welcome", "App started")
Note: The Android emulator doesn’t support NFC. You need a real phone to test the app.
Permissions & Required Features for NFC on Android
To add NFC support to the app, open AndroidManifest.xml. Add the following two lines:
- Permission: required to access NFC hardware of your phone:
<uses-permission android:name="android.permission.NFC" />
- Declare Hardware Feature: inform external entities (most notably, the Google Play Store) that our app depends on NFC. If you set required to true, we make NFC support of the phone mandatory. The store only shows the app to NFC capable phones.
<uses-feature android:name="android.hardware.nfc" android:required="true" />
Query for NFC Support
Even though we specify the requirements and dependencies in the manifest, your app can still land on a non-supported device:
- Either, the user installed the app manually and not through the Google Play Store. In this case, the uses-feature definition isn’t enforced.
- Even if the phone supports NFC, it might currently be disabled in the settings.
So, it’s a good idea to check for NFC support when the app starts. Add the following lines to onCreate() in MainActivity:
var nfcAdapter = NfcAdapter.getDefaultAdapter(this)
logMessage("NFC supported", (nfcAdapter != null).toString())
logMessage("NFC enabled", (nfcAdapter?.isEnabled).toString())
If nfcAdapter is null, the phone doesn’t have NFC support. Only if nfcAdapter.isEnabled returns true, we’re ready to go!
Launch Apps with NFC
Ultimately, we want to achieve the following: when the user taps our NFC tag, our app should launch and show the contents of the tag.
For launching our app, we use a deep link. In the Manifest, we register the URL of our website (or a specific sub-page of it). This has an important advantage: if the app is not yet installed, you show generic information on a website. That way, you’re always in control of the user experience. Place a link to the app store on that web page to “upgrade” the user.
Additionally, this method is fully compatible with the iPhone, which doesn’t support launching apps through NFC tags.
By default, Android shows a user consent dialog before launching your app. To bypass this, place a special JSON file on your web server. Read more in the Android Documentation about App Links.
Register for NFC Intents
Next, we register our app with Android. We want the app to be launched whenever a specific NDEF record is found on a tag. Add this intent filter to the Activity in your manifest:
<intent-filter>
    <action android:name="android.nfc.action.NDEF_DISCOVERED"/>
    <!-- Default category is required for the intent filter to work -->
    <category android:name="android.intent.category.DEFAULT"/>
    <!-- Browsable also enables opening this app through a link on a website -->
    <category android:name="android.intent.category.BROWSABLE" />
    <!-- Intent filters without data will never be triggered on NFC devices.
    Always define the specific data you expect to be present. -->
    <data android:scheme="https" android:host="www.andreasjakl.com" />
    <!-- Additionally support http scheme. See:
    https://developer.android.com/training/app-links/verify-site-associations.html -->
    <data android:scheme="http" />
</intent-filter>
Let’s take a closer look at the intent filter:
- When using NDEF formatted tags, it’s easiest to use the android.nfc.action.NDEF_DISCOVERED intent.
- Every intent filter requires a category. Supply at least the android.intent.category.DEFAULT category.
Android doesn’t allow generic subscriptions to all NDEF messages. Instead, we supply more information on the specific NDEF message we’re interested in. This is done through data elements.
Supply at least the scheme and host of your website. To make your filter more generic, it’s a good idea to filter for both https and http. The Android documentation has more information about linking to multiple hosts or subdomains.
Receiving NFC Intents
Now, we have the permission to use NFC. Additionally, we told Android when to launch our application. How do we find out more about the NFC tag contents?
For example: in a museum use case where each exhibit has its own tag, you’d extract the unique part of the URL. Using the item name or ID found in the URL, you show the relevant information in the app.
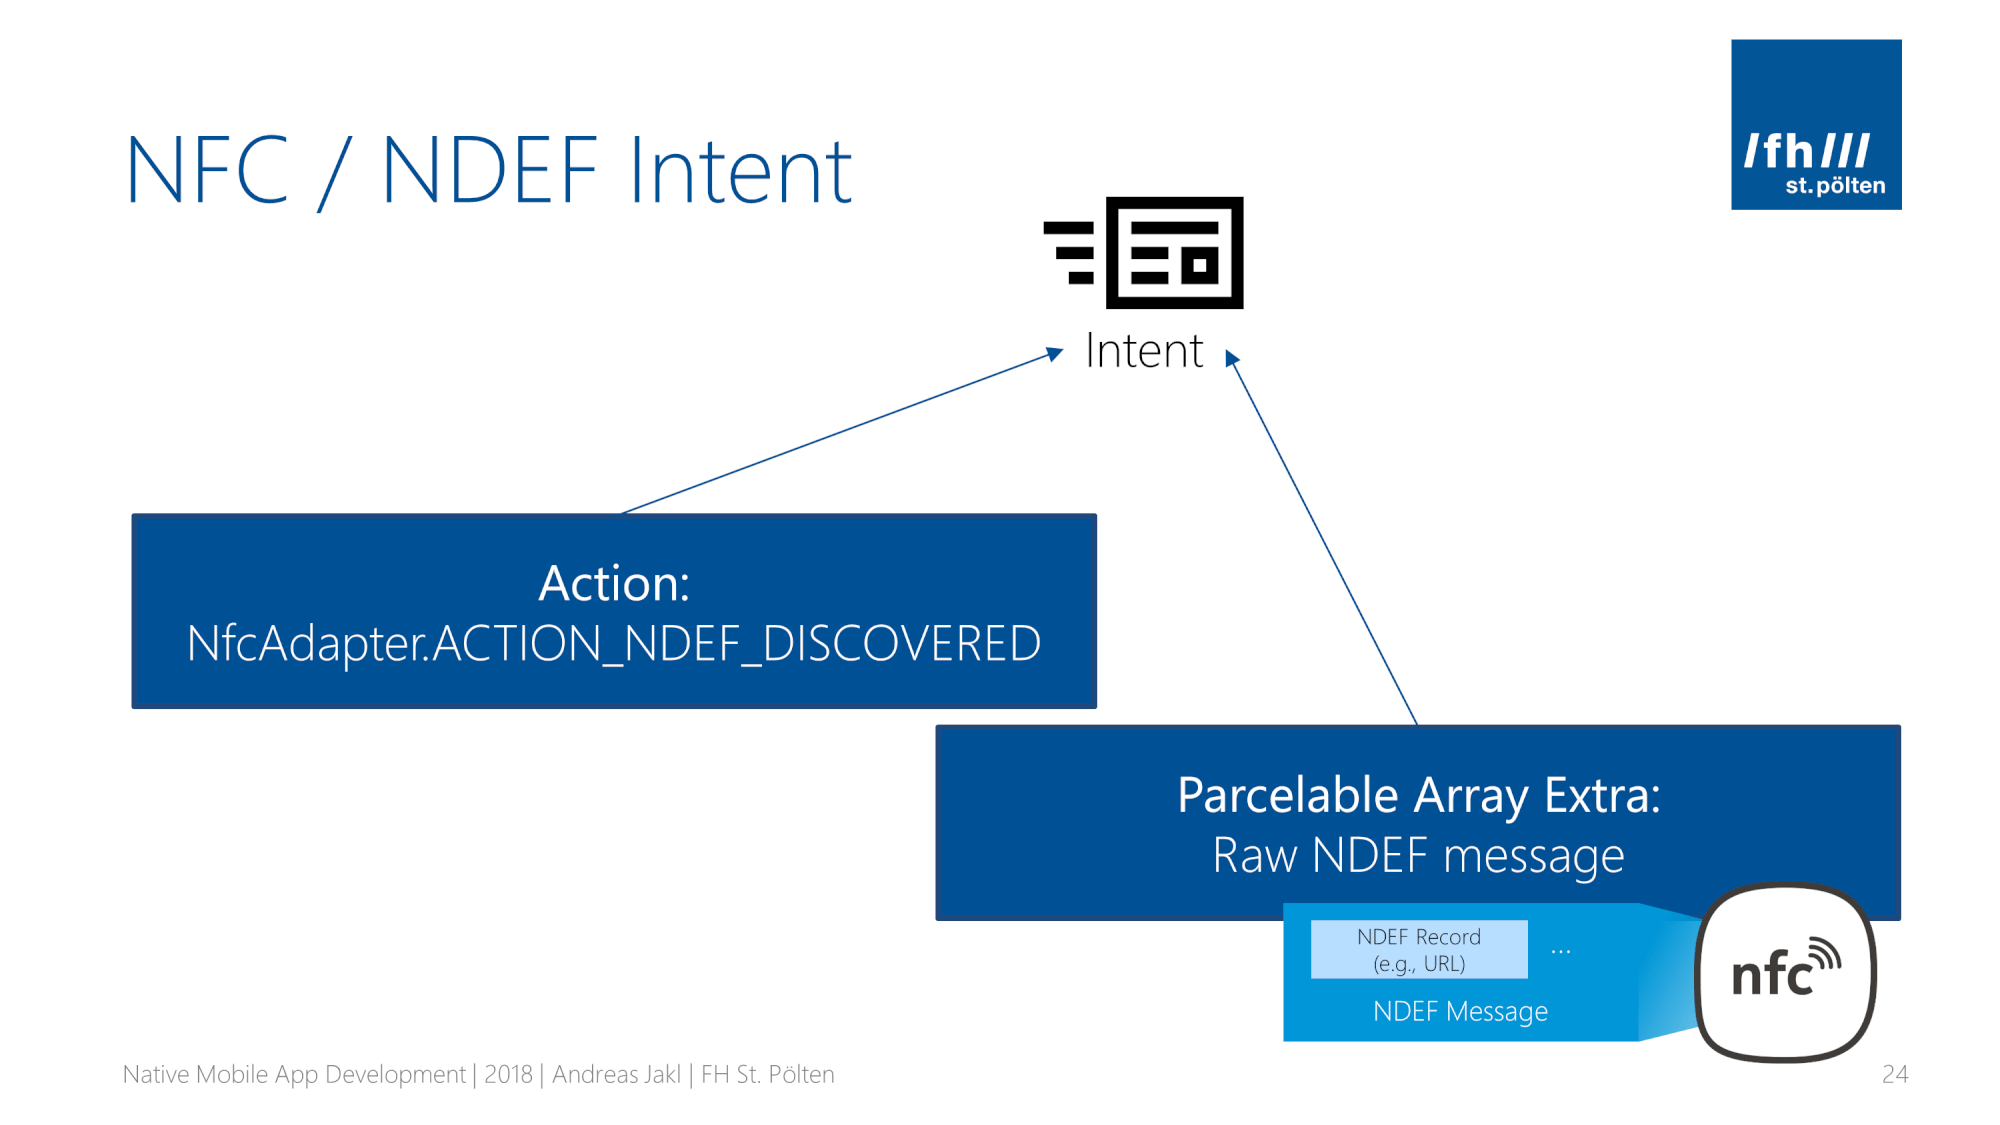
We’re interested in two properties of the intent:
- Action: the relevant intent has the action NfcAdapter.ACTION_NDEF_DISCOVERED
- Data: the raw contents of the NDEF message are contained in the parcelable array extra called NfcAdapter.EXTRA_NDEF_MESSAGES
Intents & Running Android Apps
How does Android deliver the intent to our app?
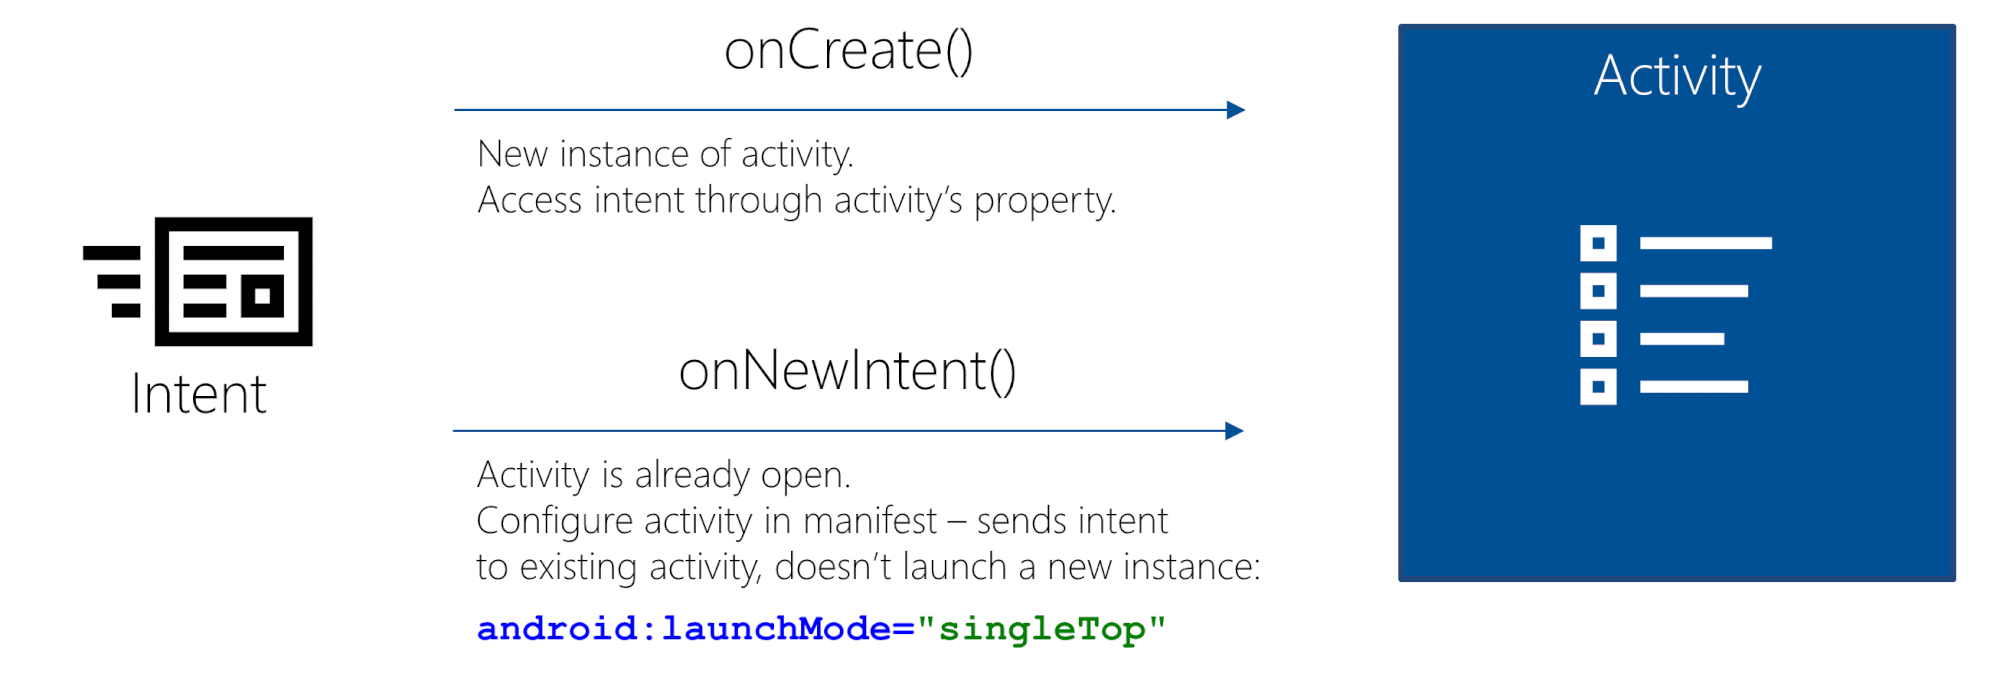
- onCreate(): If our app is launched through the NFC tag, Android creates a new instance of our activity. We retrieve the NDEF data through the Activity’s intent property.
- onNewIntent(): What happens if our activity is already open? By default, Android starts a new activity instance. To prevent this behavior, set the launchMode to singleTop in the manifest. Then, or existing activity gets the intent through onNewIntent() – it’s no longer re-started.
Handle Incoming NFC Intents
No matter which way the intent takes to reach our app, it’s a good idea to centralize handling it. Create a new function called processIntent() and call it from both entry points:
override fun onCreate(savedInstanceState: Bundle?) {
    // ...
    if (intent != null) {
        processIntent(intent)
    }
}

override fun onNewIntent(intent: Intent?) {
    super.onNewIntent(intent)

    if (intent != null) {
        processIntent(intent)
    }
}
In onCreate(), we take the intent property of the activity (getIntent() in Java). In onNewIntent(), we use the intent parameter.
Retrieve NDEF Message from the Intent
In our custom processIntent() function, we finally investigate the NFC tag contents. The following snippet checks the intent type and extracts the raw NDEF message array:
private fun processIntent(checkIntent: Intent) {
    // Check if intent has the action of a discovered NFC tag
    // with NDEF formatted contents
    if (checkIntent.action == NfcAdapter.ACTION_NDEF_DISCOVERED) {

        // Retrieve the raw NDEF message from the tag
        val rawMessages = checkIntent.getParcelableArrayExtra(NfcAdapter.EXTRA_NDEF_MESSAGES)

        // ...

    }
}
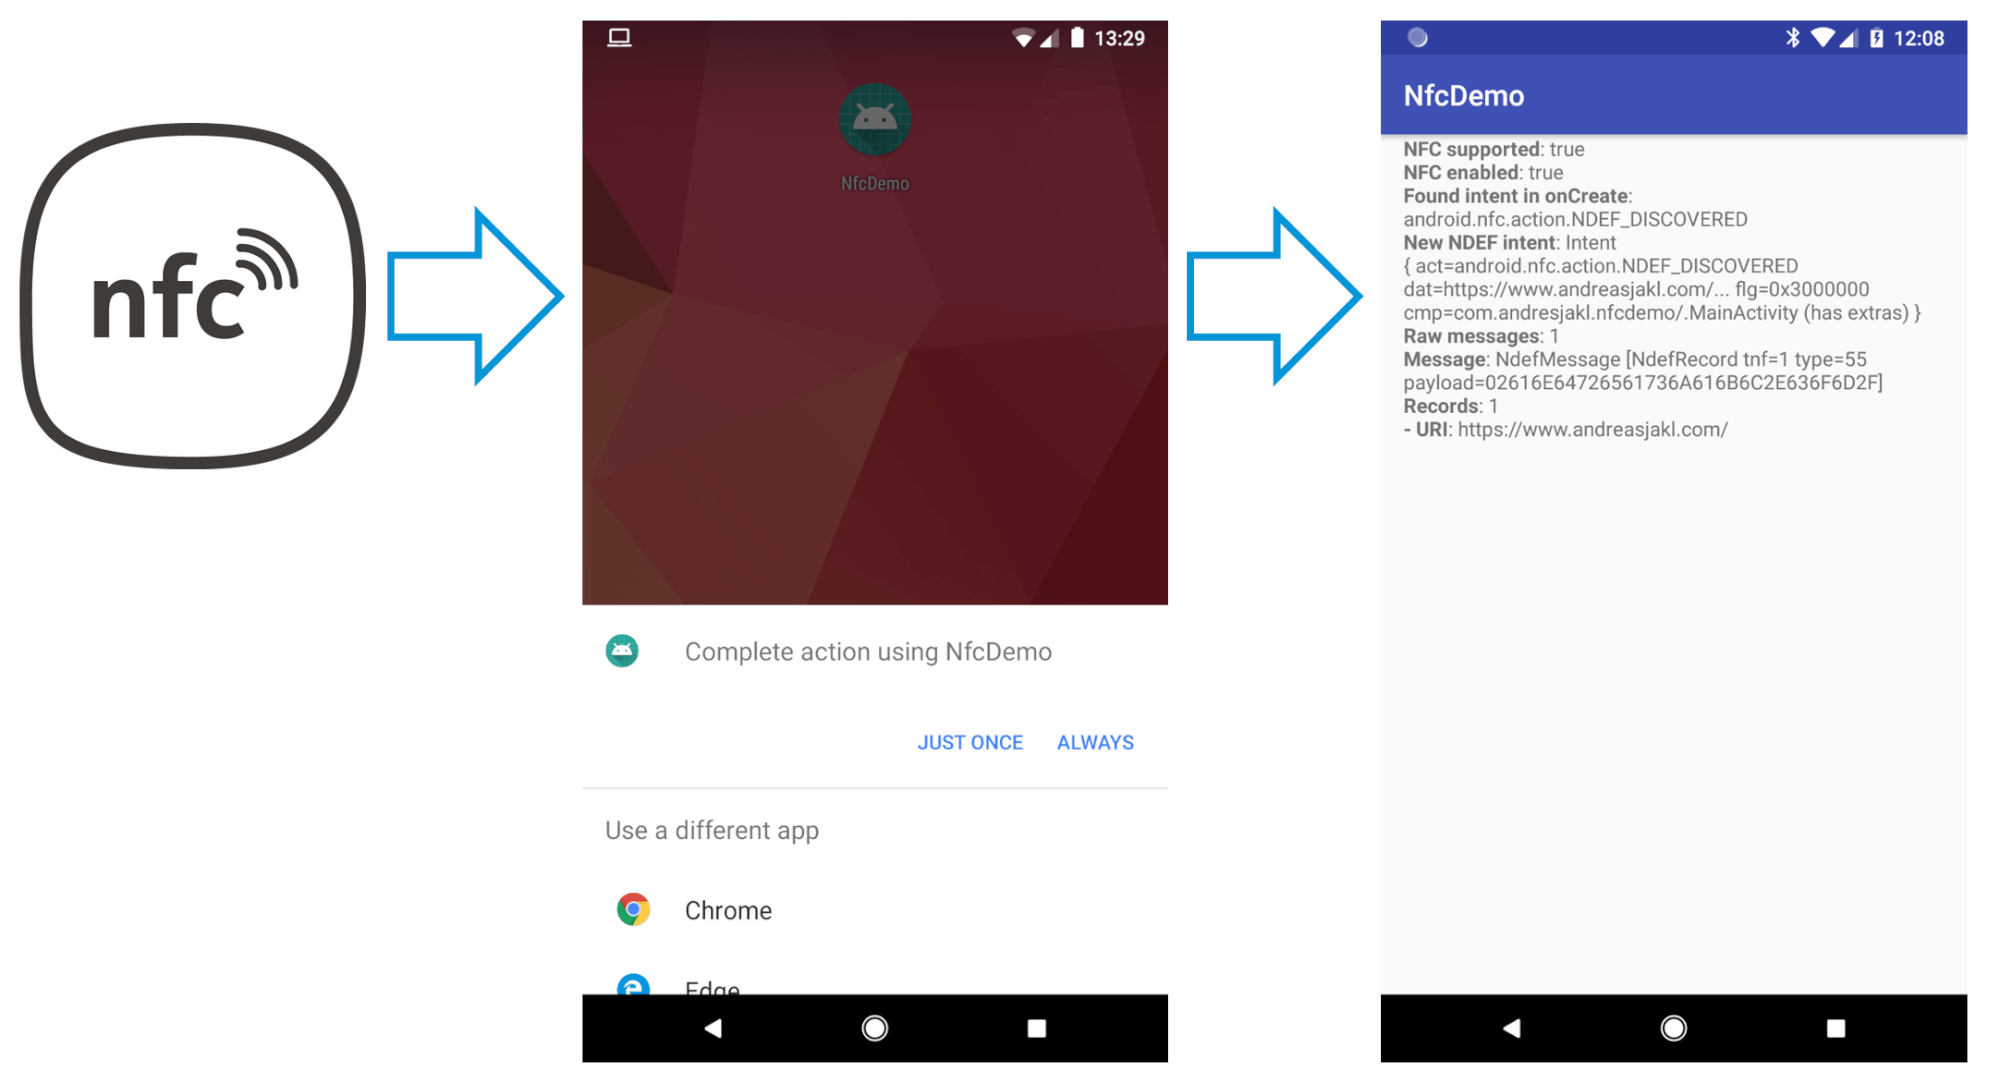
Test the app on your phone and place a breakpoint after extracting the NDEF message. Tap your NFC tag.
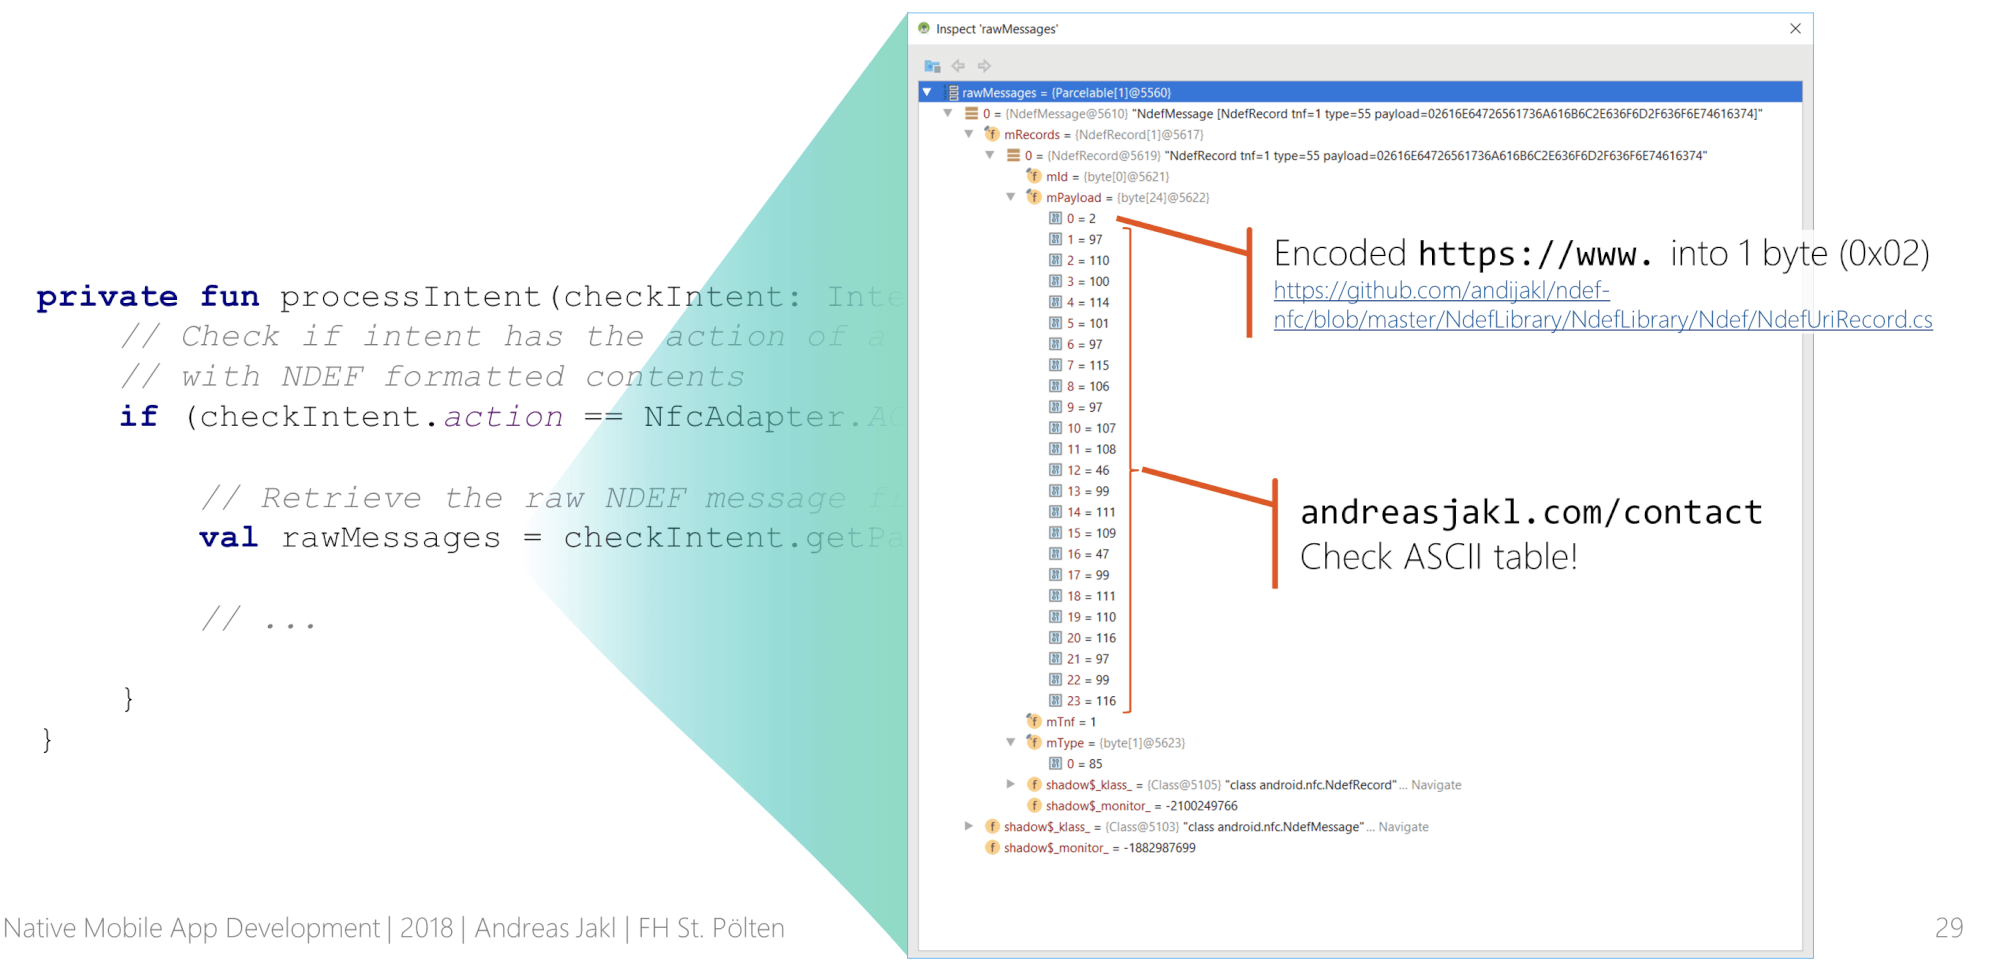
You can see that the message contains a single record. Most important is its payload: a byte array.
In the image above, the first byte is 0x02. Writable space is scarce on NFC tags. The most common URI schemes are abbreviated into a single byte, based on a standardized list. 0x02 means “https://www.”. Instead of 12 bytes, you only need 1 byte. If your whole tag only has 48 bytes of storage memory, that’s a big difference. Check the complete list or URI schemes in the NDEF library.
The remaining bytes are direct ASCII codes of the URL written to the NFC tag. The URL inside the record is UTF-8 encoded.
Extract Data from the NDEF Message
All the data we need is visible in the screenshot of the inspector window above. Let’s write the code to extract the URL.
Note: the following code emits error handling for clarity. The complete solution on GitHub includes checks for ranges and null.
- Extract the 1st NDEF message: as mentioned before, most NDEF tags only have one message. We simply take the first:
var ndefMsg = rawMessages[0] as NdefMessage
- Get the 1st record of the message: Android already parsed the message contents into an array of records. Again, we’re interested in the first record:
var ndefRecord = ndefMsg.records[0]
- Extract information: Android has a built-in function to parse URIs. So, you don’t need to worry about the efficient byte-encoding described before. For all other record types, we log the raw payload.
if (ndefRecord.toUri() != null) {
    // Use Android functionality to convert payload to URI
    logMessage("URI detected", ndefRecord.toUri().toString())
} else {
    // Other NFC Tags
    logMessage("Payload", ndefRecord.payload.contentToString())
}
Congratulations, that’s it! Your app is fully functional. It starts through NFC tags and parses & logs the NDEF contents.
Troubleshooting NFC AutoStart
If your app doesn’t start when tapping the NFC tag, the following hints might help:
Check Supported Links of your App
Through the Android settings, open the properties of your app. Check if the link you registered for is listed in “Supported Links”. The screenshot shows the app registered for “www.andreasjakl.com”:
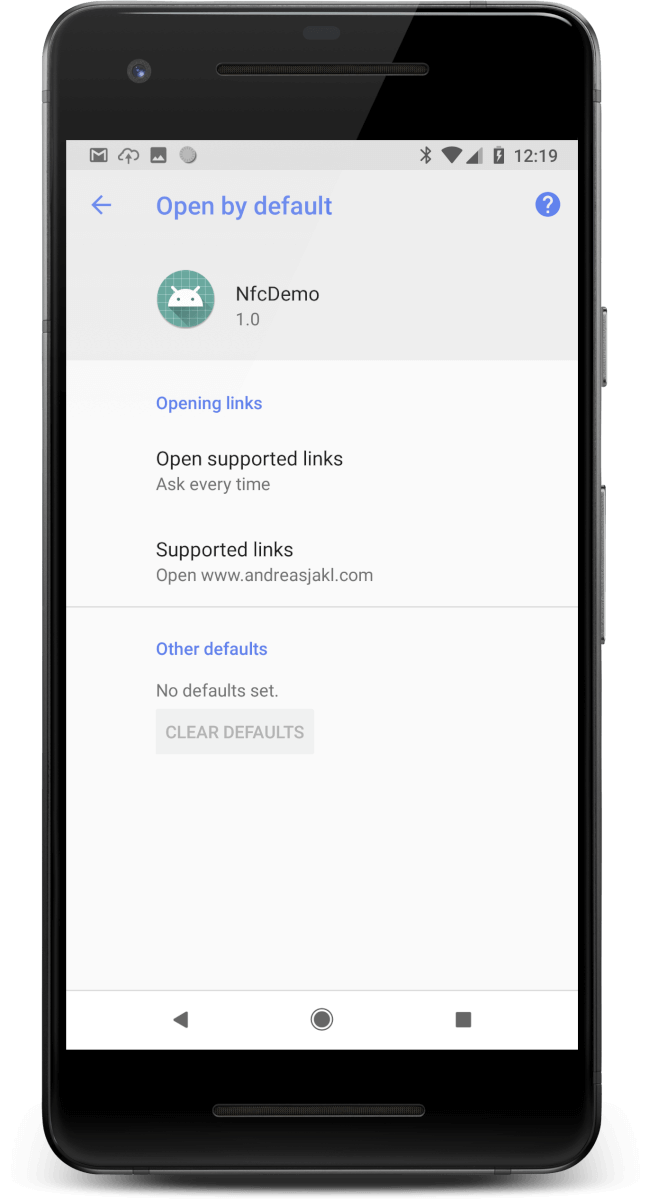
In case the URL is missing, double-check your manifest. Re-build and re-install the complete app to make sure Android recognizes the intent filter.
Chrome Opens All URLs
In case you allowed a browser like Chrome – or any other app – to open all incoming URLs from NFC tags, Android might no longer prompt to open our own app.
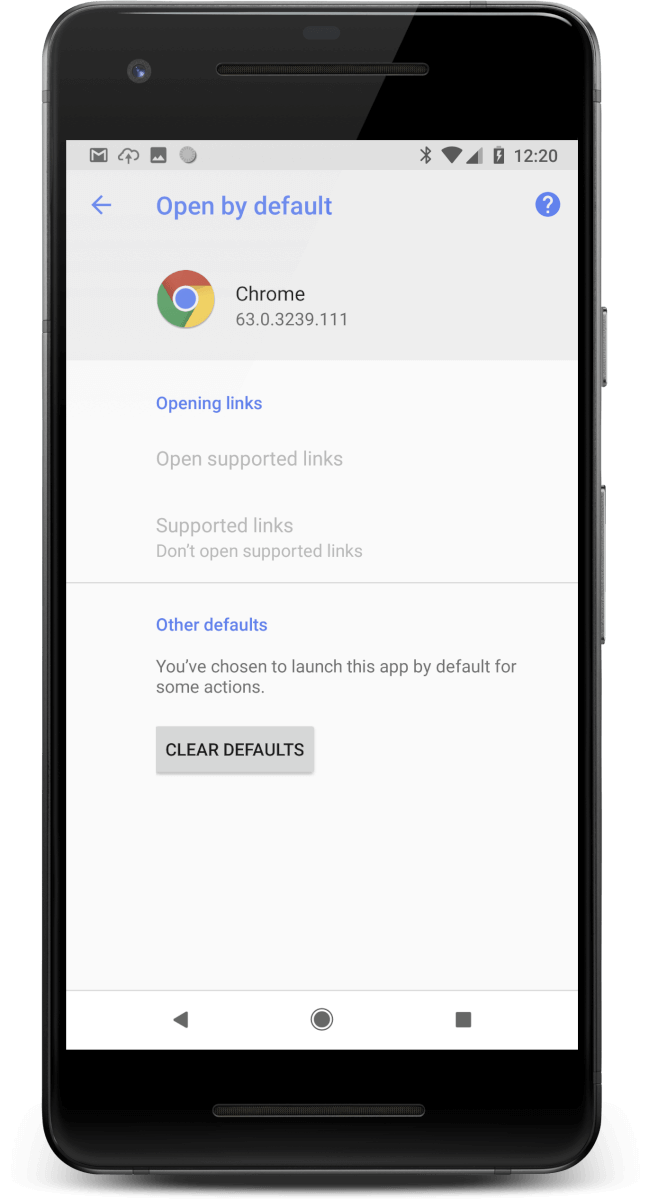
To clear the defaults, go to the properties of the current default app. In Android 8, this action isn’t easy to find; here the steps for Chrome:
- Settings > Apps & notifications > Advanced > Default apps > Opening links > Chrome > Other defaults: clear defaults
Unique Link to your App
To ensure no other app hijacks your URLs, Android offers another option: the Android Application Record (AAR). In addition to the URL record, you add a second record to the NDEF message. It contains the package name of your app.
Android will then always launch your app when it discovers a tag that includes the AAR. In case your app isn’t installed yet, it will open the Google Play Store.
You can easily include an AAR with the NXP TagWriter. Activate the “Add launch application” option when writing your tag:
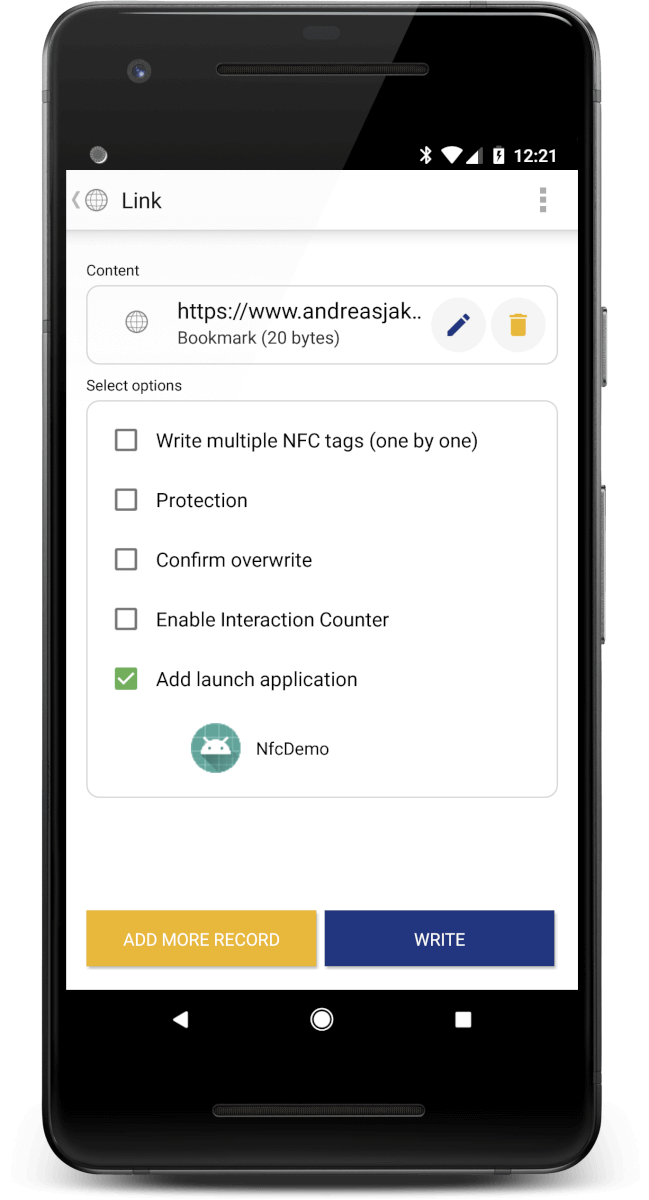
Even with an additional AAR, your app still launches the same way. You get the NDEF message through the intent as described before. Therefore, it’s always a good idea to add an Android Application Record to your NFC tag if you want a unique association with your app.
Final NFC / NDEF Reader App
 I’ve further polished the final app. Download the extended solution from this article from GitHub.
In addition to subscribing for NDEF messages through the manifest, the project also implements foreground dispatch. The app gets & analyzes all NDEF messages when it’s running in the foreground.
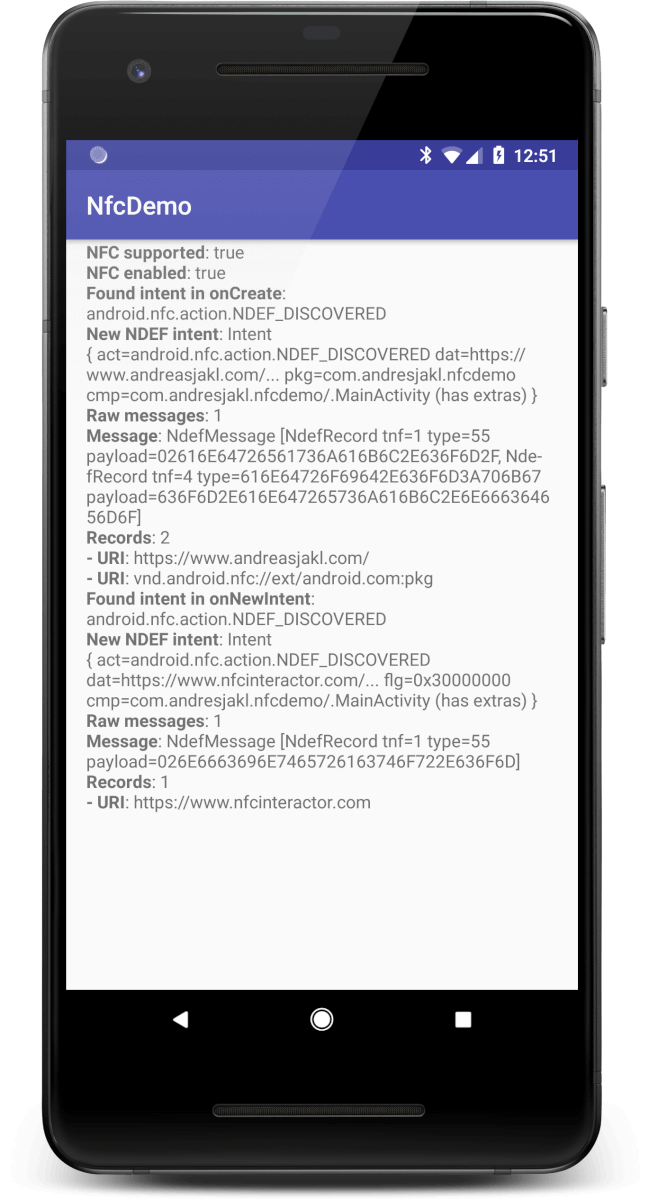
The following process is visualized in the NFC app solution screenshot:
- App is launched through NFC (NDEF_DISCOVERED in onCreate()).
- NDEF message contains 2 records: URL + Android Application Record
- While running: tapped 2nd NFC tag with different (non-subscribed) URL
- Delivered & parsed through onNewIntent() thanks to active Foreground Dispatch which subscribed to all NDEF tags.