RecyclerView is the best approach to show scrolling lists on Android. It ensures high performance & smooth scrolling, while providing list elements with flexible layouts. Combined with modern language features of Kotlin, the code overhead of the RecyclerView is greatly reduced compared to the traditional Java approach.
Updated on December 15th, 2020: the solution projects on GitHub have been migrated to the latest versions and dependencies. Most importantly, the new solutions now also use Jetpack View Bindings instead of Kotlin synthetics. The text in this article is still the original.
Updated on July 4th, 2019: Google is transitioning the additional libraries to AndroidX. Nothing changes in terms of behavior with regards to our example. I’ve updated the source code examples on GitHub to use AndroidX instead of the Android Support libraries.
Sample Project: PartsList – Getting Started
In this article, we’ll walk through a sample scenario: a scrolling list for a maintenance app, listing machine parts: “PartsList”. However, this scenario only affects the strings we use – you can copy this approach for any use case you need.
To get started, create a new Android app with Android Studio 3+. Make sure you enable Kotlin support and choose the “Empty” template for the MainActivity. Alternatively, download the finished source code from GitHub if you don’t want to manually write the code for the following steps.
What’s RecyclerView?
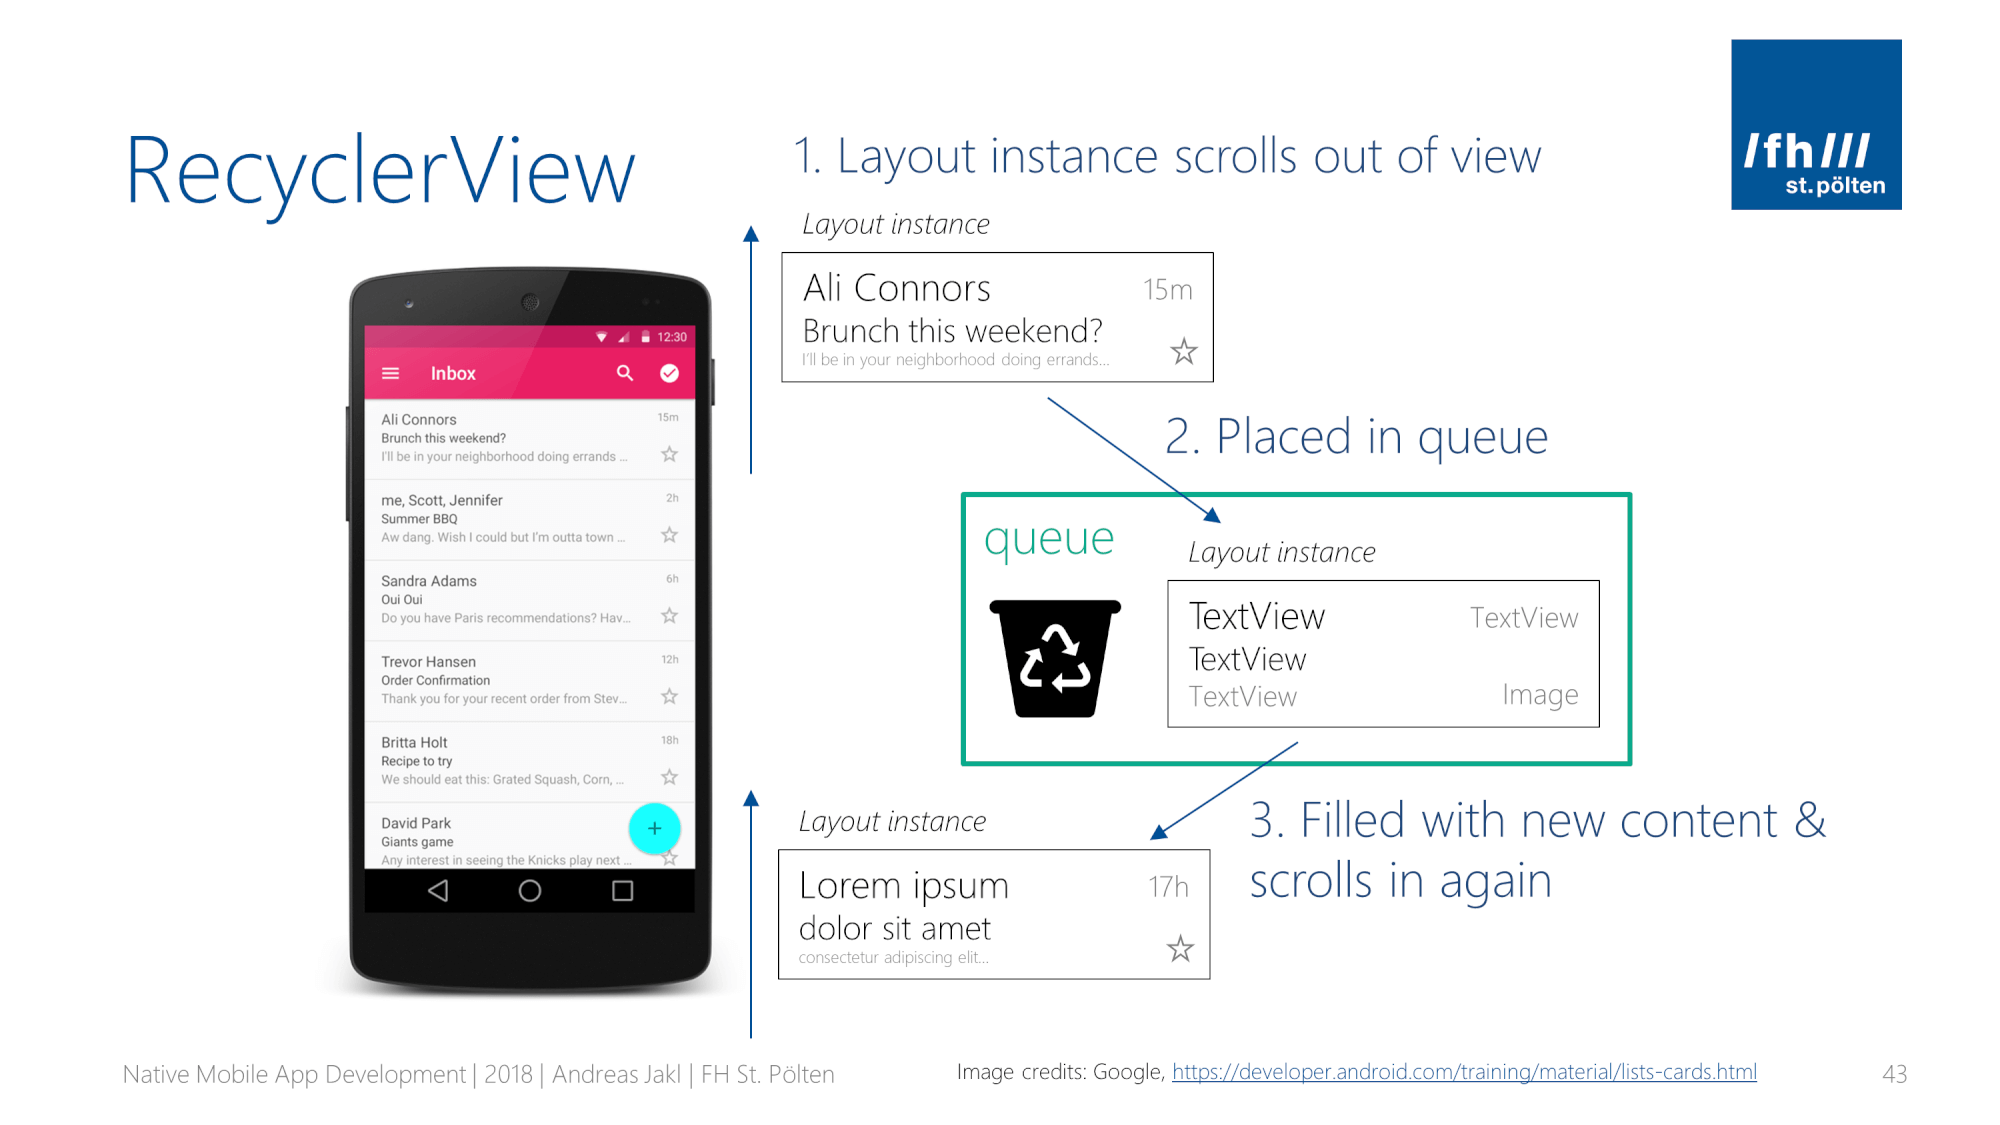
An on-screen list in Android is composed of multiple items. Each of these has a layout with several views. For example, the email app shows you multiple emails; each of these items includes the subject, the sender’s name and a bunch of other information.
Parsing the item’s XML layout definition and inflating the layout to class instances is an expensive operation. With quick flick-scrolling, this leads to an enormous strain on the phone performance. The aim is to always stick to 60 frames per second. However, this only leaves less than 17 ms computation time per frame.
The main trick in RecyclerView is that it re-uses the view items of the list. Once an item scrolls out of the visible area, it gets placed in a queue. Eventually, it will be needed again when a new item scrolls in. Then, the values of the text in the item’s UI are replaced. The following graphic visualizes this (simplified) RecyclerView principle:
RecyclerView Flow
Unfortunately, this efficient approach requires a bit of background architecture. It may seem daunting at first. However, once you have all components in place, it’s easy to further customize the behavior.
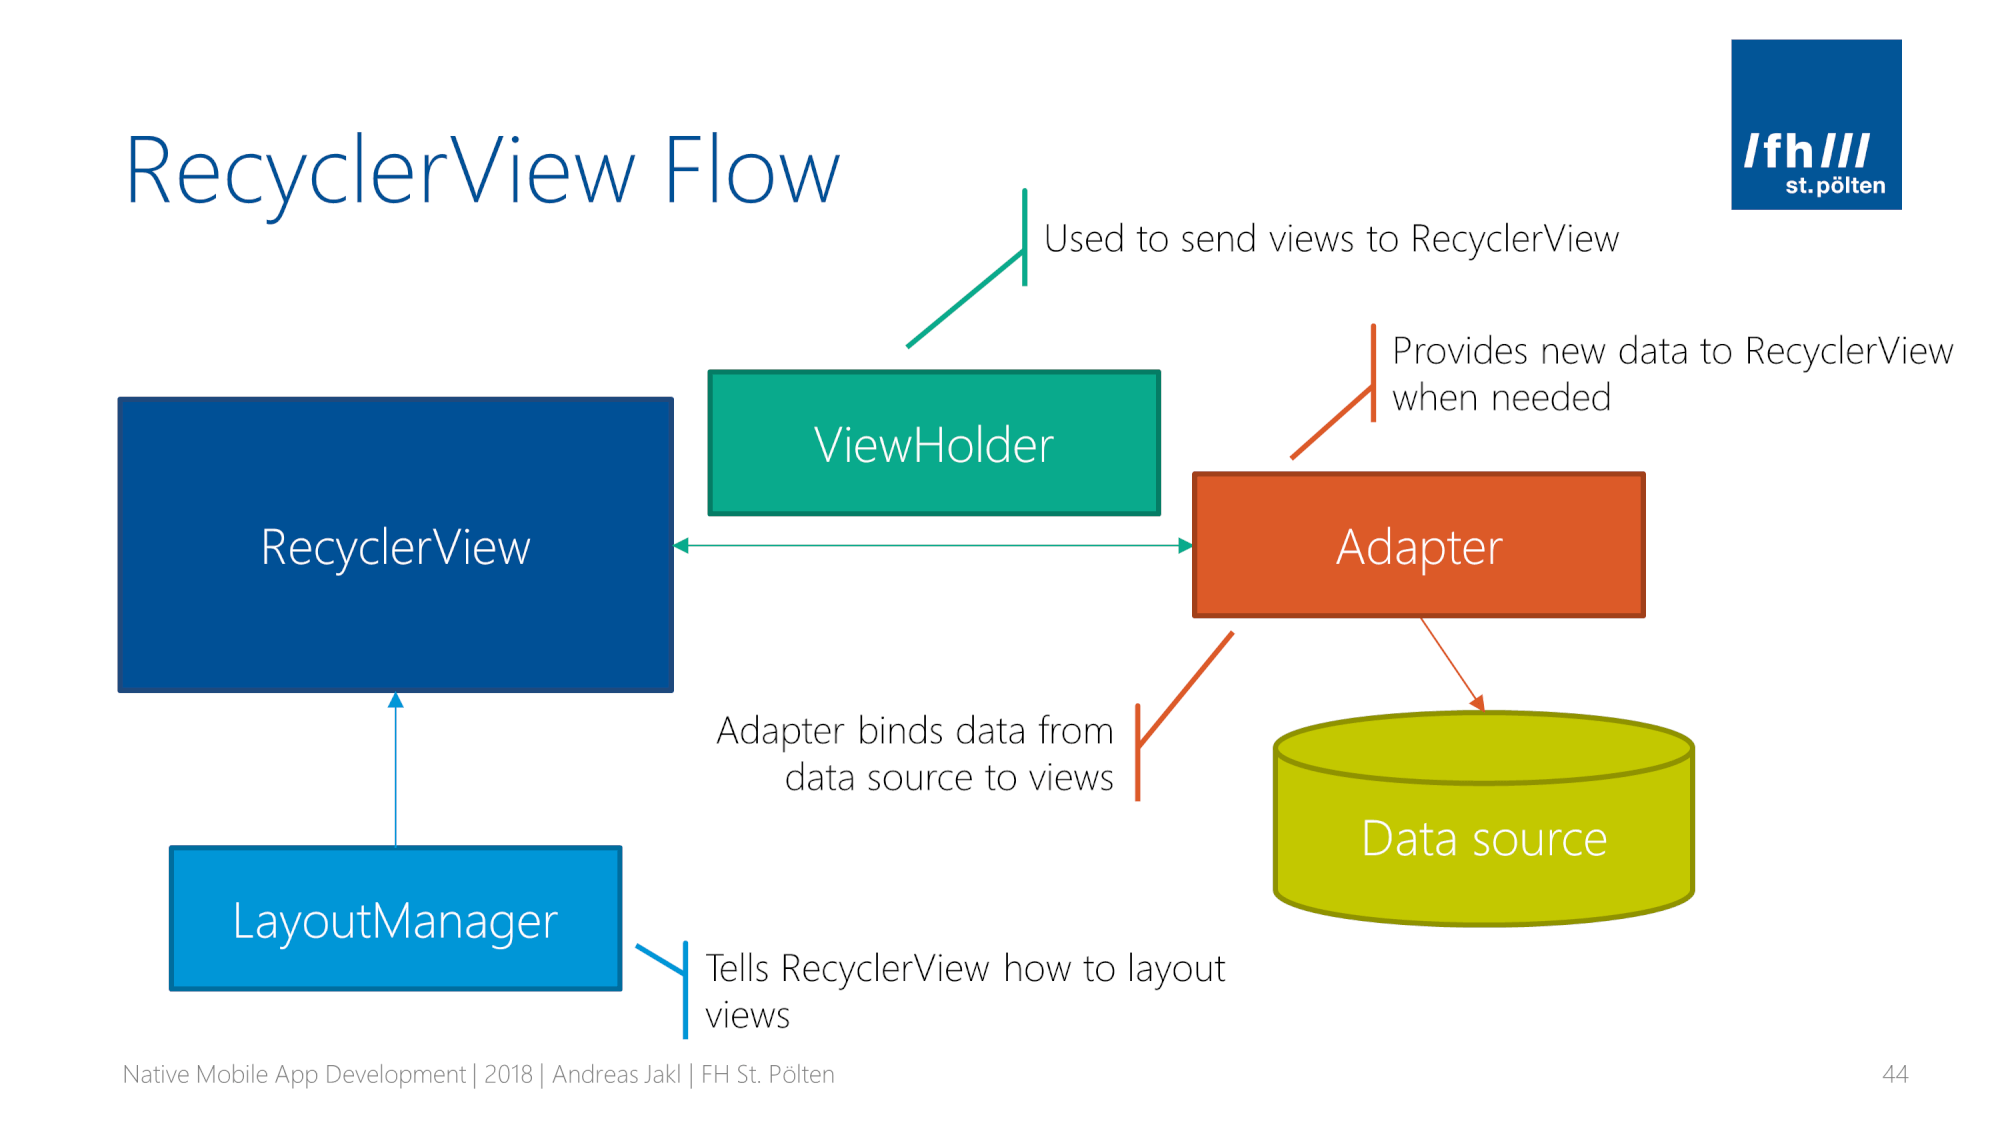
Using the RecyclerView requires configuring / implementing the following components:
- RecyclerView: manages everything. It’s mostly pre-written by Android. You provide the components and configuration.
- Adapter: you will spend most of your time coding this class. It connects to the data source. When instructed by the RecyclerView, it creates or updates the individual items in the list.
- ViewHolder: a simple class that assigns / updates the data in the view items. When a view is re-used, the previous data is overwritten.
- Data source: anything you like – from a simple array up to a full-blown data source. Your Adapter interacts with it.
- LayoutManager: is responsible for placing all the individual view items on the screen and making sure they get the screen-space they need.
Data Source & Kotlin Data Class
Our data source is a simple list / array. The list is composed of instances of a custom class. You can either hard-code these in your app, or dynamically create them – e.g., based on HTTP REST requests from an online source.
Kotlin has a great feature that simplifies writing data classes. This approach is suitable for all classes that only contain data, but no operations. Our sample data class is called PartData, as it stores information about the machine parts of a maintenance app.
data class PartData ( val id: Long, val itemName: String)
Use Android Studio to create the class in the same directory as MainActivity. For reference, you can check the full code of this class on GitHub – it’s really that simple.
For data classes, Kotlin auto-generates all utility functions:
- Properties: you no longer need to write getters and setters like in plain Java.
- Additional functions: e.g., equals(), hasCode(), toString() or copy().
Antonio Leiva has written a great article that compares a Java data class to its Kotlin equivalent. You save probably 80% of the code and still get the same result.
You instantiate a Kotlin data class like any other class. Note that Kotlin doesn’t use the new statement, so we simply use the class name and provide the values to the constructor parameters. Add this code to onCreate() of your MainActivity.
var partList = ArrayList<PartData>()
partList.add(PartData(100411, "LED Green 568 nm, 5mm"))
partList.add(PartData(101119, "Aluminium Capacitor 4.7μF"))
partList.add(PartData(101624, "Potentiometer 500kΩ"))
// ...
List Item Layout
Each of the individual items in a RecyclerView needs a layout definition. You create this in the same way as any activity layout file: in Android Studio’s Android-style project view, open app > res > layout. Right-click the “layout” folder name and choose New > Layout resource file. Create a new layout xml called part_list_item.xml .
For the sample use case, use the following properties:
- Layout:
LinearLayout(vertical) - Width:
match_parent - Height:
wrap_content - Padding:
16dp
Next, add two children to the layout. We will use TextView ‘s. Just make sure you give them useful IDs, as we will need these to assign the text from Kotlin code:
- Id 1:
@+id/tv_part_item_name(larger text size) - Id 2:
@+id/tv_part_id(smaller text size)
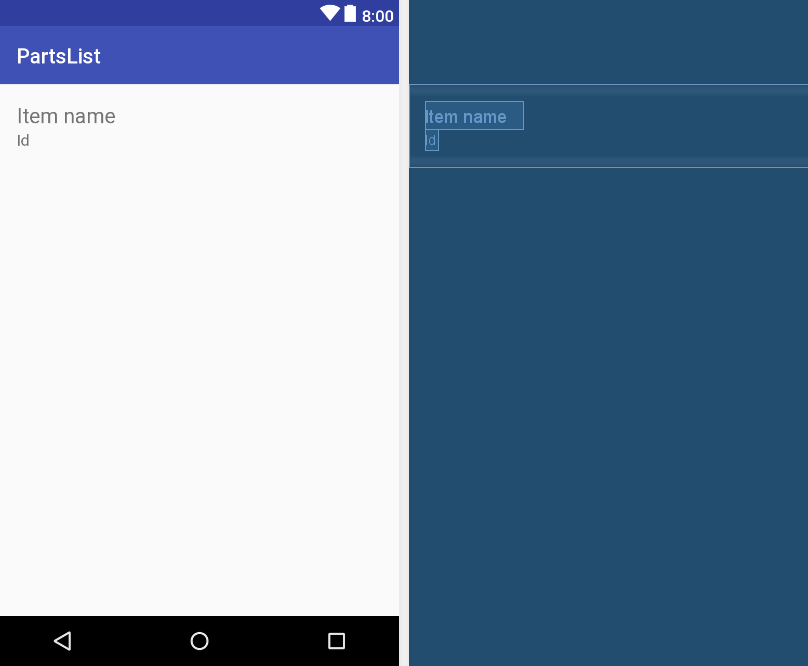
This is what your layout should look like in the end in the Android Studio designer. View the full layout XML code on GitHub.
Recycler View Dependencies
The RecyclerView has been added to the Android system with Android 5.0 (API level 21). Many apps still target Android 4.4+, so you’ll usually use the RecyclerView through the AppCompat / Support library. Include the latest support library version (depending on your compile SDK) to the dependencies of your app’s build.gradle file.
implementation 'com.android.support:appcompat-v7:26.1.0'
implementation 'com.android.support:recyclerview-v7:26.1.0'
After we’ve added this definition, we can start writing the source code that makes use of the RecyclerView.
ViewHolder: Handles Individual Items in the List
First, create a class called <PartAdapter. Place it in the same directory as your MainActivity. Inside this class, create a nested class called PartViewHolder.
class PartViewHolder(itemView: View) : RecyclerView.ViewHolder(itemView) {
    fun bind(part: PartData) {
        itemView.tv_part_item_name.text = part.itemName
        itemView.tv_part_id.text = part.id.toString()
    }
}
The ViewHolder describes the item view. Additionally, it stores metadata of its place within the RecyclerView.
Essentially, the main task of our ViewHolder implementation is binding the currently needed data to the previously inflated UI layout. Whenever a new item gets visible during scrolling, this class makes sure that the item’s view shows the contents we expect at this position in the list.
To update the UI, we create our own method and call it bind(). Note that this is not an overwritten method from a base class, so we could give it any name. As method parameter, we simply need the data to show in the UI. Within bind(), we simply assign the supplied data to the view items.
(Technically, we’re not binding it, we’re just assigning the data. If the data model changes, it wouldn’t automatically update the visible list in this implementation.)
Kotlin: Primary Constructor
If you’re new to Kotlin, you might wonder: how can we access itemView within bind()? Where does it come from?
The magic is called primary constructor. In Kotlin, it can be part of the class header. The constructor keyword in front of it is optional.
class PartViewHolder(itemView: View) : RecyclerView.ViewHolder(itemView) { ... }
What’s so great about this? Kotlin automatically makes all parameters available as properties. Therefore, we don’t see the property definition and initialization. Instead, we simply access the property from within our bind() function.
RecyclerView Adapter: Holding It Together
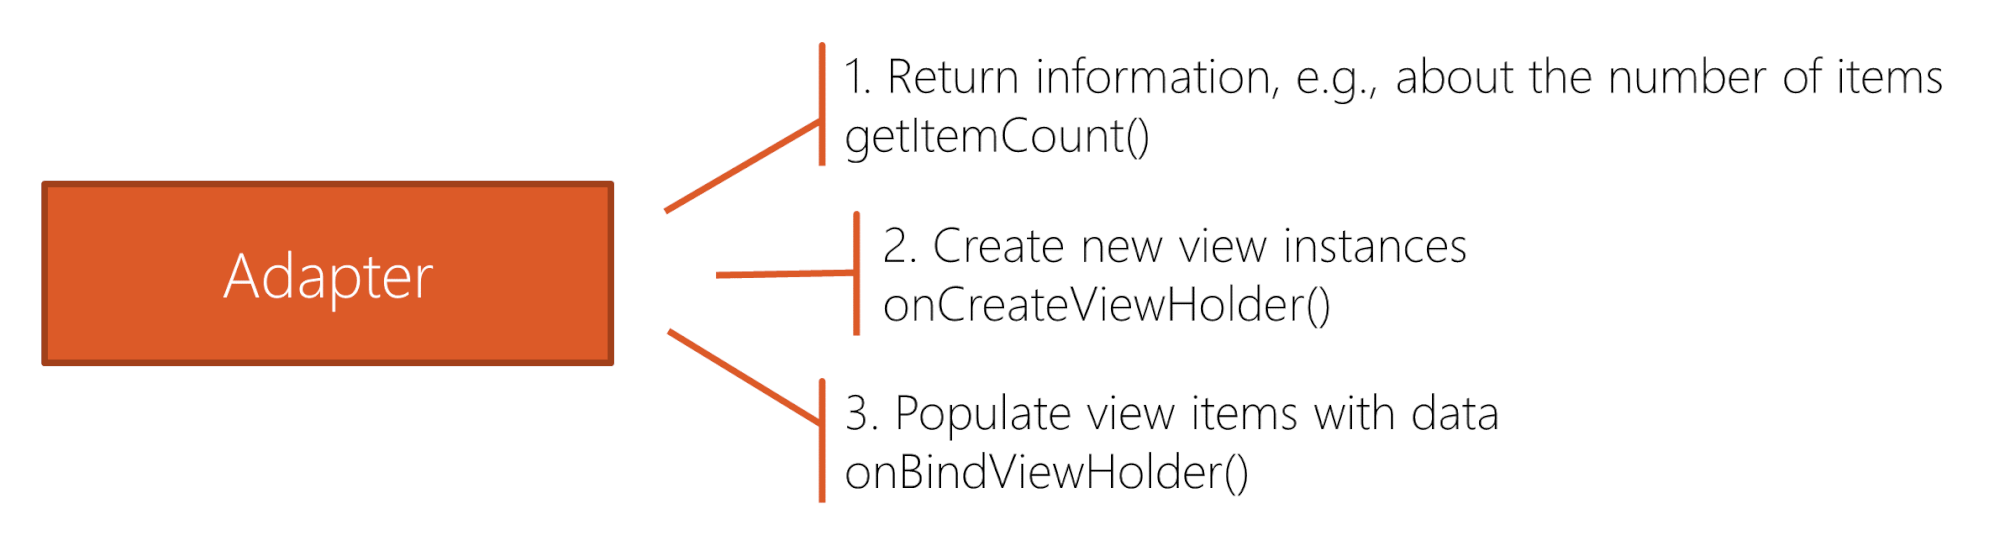
We’re getting to the most important component of the RecyclerView architecture: the Adapter. It has 3 main tasks:
Let’s look at the Adapter within the bigger picture and where these 3 tasks fit in:
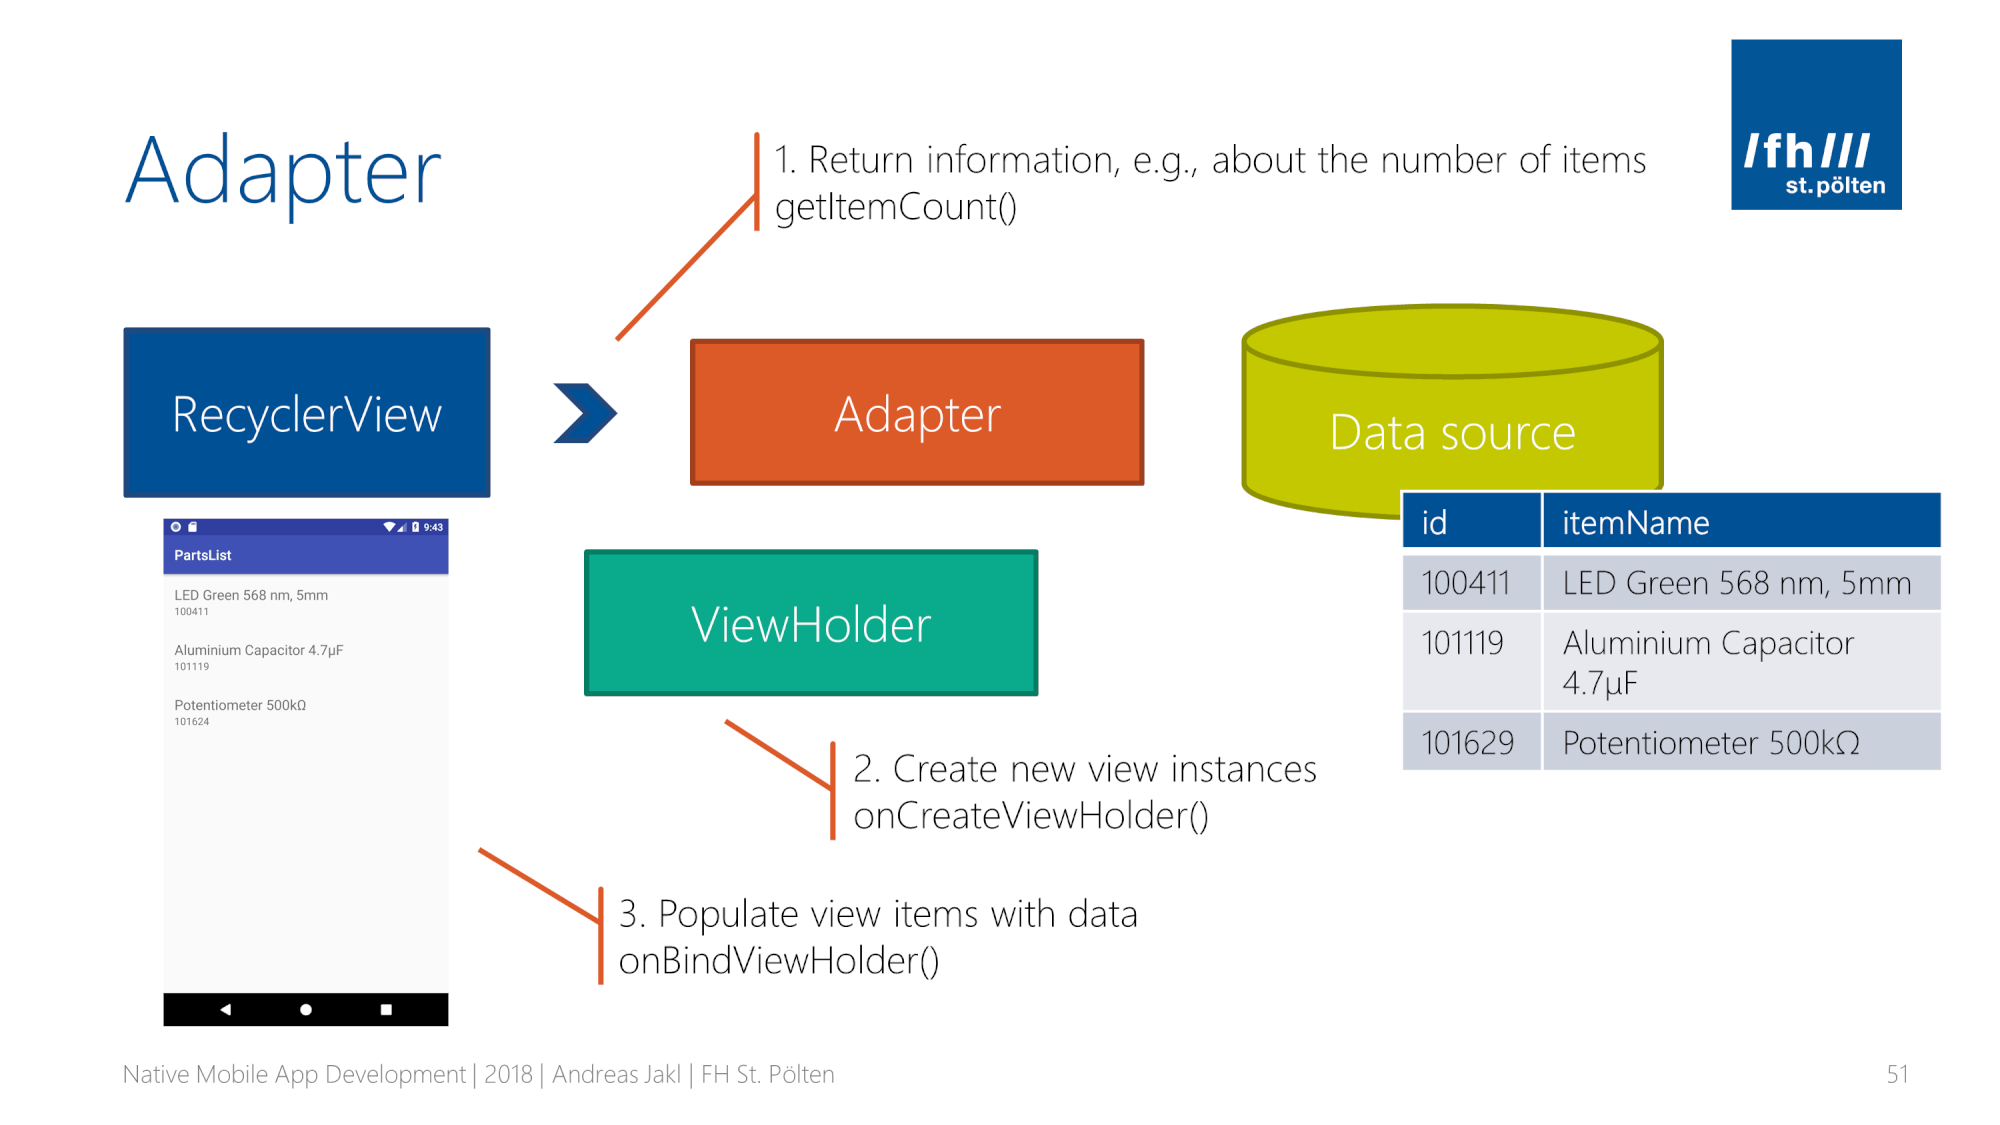
The Adapter is doing most of the work for the RecyclerView – it’s connecting the data source to view items.
- For drawing the list on the screen, the RecyclerView will ask the Adapter how many items there are in total. Our adapter returns this information in
getItemCount(). - Whenever the RecyclerView decides it needs another view instance in memory, it will call
onCreateViewHolder(). In this method, the Adapter inflates and returns the xml layout we’ve created in a previous step. - Every time a previously created ViewHolder is (re)-used, the RecyclerView instructs the Adapter to update its data. We customize this process by overriding
onBindViewHolder().
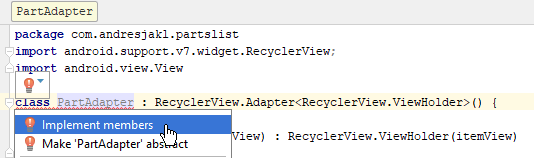
You don’t have to write the code for overriding these three functions manually. Simply extend the definition of our PartAdapter class. Make it inherit from the RecyclerView‘s Adapter. Android Studio automatically prompts you to implement all required members:
Afterwards, add a parameter “partItemList” to our PartAdapter class. Use a primary constructor. This will allow the MainActivity to supply the data model when instantiating our PartAdapter.
As before, the partItemList parameter is automatically available as a property. In our case, the property type is a simple list (array) of our data class.
class PartAdapter (val partItemList: List<PartData>, val clickListener: (PartData) -> Unit) :
        RecyclerView.Adapter<RecyclerView.ViewHolder>() {
RecyclerView’s Adapter Implementation
Android Studio has already created the method stubs. We only need to write a few lines of implementation. This code customizes the Adapter for our requirements and fulfils the 3 main tasks I’ve described.
override fun onCreateViewHolder(parent: ViewGroup, viewType: Int): RecyclerView.ViewHolder {
    // LayoutInflater: takes ID from layout defined in XML.
    // Instantiates the layout XML into corresponding View objects.
    // Use context from main app -> also supplies theme layout values!
    val inflater = LayoutInflater.from(parent.context)
    // Inflate XML. Last parameter: don't immediately attach new view to the parent view group
    val view = inflater.inflate(R.layout.part_list_item, parent, false)
    return PartViewHolder(view)
}

override fun onBindViewHolder(holder: RecyclerView.ViewHolder, position: Int) {
    // Populate ViewHolder with data that corresponds to the position in the list
    // which we are told to load
    (holder as PartViewHolder).bind(partItemList[position])
}

override fun getItemCount() = partItemList.size
- onCreateViewHolder(): inflates the layout XML of our view item. The last parameter of the
inflate()method ensures that the new view isn’t immediately attached to the parent view group. Instead, it’s only in the cache and shouldn’t be visible yet. - onBindViewHolder(): the RecyclerView supplies all the necessary information – the ViewHolder instance that should show the data, as well as its (new) position in the data list. Using the
partItemListproperty of our Adapter class, we call our custombind()function we added to our ViewHolder. - getItemCount(): simple in our case – the size of the list / array. In Kotlin, we can further simplify this to an inline implementation; we don’t need the {} of the function and the return statement if we directly return a value / a simple expression.
Activity Layout for RecyclerViews
We’re almost finished. Next, we create the RecyclerView. The first step is adding it to the XML layout definition of our MainActivity.
If you used Android Studio’s new project wizard and created an empty activity, it added an “Hello World” TextView. Delete this.
Instead, add the following definition for a scrolling, full-screen RecyclerView list with the ID “rv_parts”:
    <android.support.v7.widget.RecyclerView
        android:id="@+id/rv_parts"
        android:layout_width="match_parent"
        android:layout_height="match_parent" />
Instantiate RecyclerView
You only need three lines of code in onCreate() of MainActivity.
- 1. Assign a LayoutManager: it measures and positions the item views. Different layout managers support various layouts. We go for the most common: the LinearLayoutManager. By default, it creates a vertically scrolling list layout.
rv_parts.layoutManager = LinearLayoutManager(this)
- 2. Optimize: the RecyclerView‘s size is not going to be affected by the Adapter contents. The size of the RecyclerView only depends on the parent (in our case, the full screen is available).
Therefore, we can call setHasFixedSize() to activate a little bit of optimization in the RecyclerView.
rv_parts.setHasFixedSize(true)
- 3. Assign Adapter: this finally wires up everything: we create & assign a new instance of the Adapter class we’ve written (“PartAdapter”). The Adapter requires the list of data items, which we created at the beginning of this article.
rv_parts.adapter = PartAdapter(testData)
RecyclerView: Works!
Now press play, and your RecyclerView should work perfectly fine! With the three sample data items we’ve provided, the list is a bit too short to fully appreciate the scrolling. To test that, simply extend the list with a few additional items.

Now that you have the basics in place, it’s easy to extend the item layout and the data class with additional information.
If something isn’t working for you, compare your code to the finished solution on GitHub. Note that the solution is more advanced than we are at this stage – e.g., it already contains the click handler.
Next Step: Click Handler
One frequently used part is missing: click handlers. These are a lot more complex in RecyclerViews compared to ListViews. However, when done right, they’re very easy to add with Kotlin. It’s just a matter of understanding a few of the more advanced Kotlin concepts. We’ll look at this in the next part!