Updated: December 12th, 2022 – changed info from Microsoft LUIS to Microsoft Azure Cognitive Services / Conversational Language Understanding.
Training Artificial Intelligence to perform real-life tasks has been painful. The latest AI services now offer more accessible user interfaces. These require little knowledge about machine learning. The Microsoft Azure Conversational Language Understanding Service performs an amazing task: interpreting natural language sentences and extracting relevant parts. You only need to provide 5+ sample sentences per scenario.
In this article series, we’re creating a sample app that interprets assessments from vital signs checks in hospitals. It filters out relevant information like the measured temperature or pupillary response. Yet, it’s easy to extend the scenario to any other area.
Language Understanding
After creating the backend service and the client user interface in the first two parts, we now start setting up the actual language understanding service. I’m using the Conversational Language Understanding service from Microsoft, which is based on the Cognitive Services of Microsoft Azure.
To get started using language services, you need to make sure you have a Microsoft Account (usually you should have one from your Windows login). If not, sign up for a Microsoft account through this link for OneDrive.
If you are a student, sign up to Azure for Students with your university email address to get $100 Azure credits.
Azure Account?
You need an Azure account to use the Microsoft Language Studio. However, you can use Conversational Language Understanding in the free tier (“F0”), so it does not generate any costs / does not eat up your credits (if you have any). If you need more resources than provided through the free tier, you can use pay-as-you go to pay only for your consumption.
Cognitive Services Resource
Once you have your Azure account ready, go to the Language Studio. Select the “Understand questions and conversational language” category, and then “Conversational Language Understanding” (next generation of LUIS).

In the following dialog, click on “Sign in with Azure”.
Create the Language Resource
Select the Azure directory you have linked in your account (e.g., “Fachhochschule St. Pölten”) and your assigned Azure subscription (e.g., “Azure for Students”).
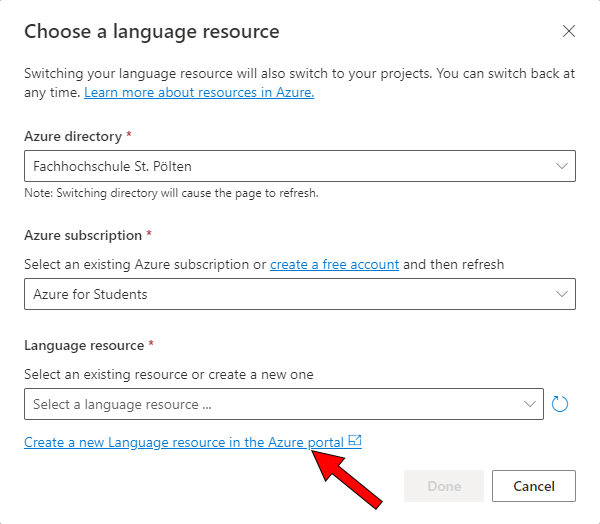
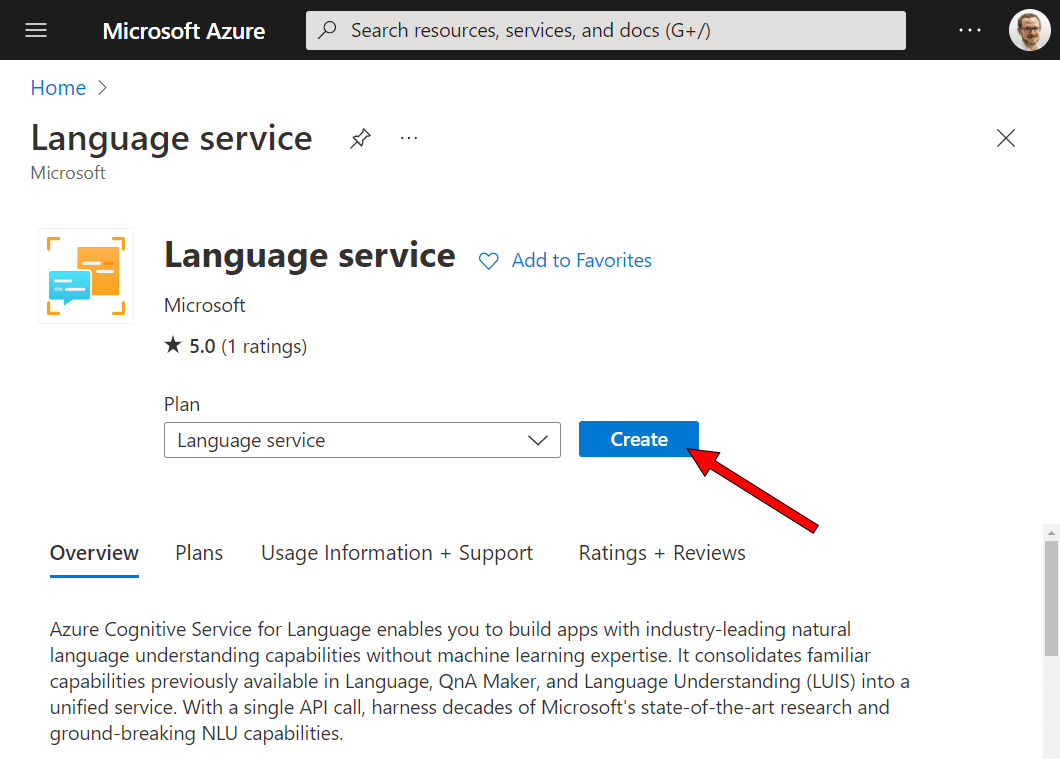
You don’t have a language resource yet, so follow the small link below to create a new language resource in the Azure portal. This will open a new browser window in your Azure portal. Click on “Create”. You do not need to enable any custom features in the wizard.
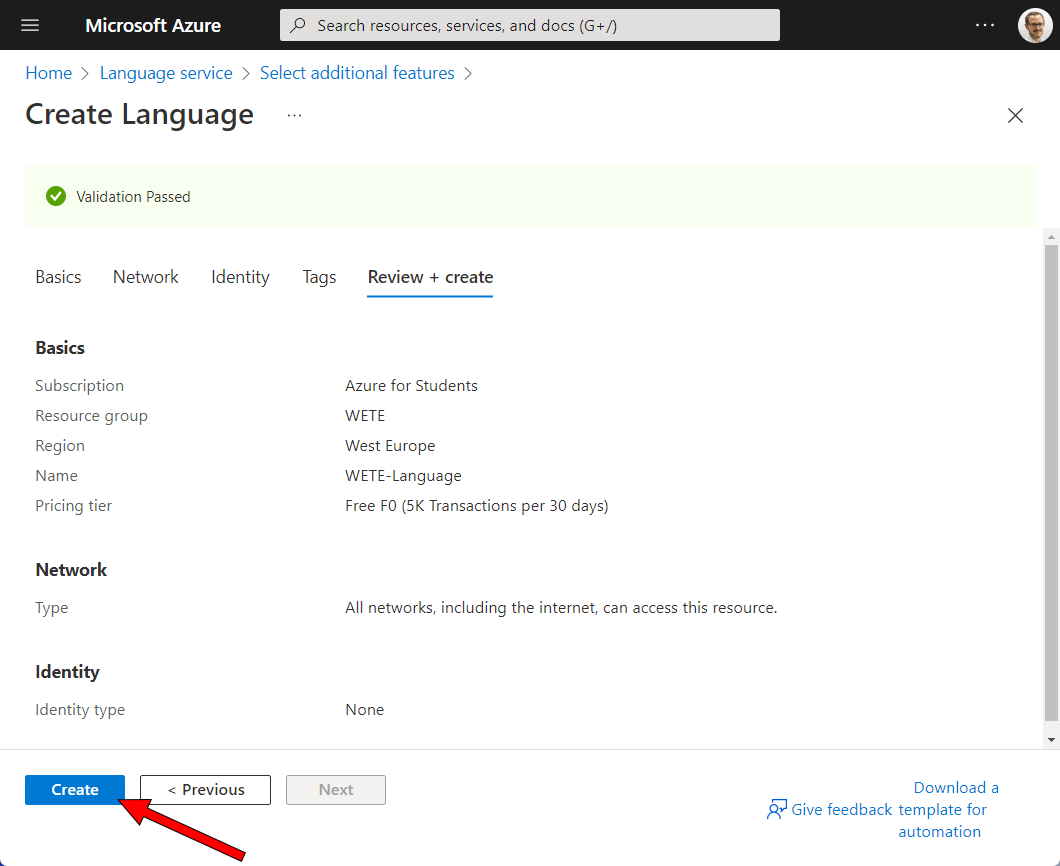
In the next step, you need to configure your language service. Again, make sure your matching subscription is selected (e.g., “Azure for Students”). If you don’t yet have a resource group, create a new one with any name you like (e.g., “WETE”). Resource groups are for easily linking related services together.
Choose your preferred region (e.g., “West Europe”). Give the language service any name you like (e.g., “WETE-Language”). Now select the pricing tier “Free F0 (5K Transactions per 30 days)” – this is more than enough for us. Read and accept the “responsible use of AI” notice. Finally, click on “Review + create”.
Create the Conversational Language Understanding Project
Go back to the other browser tab, click on the refresh-icon next to the “Language resource” and select your newly created resource.
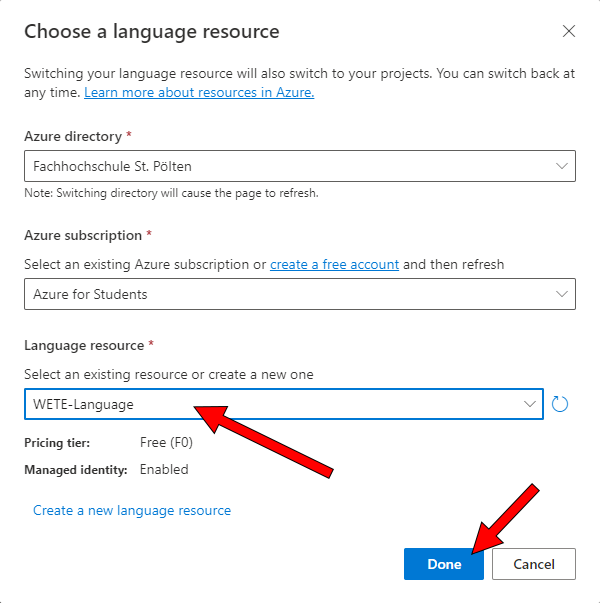
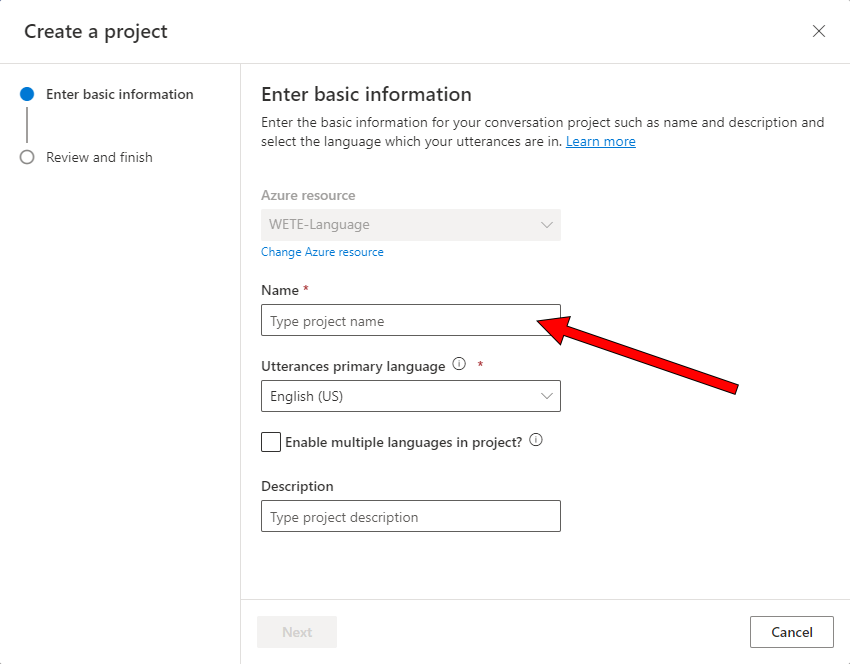
Click on “Done”. Next, click on “Create new” -> “Conversational language understanding” to create the new project within the Language Studio.
Give the project any name you like (e.g., “PatientCheck”) and choose the primary language. In this example, I’ll stick to English (US) as a single language.
Understanding How Conversational Language Understanding Works
Once your app is created, it’s time to look at the options you have in the portal:
- Intents: think of these as distinct commands that your language understanding service differentiates. In our scenario, we’ll have three: for recognizing the patient’s age, the body temperature, and the pupillary response.
- Utterances: when you create an Intent, you need to specify sample sentences, called utterances. This gives the AI some examples of what the user would say to trigger the intent.
Utterances for the same “temperature” intent could be: “Your body temperature is [entity]” or “I measured [entity]” - Entities: specific information to extract from the utterances. For the body temperature, that’s the actual measured temperature, e.g., “36 degrees”.
The Language Understanding service comes with several prebuilt entities for common data: e.g., date & time, dimension, numbers, email and many more. However, you can also create your own entities.
Setting up Entities
It’s best to start at the lowest level – the entities. Navigate to the “Schema definition” page, select the “Entities” tab and create 3 different entities:
- age: Add entity > prebuilt component Quantity.Age
- pupilLightReaction: Add entity > List
- temperature: Add entity > prebuilt component Quantity.Temperature
This is an example of adding the first entity called “age”. First, you need to give it a name. Each entity can have multiple components – e.g., it can be a prebuilt entity that you can also extend with your own list; or you learn different values from the example sentences (utterances) that you specify.
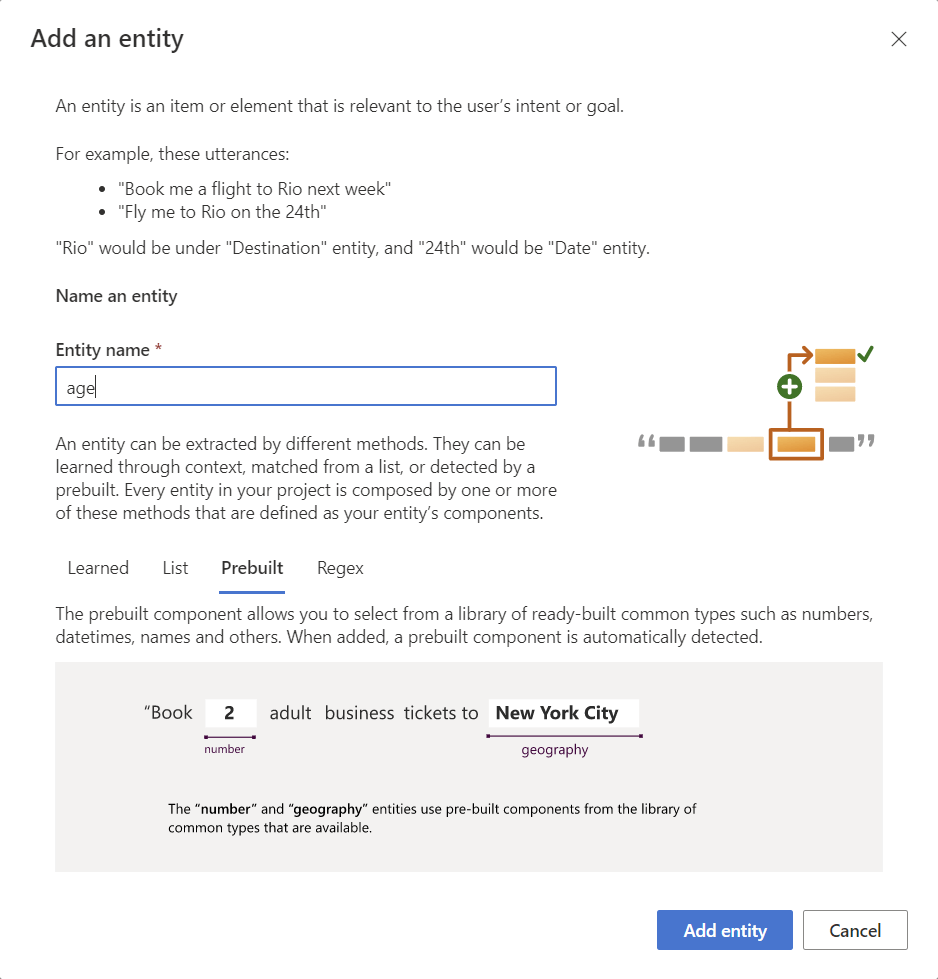
After adding the entity, you can add components to the entity. Add the prebuilt “Quantity.Age” entity to the component and save the changes.
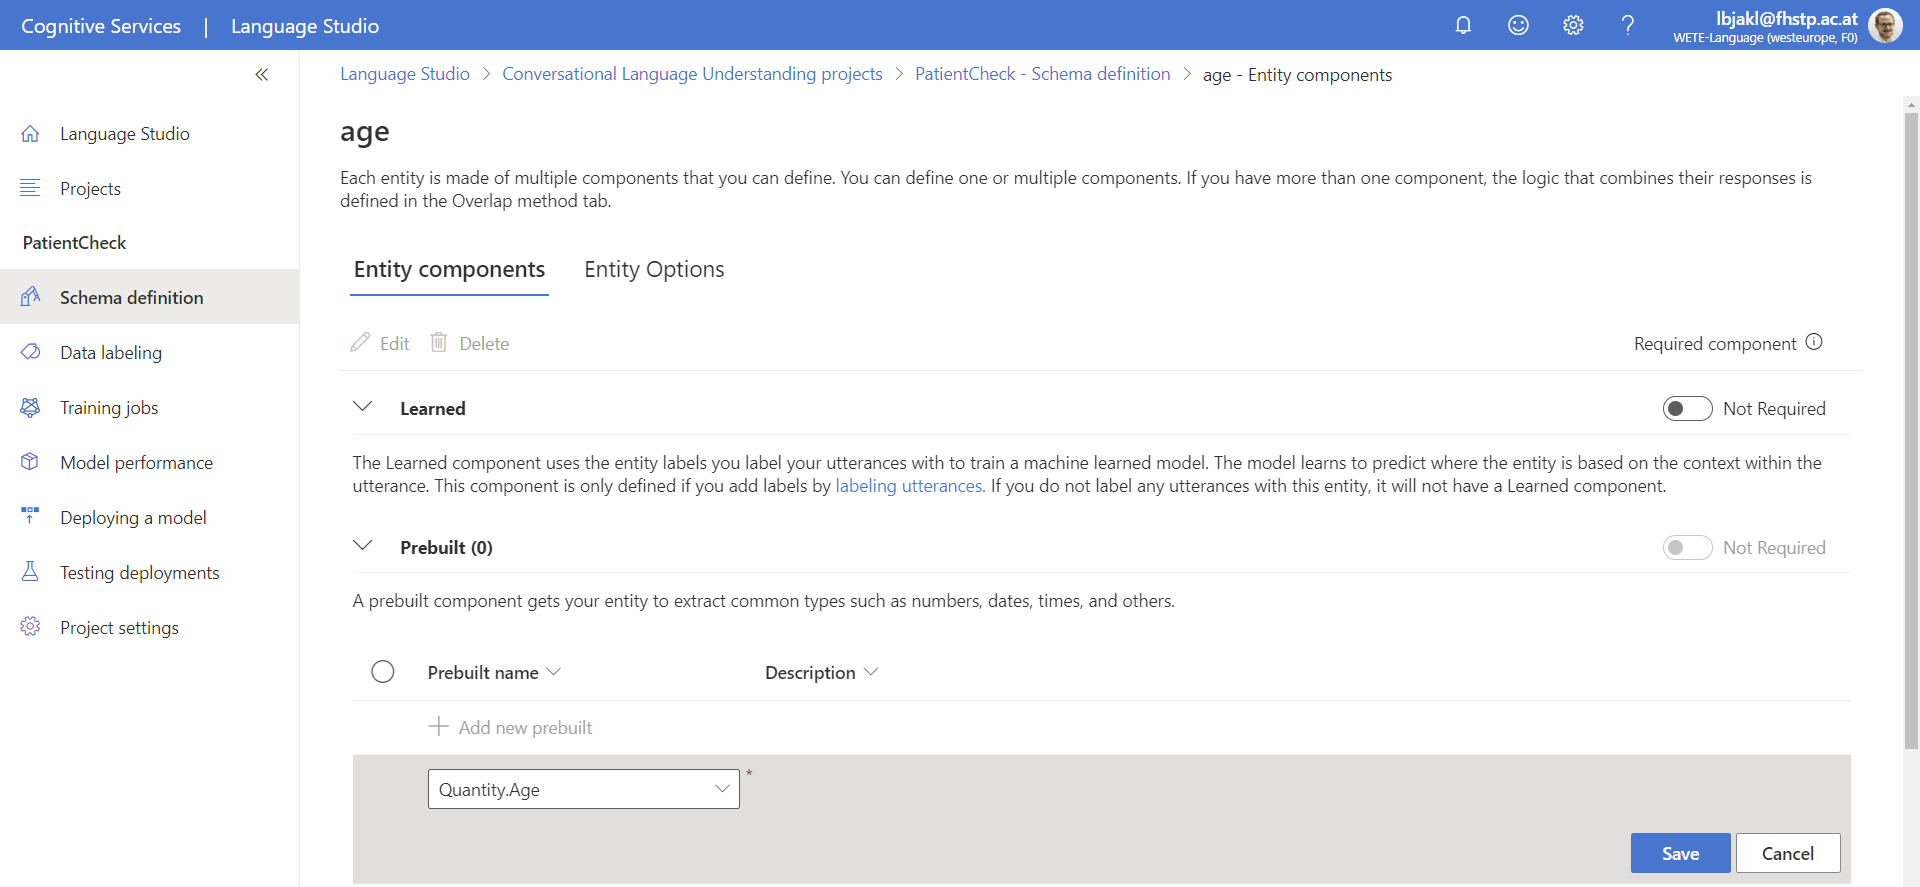
Repeat the same process for the other two entities – “pupilLightReaction” and “temperature”. Remember that temperatures are prebuilt components. For the light reaction of the pupil, you need to specify your own values.
Intents
After you created the entities, proceed to the intents. This is the most crucial step. Here, we define the different “commands” that the service distinguishes.
Intents with Entities & Prebuilt Components
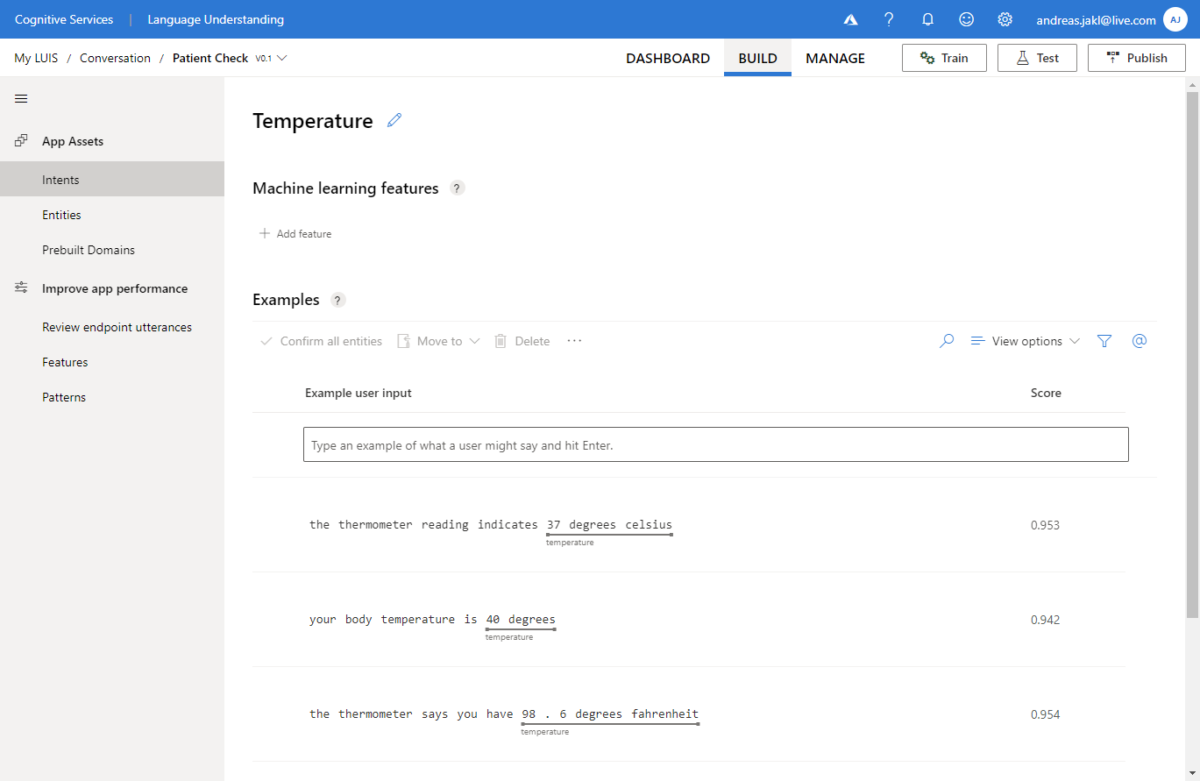
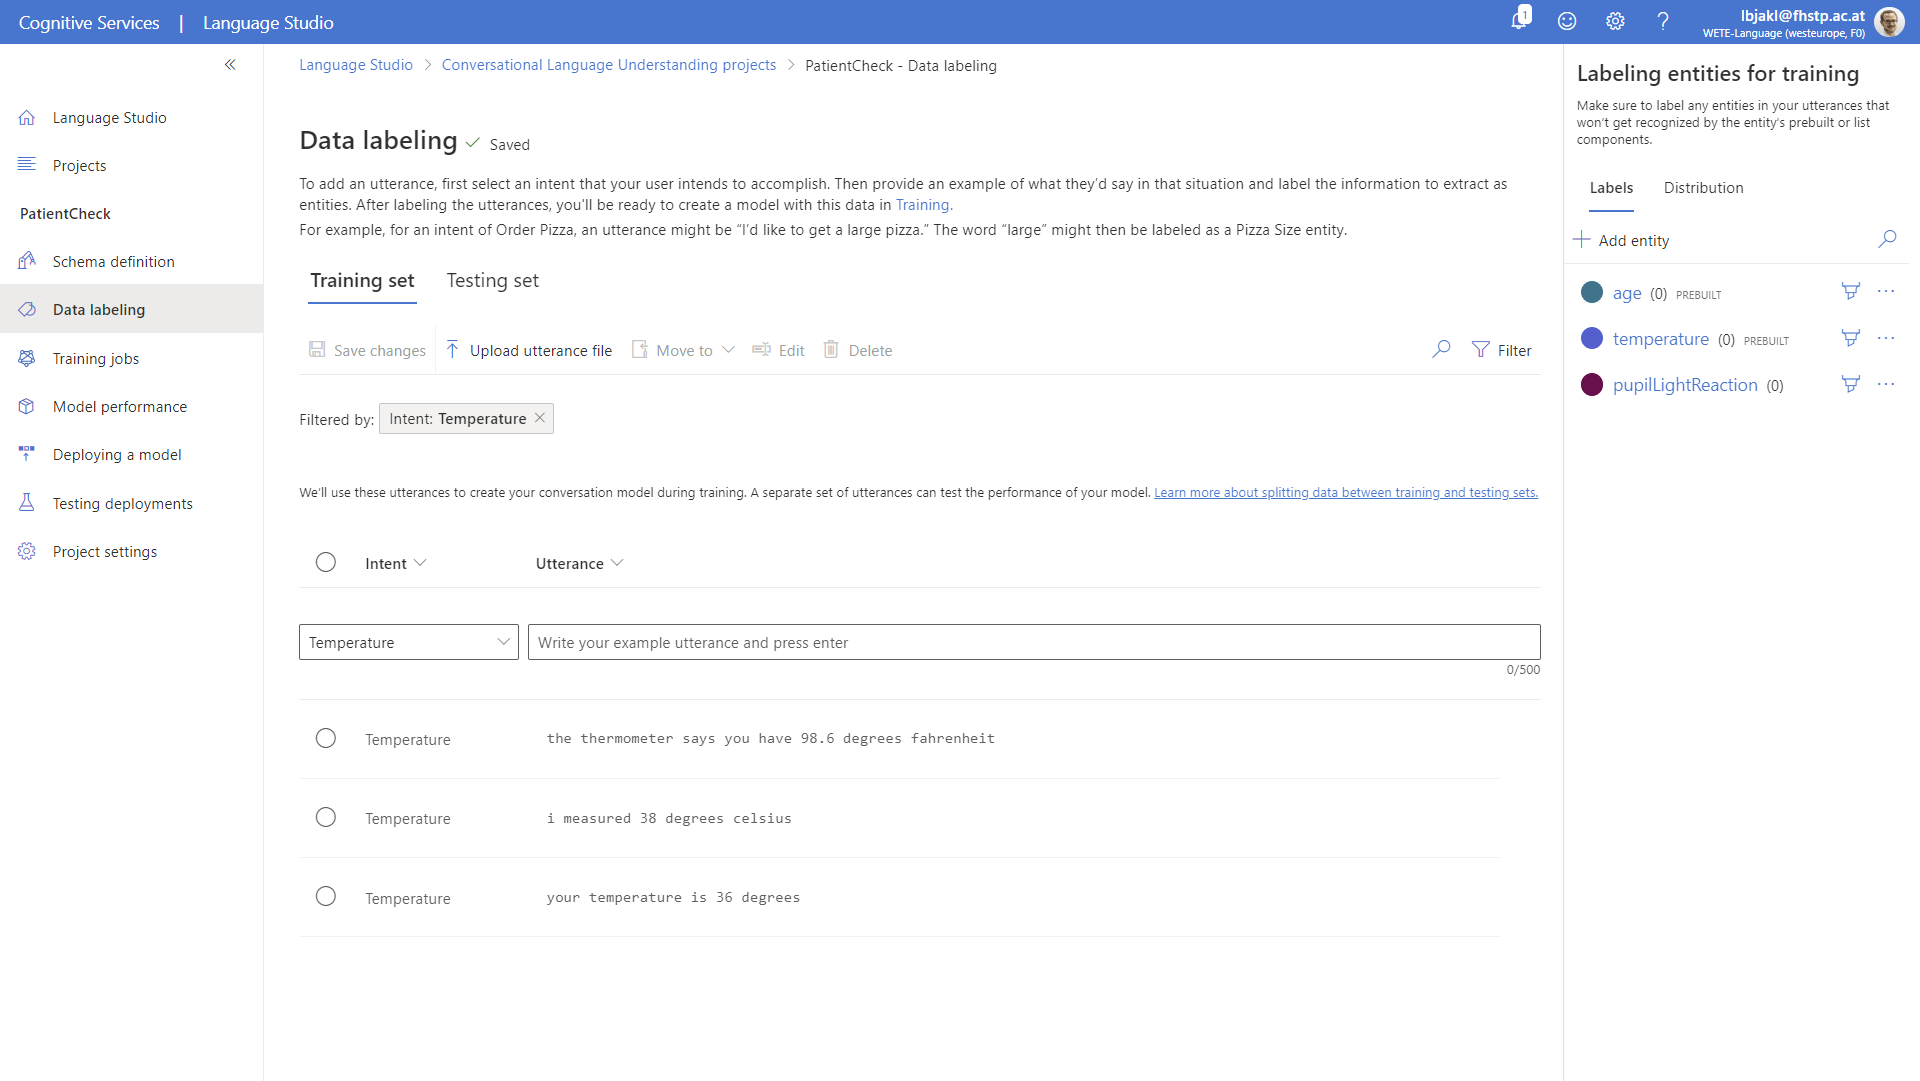
First, add an intent and call it “Temperature” and select it. You will get to the “Data labeling” section of your Conversational Language Understanding project.
In this screen, you can enter utterances and assign these to the intents you have defined. You also have the option of providing both training and testing data. This distinction comes from the machine learning background of the service: training data is the data the neural network uses to learn different ways of formulating sentences. The utterances in the test set can then be used to check if these sentences would be correctly recognized and assigned to the correct intent.
To get started, let’s add a few utterances to the “Training Set” list and assign these to the new “Temperature” intent. Some examples:
- your temperature is 36 degrees
- i measured 38 degrees celsius
- the thermometer says you have 98.6 degrees fahrenheit
Don’t forget to click on “Save changes” after entering your utterances.
Next, it’s time to assign the temperature entity to the utterances. You can simply select the temperature part of the sentences with your mouse, and then click on the according entity in the dropdown box:
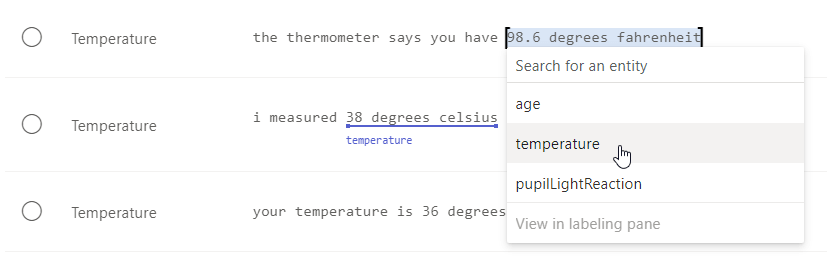
Once you have added all the sample utterances you can think of, do the same for an “Age” intent.
Intents with List Entities
These are entities we train ourselves – as such, it’s even more important to provide as many sample utterances as you can think of.
Create an intent with the name “PupillaryResponse”. I’d recommend that you don’t use special characters in the names, as these names get directly sent to your app later. It’s easy that special characters get messed up when your code runs on different operating systems and languages. So better stick to simple names using only standard characters.
This intent describes the measured response of the eye to light. One of the key factors is the speed of the pupillary light reflex – broadly speaking, how fast your pupils adapt to a bright penlight the nurse or doctor shines in your eyes.
Before we can provide utterances for the intent, go back to the “pupilLightReaction” entity, and add list items.

For each of the items, the “list key” / “normalized value” is the one you’ll also get back to your app when it’s recognized. The synonyms are other ways the user can call the list item. In the screenshot above, you can find some examples for the three main normalized values “no response”, “sluggish” and “prompt”.
Note that currently you can only save an item to the list if you also click on the block to enter a synonym. It seems like you are not able to add an item just through its list key alone.
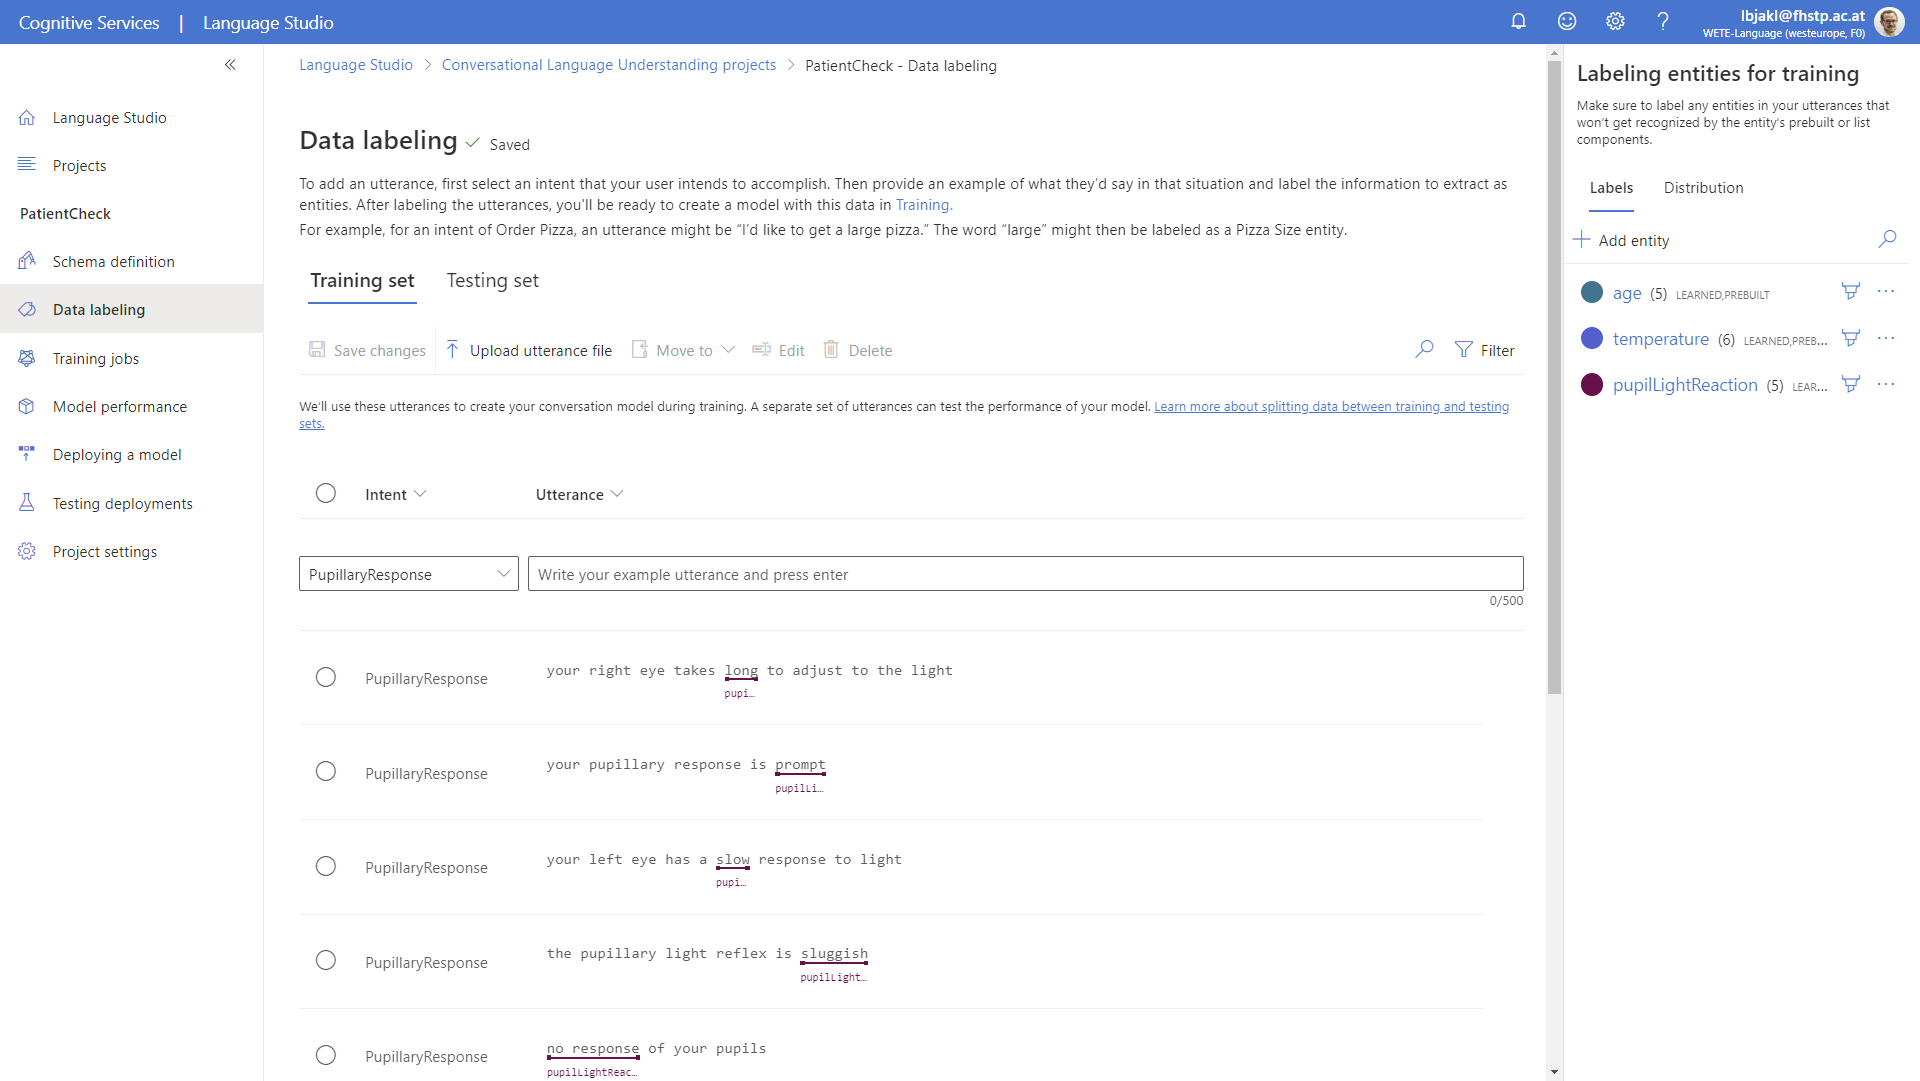
Next, go back to the intent and define sample sentences (utterances) which utilize some of the list items that we just defined for the custom entity. You still have to manually highlight them in the sentences and assign them to the correct entity type. Some examples:
- no response of your pupils
- your pupillary response is prompt
- your left eye has a slow response to light
- the pupillary light reflex is sluggish
Training your Conversational Language Understanding Service
Now, your service is ready to be trained. Language Studio trains the AI to understand the natural language using the examples we provided. It generalizes the utterances we have labeled.
Go to the training jobs section in the menu on the left. Start a new training job and give the model a name for your first training. Future model training can overwrite previous models if you simply make improvements and don’t yet distinguish between production and different development versions.
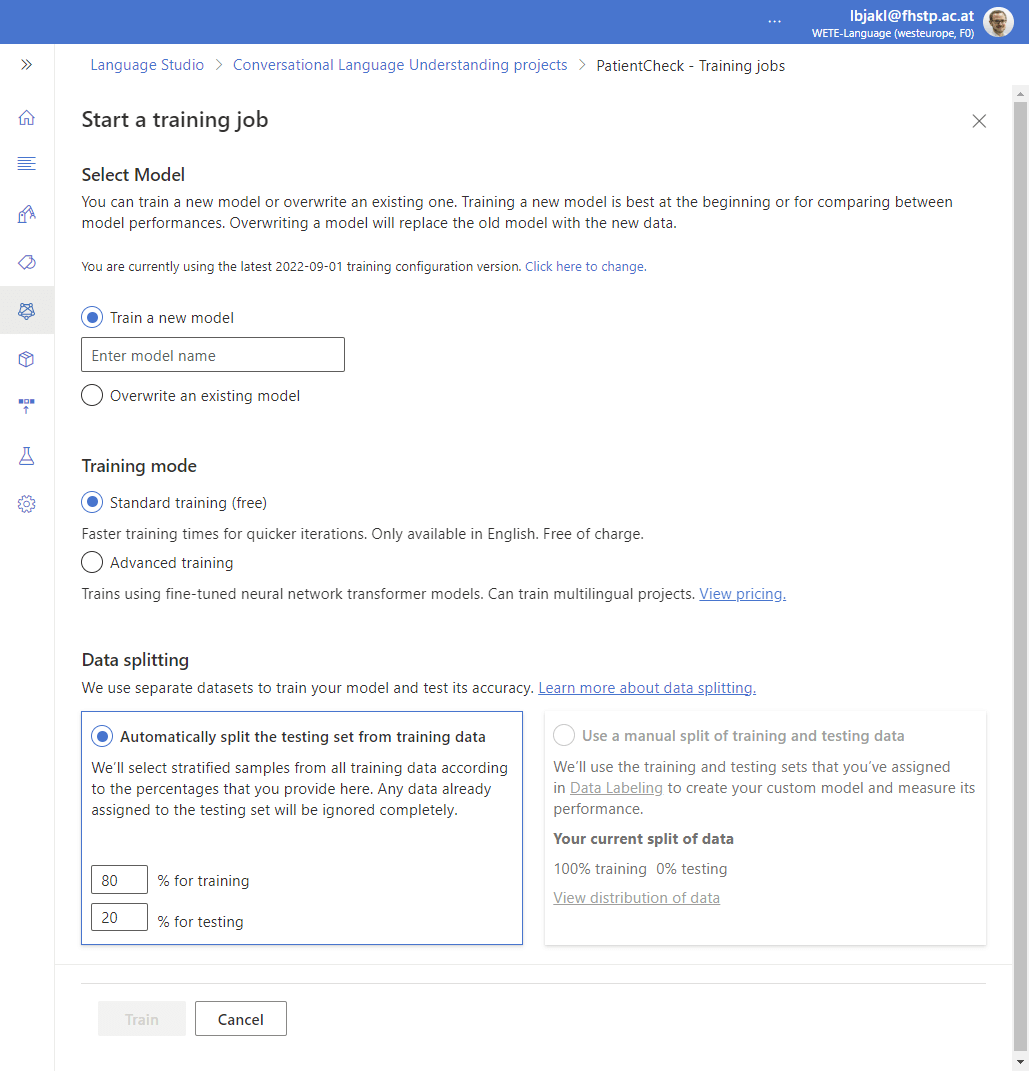
You can stay with the free standard training, which only works for English at the moment. Advanced training would allow more options and multilingual projects.
Also, as we’re training a machine learning algorithm, it needs both a training and a test set to evaluate how it’s doing. We didn’t manually create test utterances, so Language Studio will automatically split between training and testing data.
The default split is 80% for training, 20% for testing. Depending on how many sample utterances you have, you can decide if you can make the testing category larger. As we only have a few utterances so far, it’s good to retain data for training the neural network.
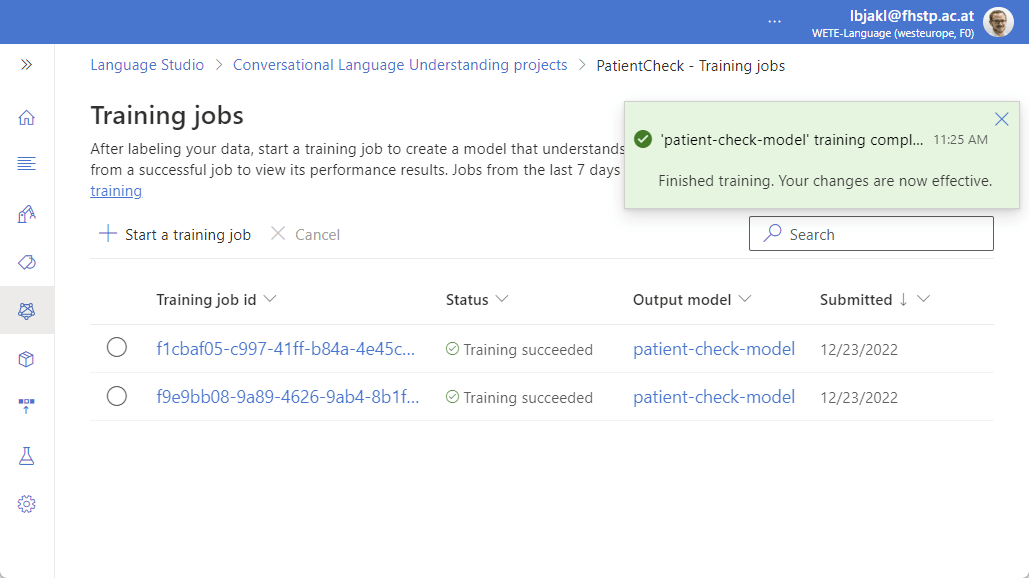
At the end of the form, simply start training. This usually takes a few seconds for a small conversational model like hours.
Once you’re satisfied with the results, it’s time to publish your app to move it from the testing environment to the real world.
Deploying Your Language Understanding Service
Finally, we’re ready to publish our natural language understanding model to the world. So far, you can only access the data when you’re logged in to your account. The following step makes the model accessible to our Node.js backend, which can run anywhere in the world.
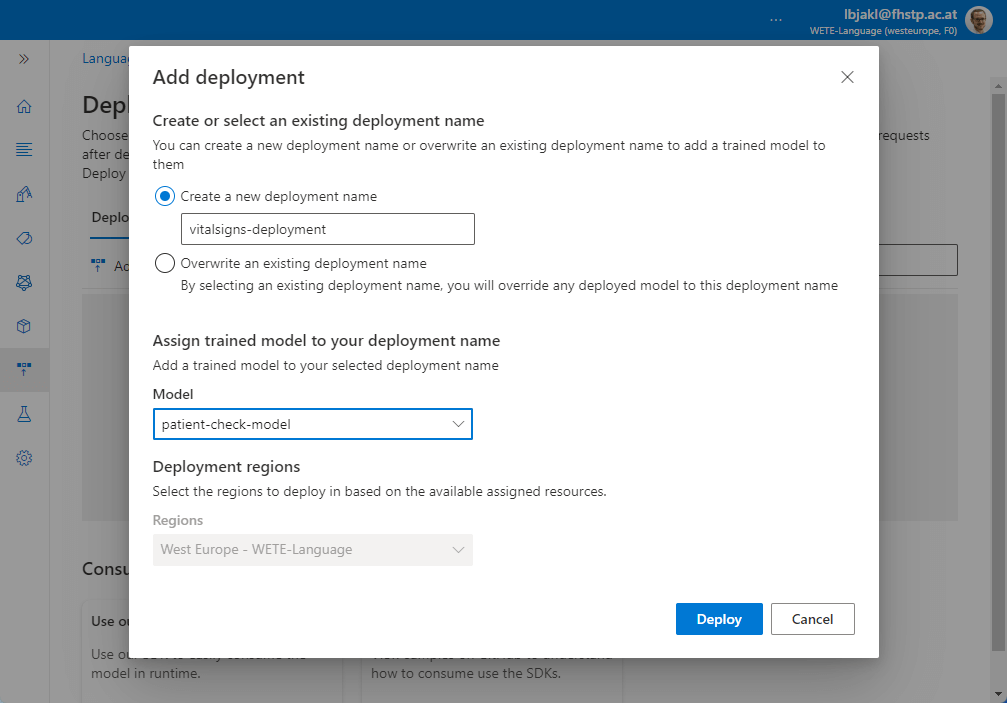
Click on the “Deploy a model” tab in the left sidebar. Next, click on “Add deployment” and give it a name – e.g., “vitalsigns-deployment”. In the model selection, choose the model that you’ve previously deployed. The region is by default according to the standard region where you created your language studio service.
Deployment is finished within a few seconds. It’s a good idea to test your deployment right afterwards. In the left sidebar, switch to the next tab “Testing deployments”. On this page, you can select the deployment, enter an assessment text and finally click on “Run the test” above. A sample assessment could be “you are 78 years old”, as seen in the example:
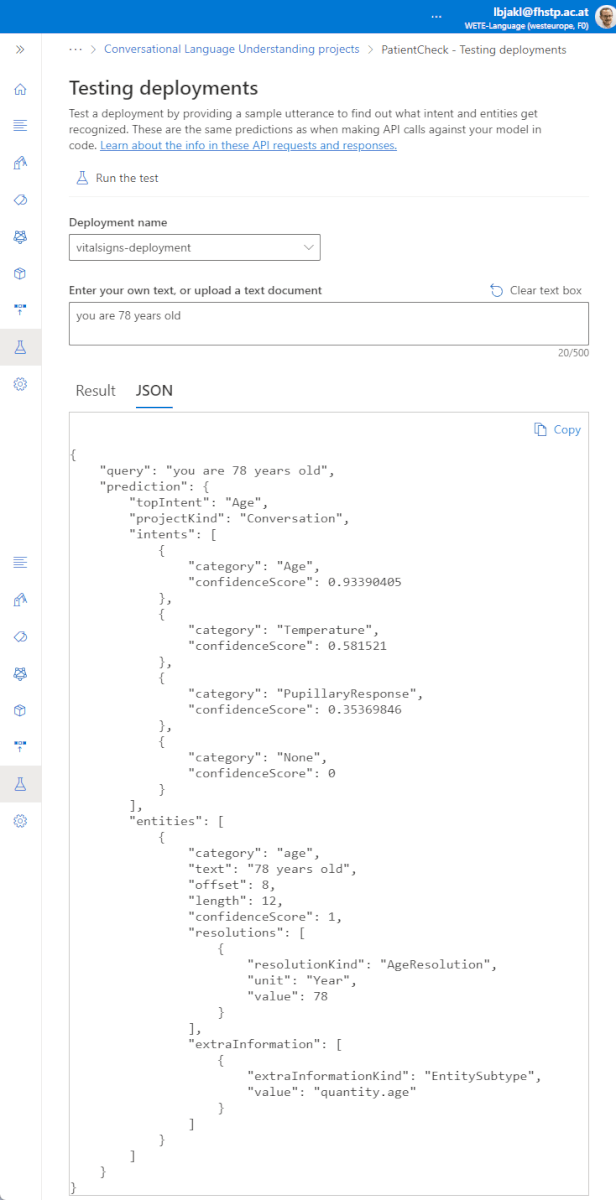
In the results section, you can switch between a nice visualization or the raw JSON output as shown in the screenshot. This will be the response our Node.js backend will receive when it sends the request to the service, and which we will need to parse.
Looking at it, you see the most relevant information in there. In this case, the model was 93.4% sure that the query fits best to the “Age” intent. Plus, it extracted the entity, with category “age” and a value of “78” & unit “Year”. This is exactly what our service needs to correctly handle such queries.
In the “Manage” section of the dashboard, you can then access the “Azure Resources” blade. To access your LUIS service from our Node.js app, you need to create the prediction resource key.
Prediction URL
The final information we will need to access the model is its prediction URL. Switch back to the “Deploy a model” section. Select our current deployment (“vitalsigns-deployment”). Next, click on “Get Prediction URL”.
A pop-up shows the relevant information, including the URL of our endpoint as well as a sample request. Note the “Prediction URL”, as we will need that later.
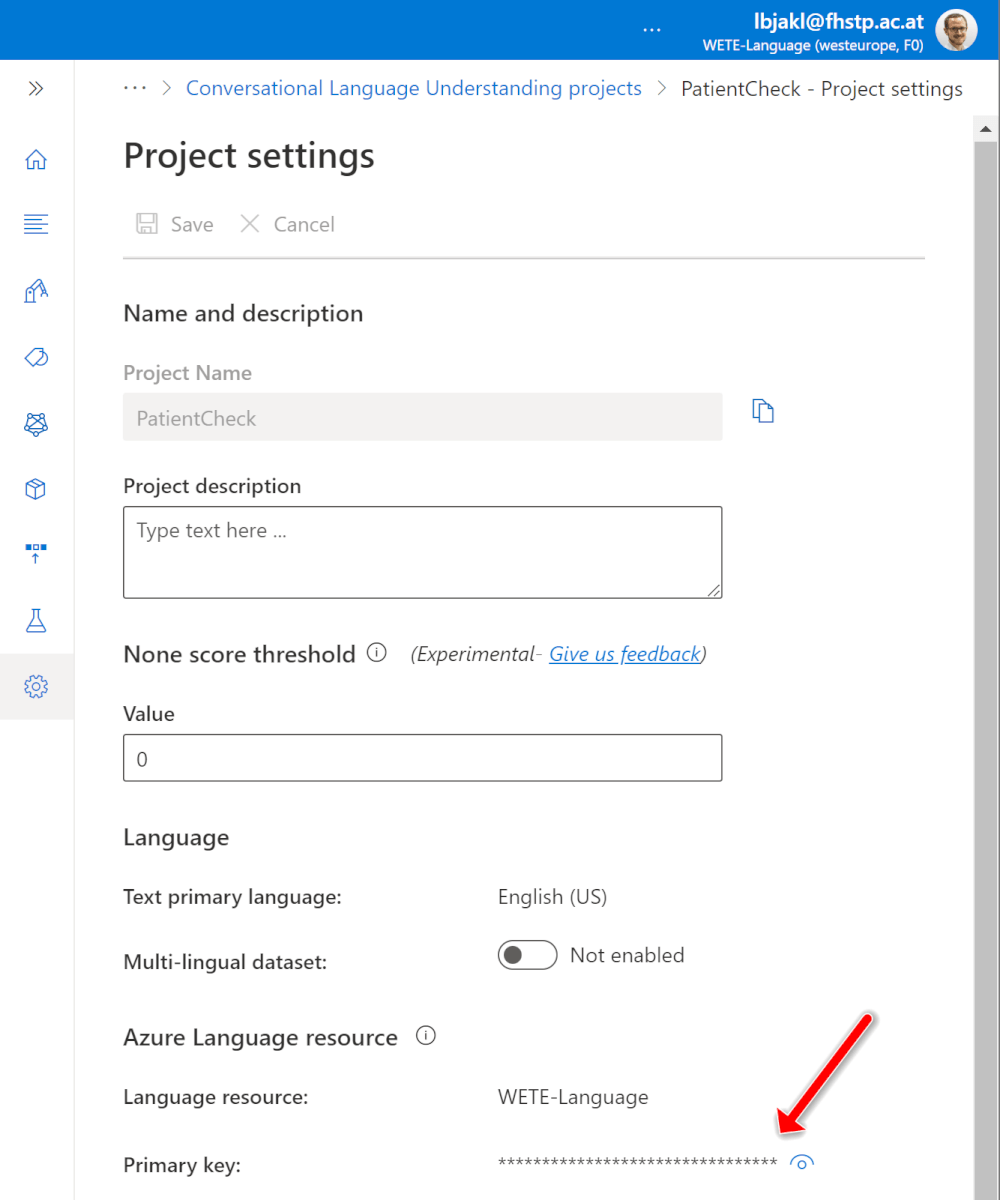
 In addition, you will need the “primary key” of your project. Go to the “Project settings” in the sidebar. At the bottom of this page, you can copy the primary key to the clipboard.
The biggest parts are done: we’ve created the HTML5 front-end UI for the user, the back-end server using Node.js, as well as the AI service based on Azure conversational language understanding.
The only remaining task is connecting everything together. That’ll be the focus of the final part of the article series!