
ARCore by Google is still in preview and only runs on a select few phones including the Google Pixel 2. In this article, I’m creating a demo app for ARCore using the ARCore SDK for Unity (Preview 1).
It’s following up on the blog post series where I segmented a 3D model of the brain from an MRI image. Instead of following these steps, you can download the final model used in this article for free from Google Poly.
ARCore vs Tango
Previously, the AR efforts of Google were focused on the Tango platform. It included additional hardware depth sensors for accurate recognition of the environment. Unfortunately, only two phones are commercially available equipped with the necessary hardware to run Tango – the Asus ZenFone AR and the Lenovo Phab 2 Pro.
Most likely, that’s one of the reasons why Google now focuses on ARCore instead. It only requires a color camera. ARCore will later run on most phones with Android 7+. The official launch is scheduled for Winter 2017, where Google promises it will work on more than 100 million existing and upcoming devices. Currently, ARCore is in preview and only runs on the Google Pixel and Samsung Galaxy S8 phones.
The Tango brand has been retired. In general, ARCore is less accurate than Tango – but good enough for most AR scenarios. Given the potential reach with ARCore running on most consumer phones, it’s the right way to bring Augmented Reality on phones to the next level. Besides, ARCore can integrate more sensors if they are available on a phone, e.g., dual cameras for better depth sensing.
Tools & SDKs
To get started with ARCore and Unity, you need the latest version of Unity (2017.2+) and the Android 7+ SDK (API level 24 or higher).
Additionally, download the ARCore SDK for Unity. It is open source and available on GitHub, where you can clone the code. Unfortunately, Google does not actively develop the SDK in the open and doesn’t push any new commits; so you get exactly the same version when you download the latest release and save yourself the work of manually creating the unitypackage.
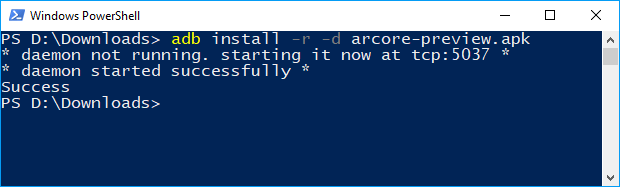
The required ARCore base services are not yet included in Android / Google Play Services by default. Download the latest apk package of the ARCore services and install these on your compatible phone using the command-line adb tool.
Environment Variables for ADB
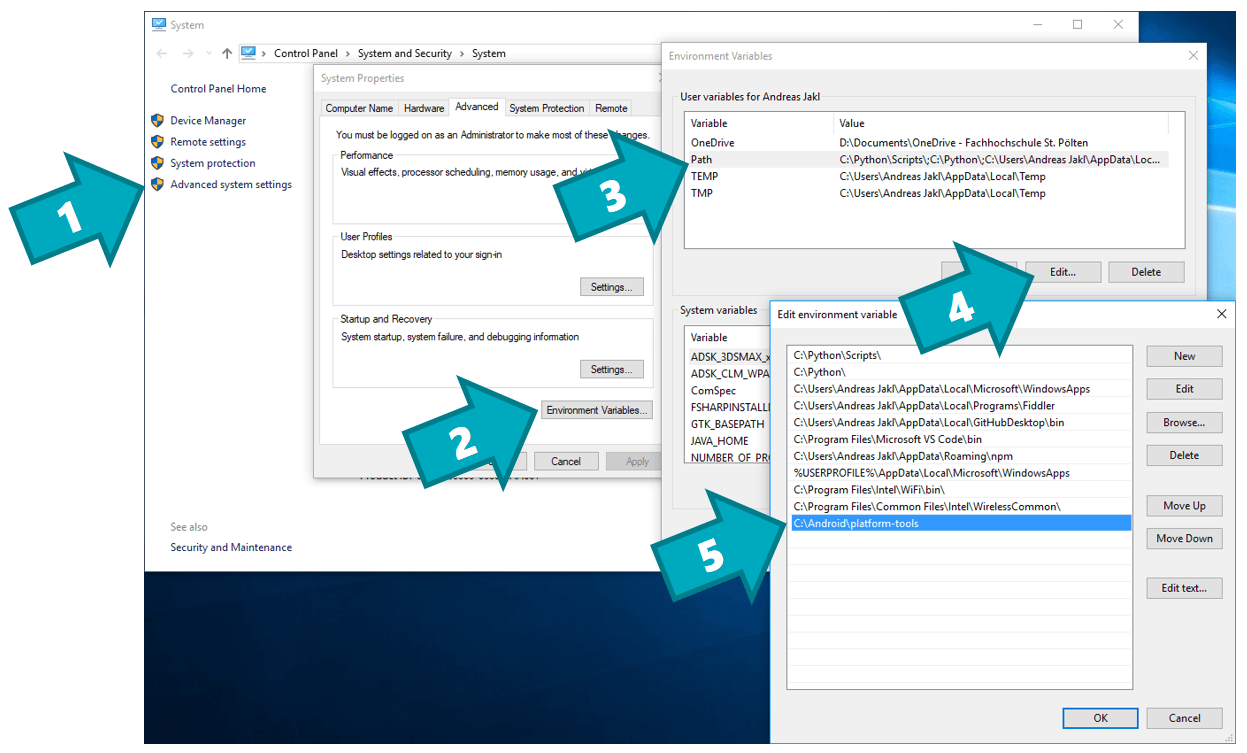
In case you have not yet added adb to your Windows 10 environment variables: press Windows-key + Pause to bring up the System window.
- Click on “Advanced system settings”
- “Environment Variables…”
- Select the line with “Path”
- “Edit…”
- “New”. Add the directory of your platform-tools path of the Android SDK installation; in my case:
C:\Android\platform-tools
Setting up the Unity Project for ARCore
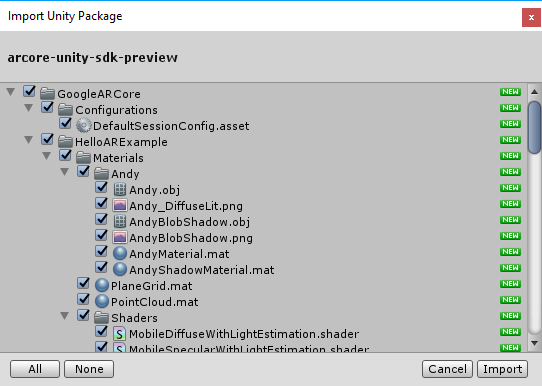
Next, create a new Unity 3D project. Right-click on Assets > Import Package > Custom Package…
Select the ARCore unitypackage file you downloaded before. Save the project and the main scene.
Go to File > Build Settings. Choose “Android” as the target platform (using “Switch Platform”). Also, include your “MainScene” into the build by clicking on “Add Open Scenes”. Open the “Player Settings” to change the following settings, based on the instructions from the Google Developers guide:
- Other Settings > Multithreaded Rendering: Off
- Other Settings > Package Name: a unique app ID that looks like a Java package name, such as com.yourcompany.brainar
- Other Settings > Minimum API Level: Android 7.0 or higher
- Other Settings > Target API Level: Android 7.0 or 7.1 or “Automatic (highest installed)”, as you anyway need to have at least Android 7.0 installed.
- XR Settings > ARCore Supported: On
Adding ARCore SDK Features to the app
Unfortunately, from now on the Google Getting Started guide only refers to testing the included sample. In this article, I go farther and explain how to set up a simple scene.
The aim is to detect and visualize planes that ARCore finds in the environment in real-time. Moreover, the user can place objects on the planes by tapping on the screen. We want to only use the minimal setup necessary to concentrate on the basics of ARCore.
The Unity ARCore SDK includes several scripts and prefabs that are useful for any ARCore app. First, drag the “ARCore Device” prefab from the GoogleARCore > Prefabs folder to your scene. It contains two important components:
- Session Component (Script): Manages the connection to the ARCore session. The session analyzes the scene and sets up the device-specific configuration (e.g., the field of view of the camera).
Right now, most settings are hard coded in the script. That will most likely change in future versions of the ARCore SDK. Currently, the default configuration enables creating point clouds and finding planes. - First Person Camera: a standard Unity camera, which contains a few pre-set settings recommended for ARCore. For example, the near clipping plane is set to 0.05 m, the far clipping plane to 200 m.
Next, we also add the GoogleARCore > Prefabs > “Environmental Light” prefab. It uses the lightning estimation performed by ARCore and applies the color scale to the global shader. The default directional light can stay in the scene.
Placeable Prefab
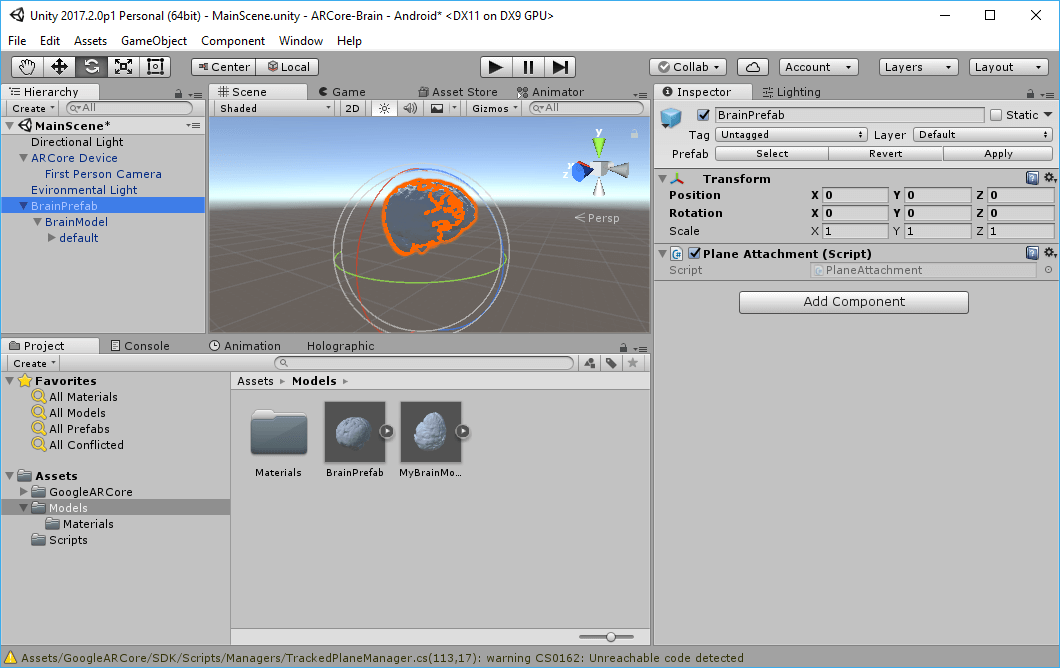
First, we need to create a prefab of the object to place in the real world. Import your model by dragging and dropping it to the assets and then to the scene. I’m using my (freely available) brain model segmented from an MRI – you can download it from Google Poly. My model is called “BrainModel” in the screenshots you can see in this article.
In the original model, the scale and orientation might be different to what you need in the scene. Therefore, create an empty game object, call it “BrainPrefab” and make the model a child of the new game object. Adjust the scale and orientation directly in the “BrainModel” object, so that the transformation of the parent game object (“BrainPrefab”) stays at 0/0/0 for position and rotation, and at 1/1/1 for scale.
After placing the object on a plane that ARCore detects in the real world, the plane’s location might later be updated – e.g., if ARCore adapts the real height of the detected table with more accuracy corresponding to the floor. In case that happens, our 3D model prefab should move with the plane. The ARCore SDK provides the Assets > GoogleARCore > HelloARExample > Scripts > “PlaneAttachment” script to handle this scenario. Drag this script onto the “BrainPrefab” object.
Finally, we need to create the Prefab out of our setup. Make sure the “BrainPrefab” is selected. Go to Assets > Create > Prefab. In the “Hierarchy” panel, the object will now turn blue, indicating that the nodes are instances from a prefab.
After the prefab has been created, you can safely delete it again from the hierarchy. Later, we’ll instantiate an instance directly from the project assets to generate a model whenever the user taps on the screen.
What’s Next?
In the next part of the tutorial, we will look at finding & visualizing planes in the real world. Afterwards, we will add the necessary code to place objects and anchor them.
Download the example source code built in this article on GitHub.